Timeless Lace – The Ultimate Crochet Wedding Dress
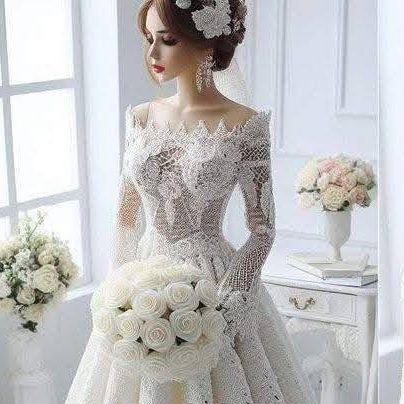
In the world of handmade fashion, there are creations that go beyond beauty—they become heirlooms, dreams woven into reality. This Timeless Lace crochet wedding dress is exactly that: a breathtaking, couture-level piece that blends delicate lacework with modern bridal elegance. It’s not just a dress—it’s a celebration of craftsmanship, femininity, and tradition.
Made entirely in intricate lace stitches and floral motifs, this gown features a fitted bodice with sheer panels, a romantic off-shoulder neckline, and a voluminous skirt that flows like poetry. Every detail whispers elegance: from the scalloped hem to the floral lacework cascading down the bodice and sleeves.
Perfect for advanced crocheters or artisans looking to create a truly unforgettable masterpiece, this dress demands patience, precision, and a heart full of love for detail. Whether it’s for a real bride or a fashion showcase, this is the kind of garment that turns heads and creates moments that last forever.
🧶 Materials Needed:
- Fine cotton crochet thread (No. 10 or lace-weight) in ivory or bridal white
- Steel crochet hook (1.25 mm–1.75 mm)
- Fabric lining (satin or silk) for underlay
- Tulle or mesh (optional for structure)
- Invisible zipper or bridal button closure
- Stitch markers
- Blocking tools
- Mannequin or dress form (highly recommended)
- Patience and love ❤️
👗 Step-by-Step Overview
1. Planning & Measurements
- Take full body measurements: bust, waist, hips, arm length, and dress length.
- Create a paper sketch of the dress layout with measurements.
- Divide the dress into sections: bodice front, bodice back, sleeves, skirt panels.
2. Bodice (Lace Motif Assembly)
- Choose a delicate floral lace motif (e.g., Irish lace or Bruges lace style).
- Crochet 10–15 motifs and begin laying them over a mesh background (net stitch: ch 5, sc across to create mesh).
- Use slip stitch to connect motifs at corners and along curves.
- Shape the neckline by strategically arranging motifs (especially for the off-shoulder line).
- Repeat for front and back bodice, keeping a sheer, elegant look.
3. Sleeves
- Use same mesh and motif combination.
- Work in rounds or flat panels, tapering toward wrist.
- Add a scalloped lace edge at wrist and at shoulder connection.
4. Skirt
- Create wide panels in fans, pineapples, or shell lace stitch patterns.
- Panels can be worked from the waist down or bottom up depending on desired flow.
- Join panels in a circular or A-line shape.
- Ensure enough flare by increasing stitches gradually if working top-down.
5. Joining & Assembly
- Carefully join bodice and skirt using invisible seams or hand-stitching.
- Fit the sleeves into the armholes, adjusting with blocking.
- Add scalloped lace edging around hem and neckline for finishing detail.
6. Lining & Finishing
- Sew a soft satin lining matching the exact cut of the dress (can be sleeveless for sheer sleeves).
- Add zipper or bridal buttons in the back.
- Block the entire dress gently to shape all lacework evenly.
- Add internal structure like boning if needed for bodice support.
✨ Tips for Elegance & Fit:
- Use a mannequin for shaping as you work.
- Spray block frequently to keep lace flat and precise.
- Consider adding a detachable train or veil with matching lace.
- Crochet a matching bouquet wrap, gloves, or hairpiece for a complete bridal set.
Final Thoughts
The Timeless Lace crochet wedding dress is more than a garment—it’s a statement of art, heritage, and handcrafted excellence. It reminds us that beauty is in the detail, and when we pour our hearts into every stitch, we create magic. Whether you’re crafting this for a bride-to-be or as your personal dream project, this dress will forever stand as a symbol of dedication and love.