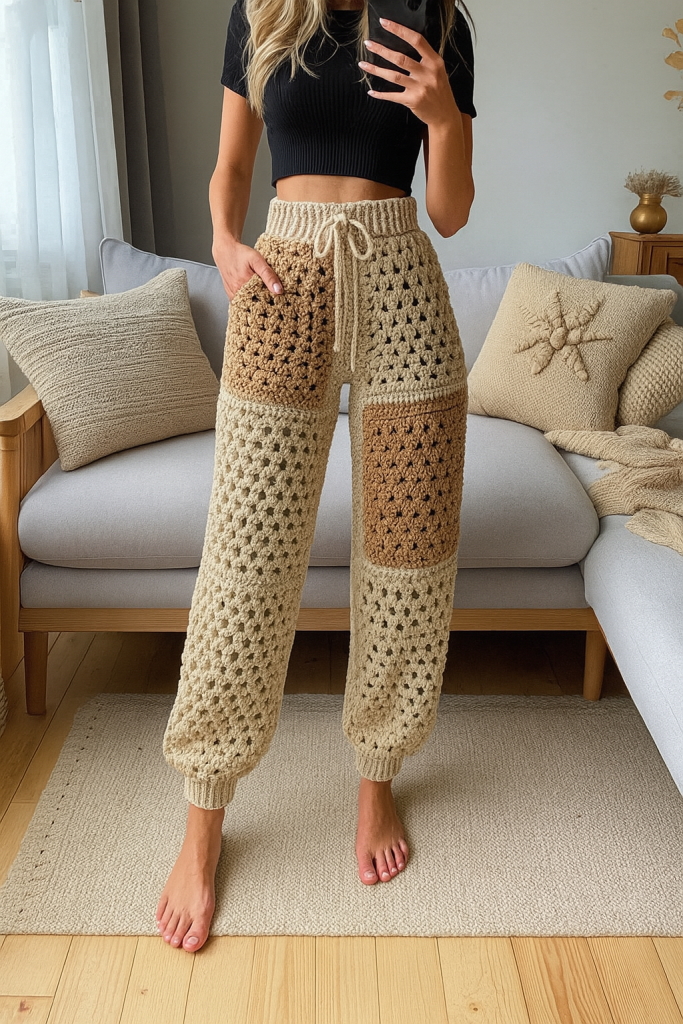
Boho Patchwork Crochet Pants – A Cozy Statement Piece
There’s something magical about a piece that blends comfort, creativity, and bold fashion — and that’s exactly what these Boho Patchwork Crochet Pants deliver. Designed with a free spirit in mind, this project takes the timeless granny square and reimagines it in a fresh, urban-chic way that’s perfect for today’s handmade fashion lovers.
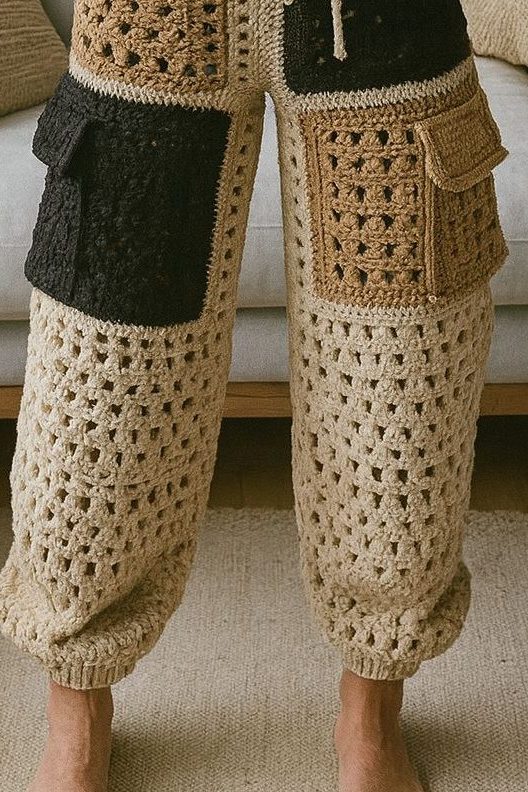
Every square tells a story — a contrast of textures, neutral tones, and structured stitches come together to create a one-of-a-kind garment that’s as expressive as it is cozy. These pants aren’t just about looking cool (though they absolutely do that!) — they’re about feeling good, confident, and wrapped in something you made with your own two hands.
Whether you’re lounging at home, running errands, or heading to a weekend market, this patchwork pant is a wearable work of art. The adjustable drawstring waist adds comfort, while the wide-leg silhouette and cuffed ankles bring structure. And those oversized pocket details? Practical and gorgeous.
Perfect for confident beginners or intermediate crocheters, this project is a great way to experiment with color blocking, shaping, and textured stitching. It’s ideal for using up leftover yarn and showcasing your favorite neutral palette.
So grab your hook, lay out your favorite earth-tone skeins, and let’s bring these pants to life — stitch by stylish stitch.
How to Make the Boho Patchwork Crochet Pants – Step by Step
🧵 Materials Needed:
- Worsted weight yarn (in cream, beige, camel, and black or your chosen color palette)
- 4.0 mm and 5.0 mm crochet hooks
- Yarn needle
- Scissors
- Measuring tape
- Elastic band (optional for the waist)
- Drawstring cord or crochet chain tie
🧶 Step 1: Crochet the Granny Squares
You will need approximately:
- 6 large granny squares (for the front and back of thighs)
- 4 medium squares (for the sides and upper hip)
- 6 small filler squares (for shaping and knees)
- Optional: 2 rectangular panels for pockets
Use traditional granny square stitch:
Rnd 1: Make a magic ring, ch 3 (counts as dc), 2 dc in ring, ch 2, 3 dc, ch 2 repeat 3x, sl st to join.
Rnd 2–4: Continue in granny square style, changing colors if desired. Fasten off.
Make all squares first and block them so they lie flat.
👖 Step 2: Assemble the Panels
- Lay out the granny squares for one leg panel: 3 squares stacked vertically for the front, and another 3 for the back.
- Repeat for the second leg.
- Seam the squares together using the whip stitch or single crochet join on the wrong side of the fabric.
🪡 Step 3: Add the Lower Leg Panels
Use a mesh or V-stitch pattern to create the bottom part of the pants (from knee to ankle).
Example pattern:
sqlCopiarEditarRow 1: Ch multiple of 2 + 2, turn.
Row 2: *dc, ch 1, skip 1* across.
Row 3: Repeat until you reach desired length.
Join this panel to the bottom of the assembled squares.
🏷 Step 4: Join Front and Back
- Join both leg panels together along the inner thigh and inseam using single crochet or whip stitch.
- Seam the outer sides leaving space for the pockets.
- Join both legs together at the crotch with strong stitches.
🧵 Step 5: Waistband
- With a 4.0 mm hook, work a row of single crochets around the waist opening.
- Work 4–6 rows in single crochet, inserting the drawstring or elastic band on the final row.
- Optional: Create a ribbed waistband by alternating front and back post double crochets.
📦 Step 6: Add the Pockets
- Use leftover squares or make rectangular panels (ch 15, work in hdc for 15 rows).
- Sew them onto each thigh or hip area.
- You can add a button or flap to make them functional.
Step-by-Step – Crochet Cargo-Style Pocket
Materials:
- Medium or bulky cotton yarn (color of your choice)
- Crochet hook (suggested: 4 or 4.5 mm)
- Scissors
- Yarn needle
🔸 Part 1 – Pocket Base (Square Panel)
- Foundation chain: Chain 17.
- Row 1: Starting in the second chain from the hook, work 1 double crochet (dc) in each stitch across (16 dc total).
- Next rows: Chain 2, turn, and work dc in each stitch across. Repeat for 8 rows or until desired height.
- Fasten off and weave in ends with a yarn needle.
🔸 Part 2 – Pocket Flap (Optional)
- Make a new foundation chain of 17 stitches.
- Work 5 rows of double crochet (dc).
- In the last row, decrease 1 stitch at the beginning and end of the row by working 2 stitches together (dc2tog) to slightly shape the flap.
- Optional: Work single crochet (sc) evenly around the flap edges for a cleaner finish.
🔸 Assembly
- Sew the sides and bottom of the pocket to the pants using a yarn needle, leaving the top open.
- If using the flap, sew only the top edge of the flap above the pocket so it folds over.
- Add a button, velcro, or snap if you want it functional.
🎀 Final Touches
- Weave in all ends with a yarn needle.
- Steam or lightly block your finished pants for a professional finish.
- Try them on and adjust the waistband or cuffs if necessary.