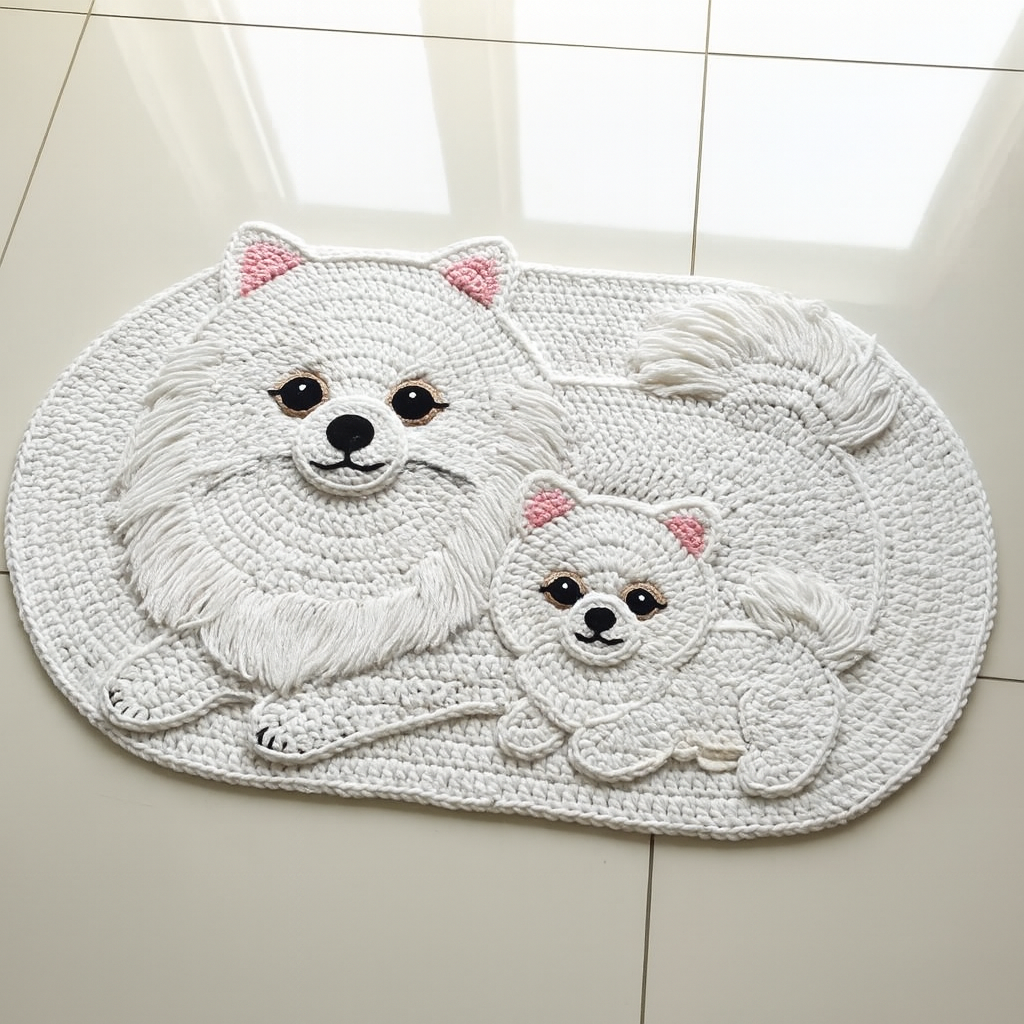
Blog-ready crochet tutorial
To make the adorable Mama-and-Pup Dog Rug—a cozy oval mat with layered appliqués, shaggy fringe fur, and sweet faces. The design is modular: you’ll crochet the oval base first, then build the dogs as separate pieces and stitch them on, so it’s very beginner-friendly to size and customize.
What makes this project pop is texture. Dense single crochet keeps the rug sturdy, while surface slip-stitch lines outline paws and ears. The fluffy cheeks and tails are added last with easy latch-on fringe for a soft, 3D look. You can keep the dogs crisp white like the photo or switch to cream, tan, or gray—any solid works beautifully.
Because all features are appliquéd, you control the expression: widen the eyes for extra cuteness, tilt the ears, or lengthen the tail swoosh. It’s also a great stash buster—eyes, noses, and inner ears use tiny amounts of yarn. Add a non-slip backing and it becomes a practical bath or nursery rug.
The measurements below make a mat about 28–30 in (71–76 cm) wide. Want bigger? Add rounds to the base and increase the head/body circles proportionally. Let’s get hooking!
Materials
- Yarn: 6–7 mm cotton rope, T-shirt yarn, or super bulky cotton/acrylic (#6)
- Main White/Cream: ~900–1100 g
- Small amounts of Pink (inner ears), Black (nose/eyes/outline), Brown/Gold (eye shadow, optional)
- Hooks: 7.0–8.0 mm for base & pieces; 5.0 mm for small details
- Tapestry needle, scissors, stitch markers
- Cardboard/book for cutting fringe (5–6 in / 12–15 cm)
- Non-slip rug underlay or latex backing (optional but recommended)
Abbreviations (US): MR magic ring • ch chain • sl st slip stitch • sc single crochet • hdc half double crochet • dc double crochet • inc = 2 sc in same st • dec = sc2tog • FLO/BLO front/back loop only. Work in joined rounds unless stated.
Size Guide (approx.)
- Base oval: 28–30″ W × 18–20″ H
- Mama head disc: 9–10″ across
- Pup head disc: 5½–6″ across
Step-by-Step
A) Oval Base (white)
- Foundation: ch 36.
- Rnd 1: sc in 2nd ch from hook and next 33, 3 sc in last ch; rotate, sc 33 on underside, 2 sc in final ch. Join. (72)
- Rnd 2: ch1, sc 33, inc in next 3, sc 33, inc in last 2. Join. (78)
- Rnd 3–6: Keep long sides straight; at each rounded end place 3 evenly spaced inc per round (adds +6 each rnd) until the oval measures about 27–28″ wide.
- Rnd 7 (ridge): sc BLO around for a crisp edge.
- Rnd 8–9: sc evenly (no increases). Fasten off. Weave in ends.
Tip: If curling, block lightly or add one more straight round.
B) Mama Dog – Head Disc (white)
- Rnd 1: MR, 8 sc. Join.
- Rnd 2: inc around. (16)
- Rnd 3: sc, inc around. (24)
- Rnd 4: 2 sc, inc around. (32)
- Rnd 5: 3 sc, inc around. (40)
- Rnd 6: 4 sc, inc around. (48)
- Rnd 7: 5 sc, inc around. (56)
- Rnd 8: 6 sc, inc around. (64)
- Rnd 9: 7 sc, inc around. (72)
Fasten off (≈ 9–10″). Leave a long tail for sewing.
Muzzle & Nose
- Muzzle oval (white): ch 8; R1 sc in 2nd ch & next 5, 3 sc in last; rotate, sc 5, 2 sc in last. Join. R2 sc 6, inc 3, sc 6, inc 2. Join. (22)
- Nose (black): MR, 6 sc; R2 sc, inc around (9). Flatten as triangle by pinching two mini corners when sewing.
Ears (make 2)
- Outer ear (white): ch 7; R1 sc in 2nd ch & across (6).
Rows 2–6: ch1, turn, dec, sc to last, dec → end with 2 sts; ch1, sc across edge. - Inner ear (pink): make a smaller triangle (start with ch5). Sew pink onto white; leave base straight.
Eyes (make 2)
- Black pupil: MR, 6 sc (don’t close too tight).
- White glint: embroider a small stitch.
- Optional lid/shadow: with brown/gold, surface-sl st a tiny arc above each eye.
Paws (front, make 2)
- Oval: ch 9; R1 sc in 2nd ch & next 6, 3 sc in last; rotate, sc 6, 2 sc in last. R2 even. Add 3 black sl sts for claws.
Mane Fringe Pads (2 crescents)
- Pad (white): ch 20; R1 sc in 2nd ch & across.
R2: dec at both ends. Repeat 2–3 rows to form a curved strip—this is where fringe will latch.
C) Pup Dog (smaller repeats)
- Head disc: Work Mama’s disc to Rnd 7 (56 sts) only.
- Small body oval: ch 14; work like the muzzle oval for 3 rounds to ~4¼–4½″.
- Tail pad: ch 16; 3 rows sc with slight dec each end to curve.
- Mini muzzle: ch 6; 2 rounds.
- Mini ears: triangles starting ch4.
- Mini paws: small ovals starting ch6.
D) Assembly Layout
- Place the Mama head on the left side of the base; slide paws just beneath. Set the pup to the right with its small body and tail pad.
- Pin everything. With white yarn and tapestry needle, whipstitch around each piece. Hide tails under the base stitches.
- Surface outlines: with black and 5 mm hook, surface sl st gentle lines for mouth, paw separation, and ear outlines (optional but impactful).
E) Fringe Fur & Tail
- Cut strands 5–6″ (12–15 cm).
- Using your hook, feed two strands through a stitch along the fringe pads and tail pad, pull ends through the loop to form a lark’s head knot.
- Work rows of fringe from top to bottom for cheeks, chest, and along the tail curve.
- Trim and shape with scissors to a smooth curve.
F) Final Details
- Sew eyes, nose, and muzzles in place; embroider a small mouth line.
- Add inner ears (pink).
- Edge of base: one last round of tight sc or reverse-sc (crab stitch) for a corded finish.
- Block lightly with steam.
Safety & Care: Attach a non-slip underlay or paint dots of liquid latex on the back. Hand-wash cool, roll in a towel, lay flat to dry; comb fringe gently.
Resize Cheat-Sheet
- To make larger, add +2 base rounds (adds ≈1″ all around) and continue the head discs with another increase round (8 sc, inc → 80 sts). Enlarge muzzles/ovals by one more round to keep proportions.