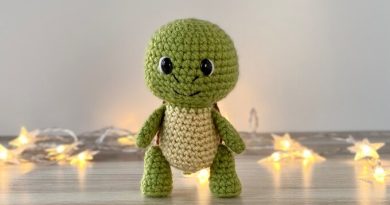
Sea Turtle Crochet Pattern – Step by Step
Few crochet projects are as delightful as creating a cuddly sea turtle. This charming piece makes a perfect gift for children, a decorative pillow, or even a cozy companion for your home. The beauty of this project lies in its colorful hexagon shell design, which you can customize with your favorite shades of yarn. Let’s dive in!
Materials Needed
- Yarn: Worsted or chunky weight yarn in turquoise, teal, mint green, white (or colors of your choice)
- Crochet Hook: Size compatible with your yarn (usually 4.0mm–5.0mm for worsted, 5.5mm–6.0mm for chunky)
- Polyester fiberfill: For stuffing the turtle’s body and head
- Safety eyes: 10–12mm, or embroider with black yarn
- Yarn needle: For sewing parts together
- Scissors
- Stitch marker: To keep track when working in rounds
Step 1 – Making the Shell Hexagons
- Magic Ring: Start with a magic ring, ch 2 (counts as first dc).
- Round 1: 11 dc into ring, join with sl st. (12 dc total)
- Round 2: Ch 2, dc in next st, 2 dc in next repeat around, join.
- Round 3: Ch 2, (dc in next 2 sts, 2 dc in next) repeat around, join.
- Round 4 – Forming Hexagon Shape: Ch 2, (dc in next 3 sts, [dc, ch 2, dc] in next) repeat around to form corners.
- Make 7 hexagons: 1 central and 6 surrounding it.
- Sew them together in a flower-like formation using the white yarn for joining.
Step 2 – Creating the Bottom of the Shell
- Repeat the hexagon process but without changing colors.
- Sew or crochet together in the same arrangement as the top.
- Place the top and bottom shells together and crochet around with white yarn, leaving an opening.
- Stuff with fiberfill, then close.
Step 3 – Head and Tail
Head:
- Magic ring, 6 sc inside.
- Round 2: Inc in each st (12 sc).
- Round 3: Sc in next, inc repeat (18 sc).
- Round 4–8: Sc around.
- Add safety eyes between rounds 5 and 6, spaced evenly.
- Round 9: Sc in next, dec repeat (12 sc).
- Round 10: Dec around (6 sc), stuff and sew to shell.

Tail:
- Magic ring, 4 sc inside.
- Round 2: Inc in each st (8 sc).
- Round 3: Sc around.
- Stuff lightly and sew to opposite end of head.
Step 4 – Flippers (Make 4)
- Ch 8, sc in 2nd ch from hook, hdc in next, dc in next 3, hdc in next, sc in last.
- Turn, work along the other side of chain with the same stitch sequence.
- Round 2: Sc around to create a smooth edge.
- Make 2 larger flippers for the front and 2 smaller for the back.
- Sew onto the sides of the turtle.
Finishing Touches
- Weave in all yarn ends.
- Lightly shape the turtle’s head and flippers.
- Add a soft blush with fabric-safe paint or pastel (optional) for a cute look.