Monochrome Bow Tote – Step by Step (US terms)
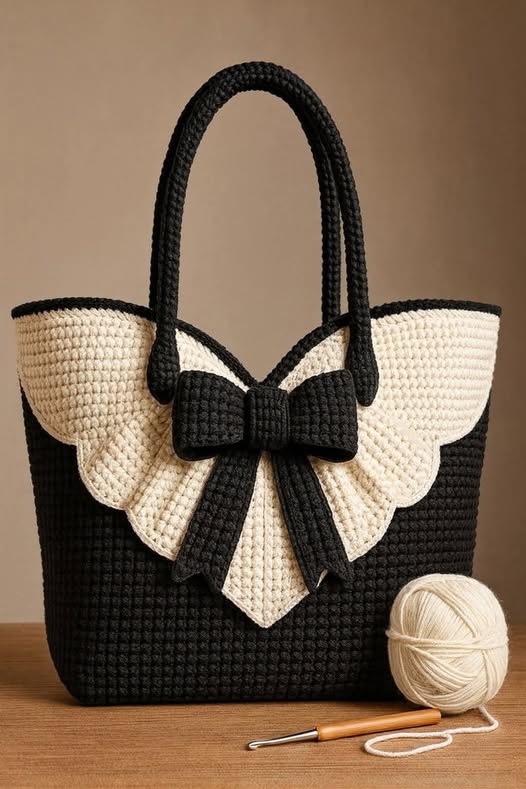
Chic, structured, and timeless—this bag pairs a knit-look black body with a creamy scalloped collar and a statement bow. The polished silhouette comes from dense stitches and a base insert, while the overlay softens everything with feminine curves. Choose a matte cotton cord for couture vibes or a soft T-shirt yarn for casual charm.
The body uses the waistcoat stitch (single crochet worked into the post/V of the stitch below) for that tidy, knit-like texture. It’s worked in the round from an oval base, so there’s no seaming and the sides stand up beautifully. The handles are simple tubes you can reinforce with rope or cord for strength.
The cream collar is made separately, top-down in rows of shells, then edged in black so it reads like piping. A narrow center panel drops into a point, and the bow covers the join—clean and professional. Because it’s an add-on, you can swap colors or remove it for washing.
Sized about 12″ W × 11″ H × 4″ D (30 × 28 × 10 cm), it’s a perfect everyday tote. Increase your starting chain and number of body rounds to size up.
Materials
- Yarn: 3–4 mm braided cotton cord or sturdy cotton (#5 bulky)
- Black: 500–600 g
- Cream: 250–300 g
- Hooks: 5.5 mm (body), 5.0 mm (overlay/edging)
- 2× bag cords/rope for handles (optional but recommended)
- Plastic canvas or bag base (cut to fit), interfacing for overlay (optional)
- Stitch markers, tapestry needle, scissors, clips
- Magnetic snap or zip (optional)
- Fabric + interfacing for lining (optional)
Gauge (waistcoat stitch): ~12 sts × 14 rnds = 4″/10 cm. Not critical—aim for a dense, non-gappy fabric.
Abbreviations (US): ch, sl st, sc, wsc (waistcoat stitch = sc worked between the “V”), inc = 2 sc in same st, dec = sc2tog, hdc, dc, tr, sk, BLO/FLO.
A) Bag Base (oval, black – 5.5 mm)

- Foundation: ch 36.
- R1: sc in 2nd ch from hook and next 33 ch, 3 sc in last ch; continue on underside of chain, sc 33, 2 sc in final ch to complete the oval. (72) Place marker; work continuous rounds.
- R2: (sc 33, inc 3× around tip) twice. (84)
- R3–R5: Keep the long sides straight; at both tips inc 3 evenly each round (adds +6/rnd) until base measures about 11″ × 4″ (28 × 10 cm).
- R6 (turn-up round): sc BLO around to create a crisp edge.
Slip in a plastic-canvas base later; for now keep working the sides.
B) Body in Waistcoat Stitch (black)
- R7: Switch to wsc. Work 1 wsc in every st around (insert hook between the legs of the stitch below).
- R8–R34: Continue wsc in a spiral until side height is 10½–11″ (26–28 cm). Keep the last 2 rounds snug for a firm rim.
- R35: sl st loosely around for a tidy finish; fasten off and weave in tails.
Optional: on the final 2 rounds, work BLO to leave an inner “sewing ridge” for the lining.
C) Handle Tabs & Handles (black)
Tabs (make 4):
- Ch 7, sc back 6; work 12–14 rows for a 1″ × 2½″ strip. Edge with sl st; fasten off leaving long tails.
Handles (make 2):
- Rnd cord: 6 sc into MR; work in a spiral to 17–18″ (43–46 cm). Feed rope/cord inside as you go or afterward using a safety pin. Steam-shape straight.
- Position tabs 3″ from each side seam (front and back). Insert handle ends under each tab, fold tab down the rim and stitch through bag fabric securely. (Sew in a box + X for strength.)
D) Cream Collar Overlay with Piped Edge
Measure: Around the front half of the bag (rim-to-rim) ≈ 22–24″ (56–61 cm). That’s your overlay width.
- Top band (cream, 5.0 mm): ch the measured length minus 1″ (it stretches). Row 1: sc in 2nd ch and across. Rows 2–3: sc across for a neat band.
- Row 4 (shell setup): sc, sk 2, 5 dc in next, sk 2 repeat across, ending sc. Adjust the last few stitches so shells are centered.
- Row 5: sc in sc, 7 dc in shell center repeat.
- Row 6: sc in sc, 9 dc in shell center repeat for deep scallops.
- Center drop panel: Mark the middle 6 sts of Row 6. Working only on these 6 sts, turn and sc 10 rows to form the vertical panel. Taper to a point: Row 11: sc2tog, sc 2, sc2tog; Row 12: sc2tog, sc, Row 13: sc2tog. Fasten off.
- Black “piping” edge: Join black; sc evenly all around the collar and down the center panel, working 3 sc in outside points and sc2tog at inside corners. Steam-block flat. (For a crisper collar, fuse light interfacing to the wrong side before edging.)
E) Bow (black)
- Bow rectangle: ch 18, hdc in 2nd ch and across (17). Work 12 rows hdc. Sew short ends to make a loop; flatten so seam sits at center back.
- Center wrap: ch 10, sc back 9 for 3–4 rows; wrap tightly around bow middle, stitch at back.
- Tails (make 2): ch 20, hdc back; taper last 2 rows by hdc2tog at each edge. Cut a V notch or a point; edge with sl st.
F) Assembly
- Attach collar: Center the collar on the front rim so the drop panel points downward. Hand-stitch the top band of the collar to the inside of the rim (or stitch in the ditch along the black piping). Allow scallops to sit on top of the bag’s exterior.
- Add bow: Position bow over the top of the drop panel; place tails beneath; stitch securely through several layers.
- Base insert: Cut plastic canvas to base size; slide inside.
- Closure (optional): install a magnetic snap inside the rim.
- Lining (optional): Sew a simple rectangle with boxed corners to match bag size; slip into bag and hand-stitch to the inner sewing ridge.
G) Customizing & Care
- Swap the palette (navy/ivory, camel/cream, red/black).
- Make the collar removable with tiny hidden snaps inside the rim.
- Spot-clean; reshape while damp. Cotton cord can be hand-washed; lay flat to dry.
Quick Recap (cheat sheet)
- Oval base → wsc body to 11″ → finish rim.
- Corded handles with tabs.
- Cream shell collar + black edge + center drop.
- Bow + tails → stitch on.
- Insert base, add lining/snap.


