Boho Chevron & Granny Square Crochet Cardigan – Step by Step
Crochet cardigans are a timeless expression of creativity, comfort, and personal style. Unlike store-bought garments, handmade crochet clothing carries the beauty of craftsmanship and individuality. This cardigan combines stripes, chevron textures, and granny squares, creating a piece that feels both modern and nostalgic. It’s perfect for layering and versatile enough to wear in any season.
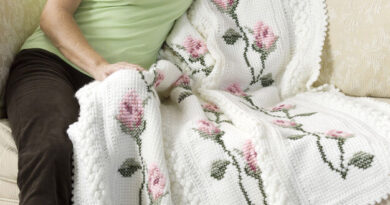
What makes this design stand out is the combination of techniques. The bodice is built with rows of simple stitches that highlight the beauty of striped yarn work, while the lower section features chevron shaping for movement and flow. Adding granny squares at the waistline introduces a playful bohemian touch that makes the cardigan unique and eye-catching.
This project is ideal for crocheters who want to expand their skills. It teaches shaping through increases and decreases, seamless joining, and the integration of motifs into a larger garment. While it looks advanced, it’s built on familiar stitches—mostly double crochet, treble crochet, and chains—so intermediate makers can take it on with confidence.
The best part is how customizable this cardigan can be. You can choose natural tones for a neutral, everyday look, or bright contrasting colors for a bold boho vibe. Adjust the length to create a short jacket or a cozy duster. With creativity in color placement, each version will be completely unique while following the same construction steps.
Materials
- DK or Worsted weight yarn in 3–4 colors (main + accent shades)
- Crochet hook: 4.0–5.0 mm, depending on yarn weight
- Yarn needle and scissors
- Stitch markers
- Optional: buttons or clasp for closure

Step-by-Step Instructions
Step 1 – Upper Bodice
- Begin with a foundation chain that matches your shoulder width plus ease (approx. bust measurement ÷ 2).
- Work in rows of double crochet, alternating colors every 2–4 rows for striping.
- Shape armholes by skipping stitches at the beginning and end of rows when you reach desired length.
- Make two identical panels for front and one larger panel for the back.
Step 2 – Sleeves
- Crochet a foundation chain for sleeve width.
- Work in rows of double crochet with stripe pattern.
- Decrease slightly towards the wrist for a tapered look or leave straight for a relaxed fit.
- Sew or crochet seam to form sleeve tubes.
Step 3 – Granny Square Inserts
- Crochet four to six granny squares in matching colors.
- Arrange them at the waistline between the upper bodice and lower chevron skirt.
- Join using slip stitch or whip stitch, ensuring neat alignment.
Step 4 – Chevron Skirt (Lower Section)
- Attach yarn to the joined granny square row.
- Work in chevron (V-stitch pattern): dc3, dc2tog for decrease; dc2, 2dc in one st for increase.
- Continue working in rounds or rows, changing colors to create striped chevrons.
- Work until cardigan reaches desired length.
Step 5 – Assembly & Edging
- Join front panels to back at shoulders.
- Attach sleeves to armholes.
- Seam sides from underarm down to hem.
- Work a border around the entire cardigan opening using single crochet or shell stitch for a polished look.
- Weave in all ends and block to shape.
✨ The result is a stunning handmade cardigan that combines stripes, chevrons, and granny squares into one wearable masterpiece. Perfect for everyday wear or as a statement piece, it’s a project that celebrates both tradition and individuality.