3D Irish-Style Crochet Butterfly – Step-by-Step Tutorial (US terms)
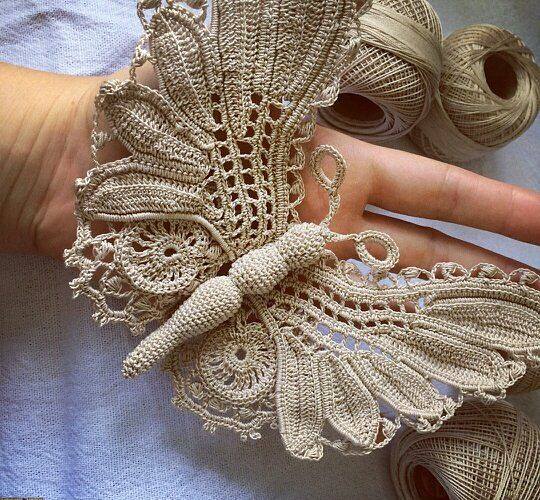
Delicate lace butterflies are show-stopping appliqués that look stunning on bags, garments, cushions, table runners, or framed as wall decor. This design combines Irish-crochet techniques (cords, picots, and lace arches) with simple shaping so you get dramatic wings and a firm, sculpted body.
Unlike flat motifs, a 3D butterfly has layers, veins, and texture. We’ll build a sturdy body first, then crochet four separate wings (two upper, two lower) with raised “ribs” and lacy edges. The pieces are sewn together and lightly stiffened so the wings hold their graceful curve.
You can keep it classic with natural linen or ecru thread (like the photo) or switch to color for a whimsical look. Very fine thread gives a filigree effect; a slightly thicker cotton makes a bold statement and is easier to handle if you’re new to lace.
This project is perfect for confident beginners ready to try lace, or for intermediate crocheters who want an elegant, heirloom embellishment. Work slowly, block neatly, and the result will look exquisite from every angle.
Materials
- Mercerized cotton crochet thread #10–#20 (ecru/natural in the photo)
- Steel hook size 1.25–1.75 mm (match to thread)
- Tapestry needle, scissors
- Optional: 26–28 ga craft wire for a wired wing edge
- Stiffener: diluted white glue (1:1 with water) or fabric stiffener, pins, blocking board
- Small amount of fiberfill (or thread scraps) for the body
- Optional: brooch pin or hair clip for finishing
Abbreviations (US)
ch = chain • sl st = slip stitch • sc = single crochet • hdc = half double crochet
dc = double crochet • tr = treble • inc = increase (2 sts in same st)
fpdc = front-post double crochet • picot = ch3, sl st in first ch
Gauge is not critical. Work firmly so parts hold shape.
Part A — Body & Antennae
Body (worked from tail to head):
- MR, 6 sc in ring. Pull tight.
- sc in each st around (6).
- (sc, inc) ×3 → 9.
- (2 sc, inc) ×3 → 12.
5–8) sc around (12) to form the long tail. Stuff lightly as you go. - (2 sc, dec) ×3 → 9.
- (sc, dec) ×3 → 6.
- Head: inc in each st → 12.
- (sc, inc) ×6 → 18.
- sc around (18).
- (sc, dec) ×6 → 12.
- dec around → 6. Sl st, fasten off, close opening. Leave a long tail to sew wings.
Antennae (make 2):
Ch 25, sl st back along chain; at tip make a picot, sl st in last ch. Sew to top of head.
Part B — Upper Wings (make 2, mirror as you go)
Base ring & center vein
- Ch 8, sl st to form ring. (This ring sits near the body.)
- Into ring: (ch 3 counts as dc) 11 dc, join (12 dc).
- Vein: ch 18, sl st in 2nd ch from hook, sl st back down chain to ring (forms a firm raised cord). Sl st in next dc to anchor.
Shaping panels around the vein
4) Right side of vein: (ch 2, hdc) in same st, then work [dc, dc, tr, tr, dc, dc, hdc] evenly spaced up the side of the vein, ending near the tip; ch 3, turn.
5) Work back down with fpdc in each tall stitch to create a raised “rib”, filling gaps with hdc/sc as needed to keep a smooth curve; ch 2, turn.
6) Repeat Row 5 once more, adding small picots every 3–4 stitches along the outer edge.
Lace outer edge
7) Around the whole outer curve, work [sc, ch 3, skip 1] to make arches. Optional: crochet over a thin wire to wire the edge.
Left side of vein
8) Re-attach yarn at ring on the other side of the vein and repeat Rows 4–7 to mirror.
Fasten off. Block lightly. Repeat for the second upper wing.
Part C — Lower Wings (make 2)
Root medallion
- Ch 6, sl st to form ring.
- (ch 3, 15 dc) in ring, join → 16 dc.
- [sc, ch 5, skip 1] around to form open loops (8 loops). Do not join tightly—this gives the lacy inner base.
Fan build-out
4) Into first loop: (sc, hdc, 3 dc, hdc, sc) to make a petal; repeat in each loop.
5) Work one more round around the fan edge with fpdc over each dc to create ridges; place picot at the top of every second petal for interest.
Fasten off and make a second lower wing, mirroring as needed.
Part D — Assembly
- Pin the upper wings to the sides of the body, slightly angled upward; sew along the ring edges and first 1–2 cm of the veins.
- Pin the lower wings just beneath the uppers, tucking their medallions slightly under the body for a natural overlap; sew securely.
- Weave in all ends.
Part E — Stiffen, Shape & Finish
- Mix equal parts white glue and water. With a brush, dampen wings (avoid soaking the body).
- Pin the butterfly to a blocking board: curve upper wings upward and lower wings slightly down for a 3D look; define scallops and picots neatly.
- Let dry completely. Remove pins.
- Optional: sew a brooch pin or clip to the underside, or stitch the butterfly onto your project.
Tips & Variations
- For extra texture on the wings, sprinkle a few puff stitches (yo, pull up loop 5–7×, yo, pull through all) between ribs before the lace edging.
- Work the body in Romanian cord instead of amigurumi if you prefer a solid corded look.
- Beads at picot tips add sparkle.
- Scale up with #5 thread and a 2.25 mm hook for a larger statement piece.
If you want, I can turn this into a printable one-page pattern card for your blog or write a short Instagram caption with hashtags to promote the tutorial.