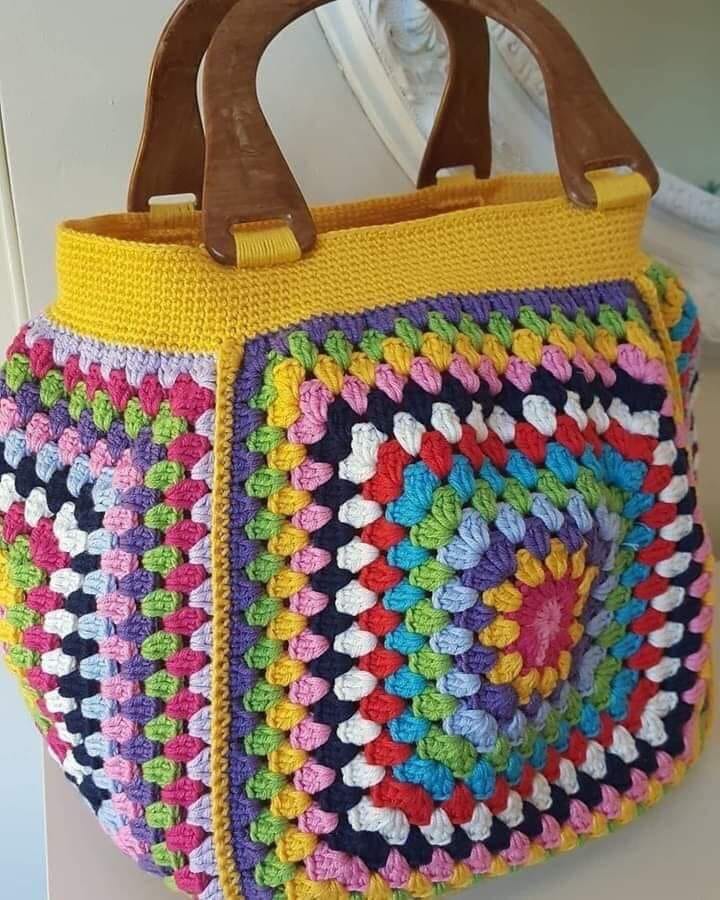
Crochet Granny Square Bag – Step by Step Tutorial
Colorful granny square projects have always been a symbol of creativity and joy in crochet. This handbag design takes the classic granny square and transforms it into a modern, stylish accessory that is both practical and fun. With its vibrant mix of colors and wooden handles, this bag is perfect for adding a touch of handmade charm to any outfit.
Granny squares are one of the most beloved crochet motifs because of their versatility. They can be turned into blankets, garments, and of course, bags. By simply joining a few squares together, you can create a unique design that reflects your personal style. This makes granny square bags a fantastic project for both beginners and experienced crocheters.
What makes this design so appealing is the playful combination of colors. Using leftover yarns or mixing bold and bright tones can give your bag a cheerful, eye-catching look. Paired with a solid crochet base and sturdy wooden handles, the granny squares turn into a statement piece that is both strong and beautiful.
In this tutorial, you will learn how to crochet granny squares, join them together, and assemble them into a handbag with a solid top border and handles. The result is a handmade accessory that is not only functional but also a true expression of your creativity.
Materials Needed
- Assorted cotton yarns in different colors
- Crochet hook suitable for yarn thickness
- Wooden or bamboo handles
- Yarn needle for sewing pieces
- Scissors
- Fabric lining (optional, for added durability)
Step-by-Step Instructions
Step 1 – Crochet the Granny Squares
- Start with a magic ring and crochet 3 double crochets (dc), chain 2, repeat until you have 4 clusters forming a square.
- Continue working in rounds, adding 3-dc clusters in each space, chaining 2 at the corners.
- Change yarn color at the beginning of each round to create a multicolor effect.
- Make 4 large squares (two for the sides, two for the front and back panels).
Step 2 – Joining the Squares
- Arrange the granny squares so they form the front, back, and side panels of the bag.
- Use slip stitches or whip stitch to join the squares together.
- Crochet a continuous border around the entire joined piece to reinforce the edges.
Step 3 – Crochet the Top Border
- With yellow (or your chosen solid color), crochet rows of single crochet (sc) along the top edge of the bag to create a sturdy border.
- Work several rows until the top part is thick and strong enough to hold the handles.
Step 4 – Adding the Handles
- Position the wooden handles on each side of the bag.
- Attach them by crocheting around the handle or by sewing securely with yarn.
- Make sure the handles are firmly attached for durability.
Step 5 – Finishing Touches
- Optional: Add a fabric lining inside the bag for extra strength.
- Weave in all loose yarn ends neatly.
- Block the bag lightly if necessary to give it a polished shape.
✨ Your colorful granny square handbag is ready! This cheerful design is ideal for summer days, picnics, or as a unique everyday accessory.