Crochet Bird Rug – A Work of Art Beneath Your Feet
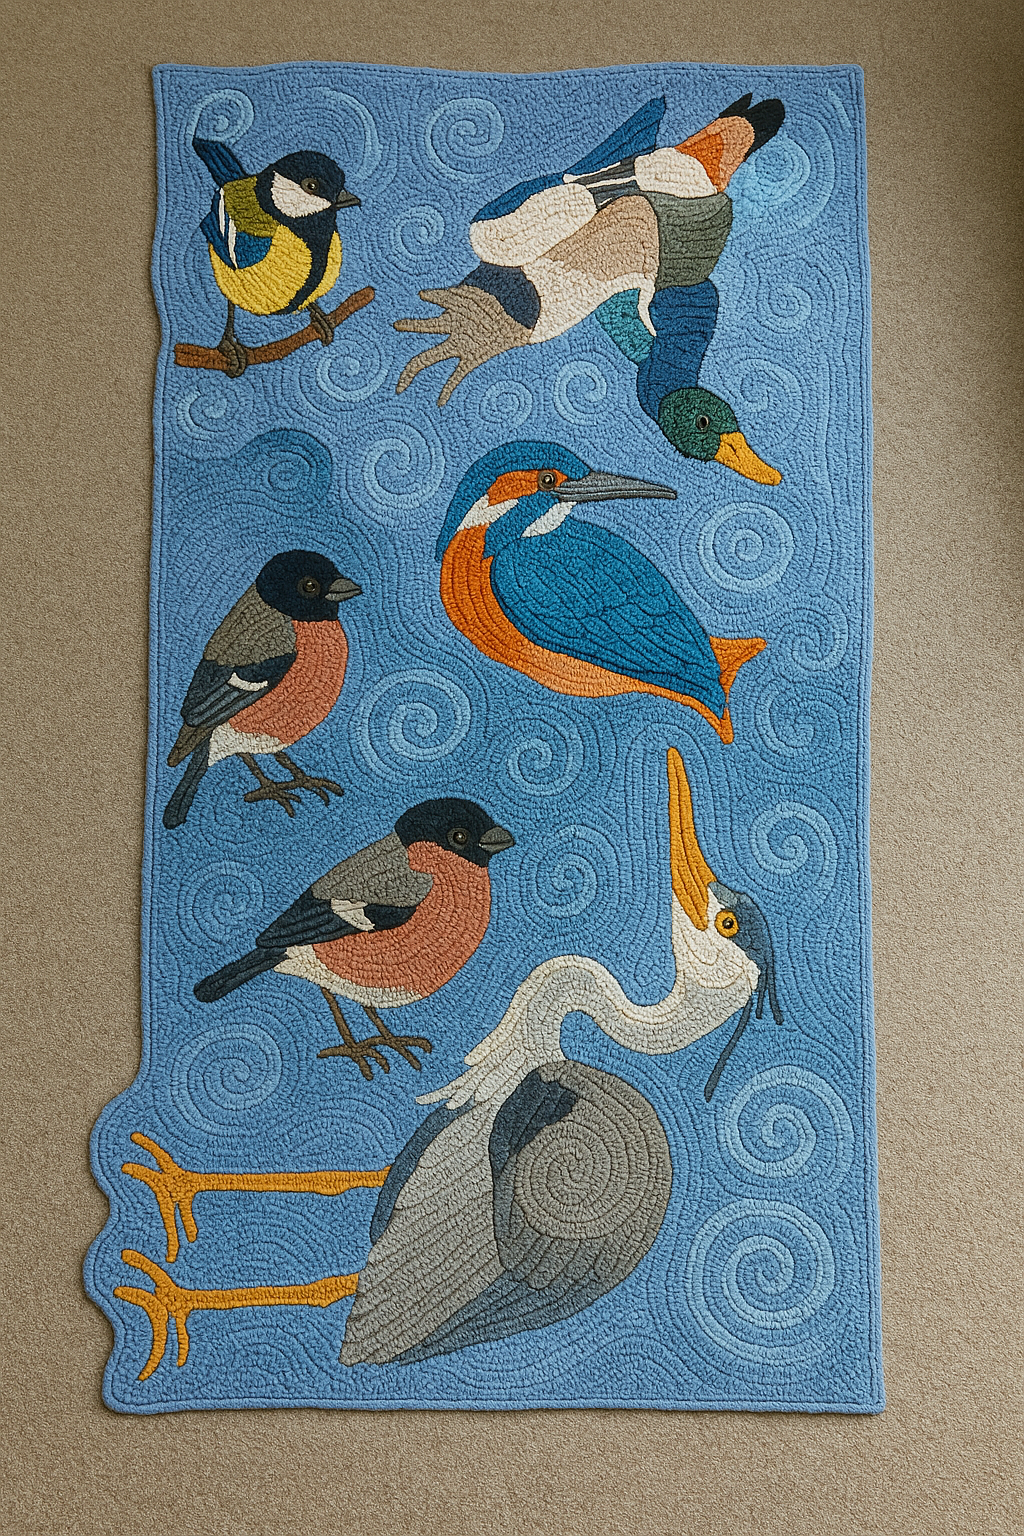
There’s something magical about combining nature and craft, and this crochet bird rug captures that beauty perfectly. With five vibrant birds crafted in vivid color and set against a swirling blue sky, this piece turns any space into a cozy haven filled with charm and character. Whether placed by the door, at your bedside, or as a decorative accent in your craft room, this rug is guaranteed to spark joy and conversation.
Each bird—from the majestic grey heron to the tiny great tit—is a tribute to both creativity and patience. The details, colors, and composition bring a painterly effect to this crochet work, making it much more than a functional piece—it’s a textile artwork. The background of swirling stitches mimics a breezy sky, giving the impression that these birds are floating through a dreamlike scene.
This rug is ideal for advanced crocheters or those who enjoy tapestry and appliqué techniques. While it may look complex, the process is meditative and deeply satisfying, especially as each bird begins to come to life stitch by stitch. Whether you’re a bird lover, a crochet enthusiast, or a curious maker looking for your next ambitious project, this rug is a perfect choice.
Ready to create your own version? Here’s the full step-by-step pattern to guide you through this creative journey.
🧶 Materials Needed:
- 4.0 mm and 5.0 mm crochet hooks
- Worsted weight yarn in: sky blue (background), yellow, black, white, brown, grey, green, orange, pink, blue
- Tapestry needle
- Stitch markers
- Non-slip backing (optional for rug use)
- Blocking mat and pins
🧵 Step-by-Step Instructions:
1. Create the Base:
- With sky blue yarn, ch 120.
- Row 1: Hdc in 2nd ch from hook and across. Ch 1, turn.
- Rows 2–90: Hdc in each st across. Ch 1, turn. (Adjust row count for desired length)
- Fasten off and block the rectangle to size.
2. Crochet the Birds (Appliqué Style):
- For each bird, crochet the body, wings, and details separately using colored yarns.
- Example: Kingfisher – Use orange for the belly, blue for wings, and white for neck markings. Work in sc and hdc to shape the bird parts.
- Use images for reference to shape and color-match the birds.
3. Assemble and Attach Birds:
- Lay out the birds on the blue background using the original design as your guide.
- Pin pieces in place and use whip stitch or invisible stitch to attach each bird securely to the base.
4. Add Swirling Background Details (Optional):
- With a tapestry needle and blue yarn in a slightly lighter or darker shade, embroider spiral motifs between the birds using chain or surface slip stitches.
5. Finish the Edges:
- With 5.0 mm hook, sc evenly around the entire edge in blue.
- Optional: Add a wave-like border using shells (5 dc in same st) for a whimsical finish.
6. Add Non-Slip Backing (Optional):
- If using as a rug, attach non-slip backing or sew on rug gripper fabric to underside.
7. Block Again:
- Lightly steam block to shape the final piece and allow to dry flat.