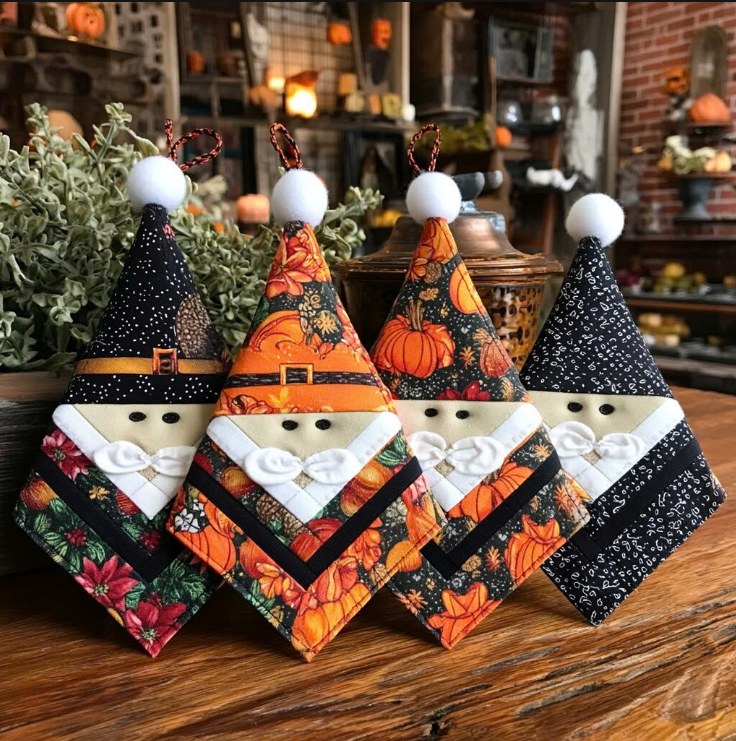
Whimsical Fabric Gnomes – A Quilter’s Delight
Bringing warmth, charm, and a touch of whimsy to any space, handmade fabric gnomes are a delightful way to express your creativity through sewing. Their iconic pointed hats, cozy beards, and playful colors instantly capture attention, making them perfect for seasonal décor. Whether crafted for autumn harvest displays, festive holiday scenes, or simply to brighten a cozy corner, these little characters radiate personality and joy.
The beauty of these gnomes lies in their versatility. By choosing different fabric prints and color schemes, you can adapt them to any occasion — from rich oranges and browns for fall to classic reds and greens for Christmas. Each one becomes a unique creation, telling its own story through patterns, textures, and small handcrafted details. They are not only decorative but also meaningful keepsakes that can be treasured for years.
Creating these gnomes is also a wonderful way to use leftover fabric scraps from other quilting or sewing projects. Every tiny piece finds a new life, transformed into hats, faces, and charming layered outfits. This makes the project both budget-friendly and environmentally conscious, while also encouraging creativity and improvisation in design.
Beyond personal use, these gnomes make heartfelt handmade gifts. They can be given as ornaments, table decorations, or part of a themed gift basket. Each one carries the warmth of the maker’s hands and the thoughtfulness of a personalized creation, making them more than just decorations — they’re small tokens of joy, crafted to bring smiles wherever they go.
Materials Needed
- Assorted quilting cottons in seasonal prints
- Cream or beige fabric for the face section
- Small buttons or beads for eyes
- White felt or fabric for the beard
- Decorative trim or ribbon for the “belt”
- Small pom-poms for the hat tip
- Thread matching your fabrics
- Sewing machine and basic sewing tools
Step-by-Step Instructions
1. Cut the Fabric Pieces
Prepare triangles for the hats, rectangular sections for the face, and additional strips for the layered “body” of the gnome. The size can be adjusted depending on how big you want your gnomes to be.
2. Assemble the Hat and Face
Sew the triangular hat piece to the rectangular face piece along the bottom edge. Press the seam open for a neat finish. Add the belt strip below the face area to separate it from the body section.
3. Layer the Body Sections
Using contrasting fabrics, sew strips or small rectangles beneath the belt to create the gnome’s “clothing.” This is a great opportunity to mix and match prints for extra charm.
4. Add the Beard and Eyes
Cut the beard shape from white felt or fabric and sew or glue it in place. Stitch small black buttons or beads for the eyes.
5. Finish the Hat
Fold and stitch the hat into a cone shape, securing the sides. Attach a small pom-pom at the tip for a whimsical touch.
6. Optional Hanging Loop
If you want your gnome to be an ornament, sew or glue a small ribbon loop at the top of the hat for hanging.
These quilted fabric gnomes are a fun, beginner-friendly project that lets you experiment with color, texture, and pattern. Whether you make one or a whole family, they’re sure to bring a smile to anyone who sees them.