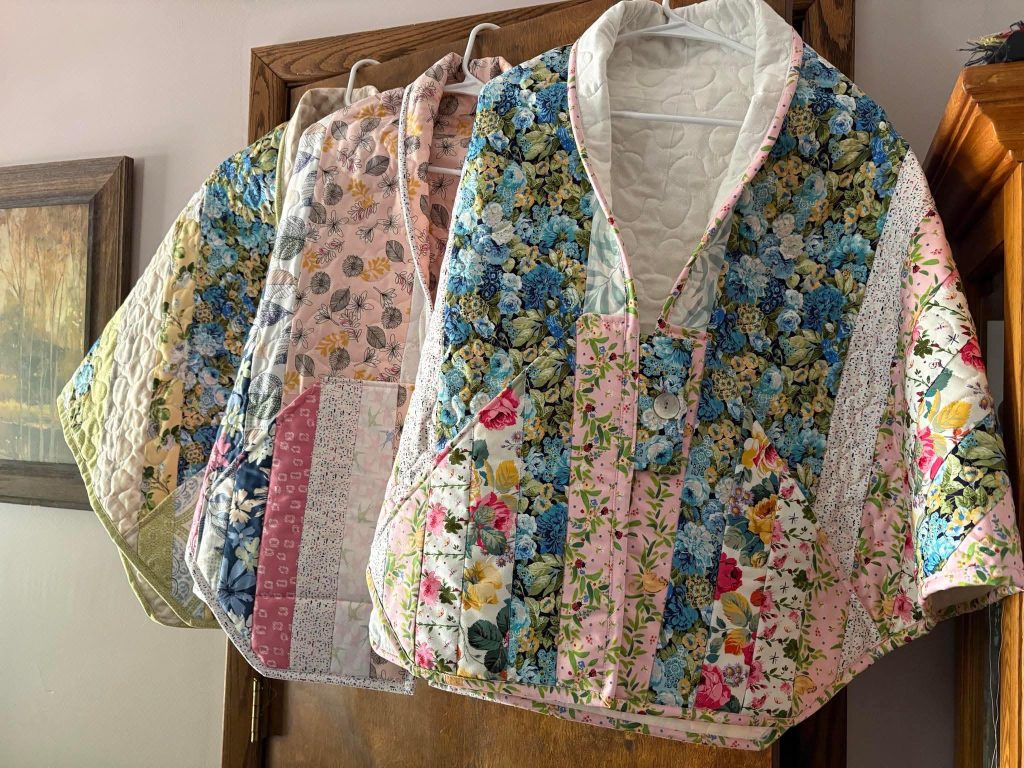
Quilted Jacket – Step by Step Tutorial
Quilted jackets have become a timeless fashion trend, blending the coziness of handmade quilting with the elegance of a wearable garment. These pieces are not only functional but also a statement of creativity, giving you the chance to wear your art proudly. The charm of a quilted jacket lies in its patchwork details, the textures of carefully chosen fabrics, and the warmth it provides on chilly days.
For quilters, this project is especially rewarding because it transforms a traditional quilt into something that can be worn every day. Instead of simply displaying a quilt on a bed or wall, you get to showcase your craftsmanship everywhere you go. Whether you use vintage floral fabrics, bold modern prints, or a combination of scraps, every jacket becomes truly one of a kind.
Another reason quilted jackets are so beloved is their versatility. They can be designed in different lengths, with collars or without, buttoned or open-fronted, depending on your personal style. Beginners can start with a simple boxy shape, while more experienced sewists may experiment with tailored fits and unique design elements. The freedom of choice makes each project a reflection of the maker’s personality.
Handmade quilted jackets are also a sustainable fashion choice. By using leftover fabric scraps or repurposing old quilts, you can create something stylish while minimizing waste. This makes the project not only beautiful but also environmentally friendly. Let’s go step by step and learn how to make your own quilted jacket that’s as cozy as it is fashionable.
Materials Needed
- Assorted quilting cottons or pre-made quilt top
- Backing fabric and batting
- Sewing machine and thread
- Jacket pattern (or a favorite loose-fitting jacket to trace)
- Scissors, pins, and measuring tape
- Buttons, snaps, or zipper (optional)
Step-by-Step Instructions
Step 1 – Prepare the Quilt Sandwich
- Begin by creating a quilt sandwich with your quilt top, batting, and backing fabric.
- Pin or baste the layers together, then quilt with straight lines or free-motion designs to secure.
- Make sure the quilting is even to prevent shifting during cutting.
Step 2 – Cut the Jacket Pieces
- Use a paper pattern or trace around a favorite jacket to create your template.
- Cut the front, back, and sleeve pieces carefully from your quilted fabric.
- Remember to add seam allowances for sewing.
Step 3 – Assemble the Jacket
- Sew the shoulder seams first, then attach the sleeves to the armholes.
- Stitch the side seams and underarm seams.
- Try the jacket on and adjust the fit if necessary.
Step 4 – Add Finishing Touches
- Attach a collar or facing around the neckline for a neat finish.
- Add buttons, snaps, or a zipper closure to the front.
- Finish raw edges with bias tape or binding for durability and a polished look.
✨ Your quilted jacket is now ready to wear! Cozy, stylish, and unique, it’s the perfect project to show off your quilting skills while creating a functional piece of art.