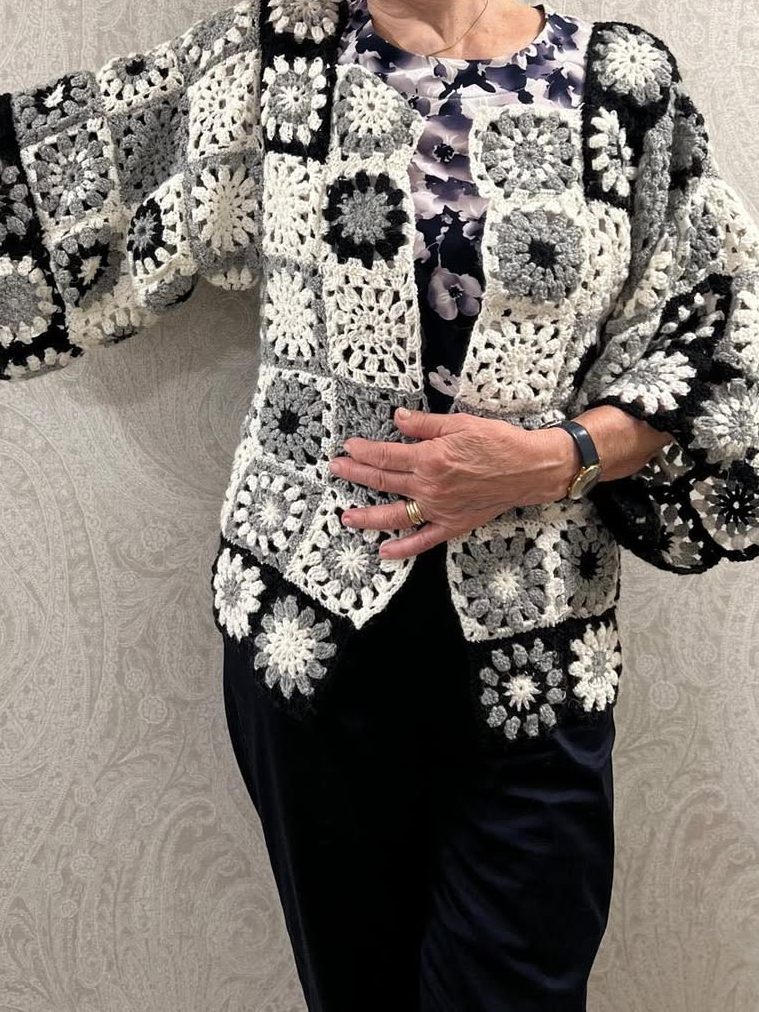
Granny-Square Kimono Cardigan – Step by Step (US Terms)
Crochet cardigans made from granny squares are the perfect mix of vintage charm and modern comfort. They let you play with color, texture, and layout—while keeping construction beginner-friendly. This kimono-style jacket uses classic squares joined into roomy fronts, a straight back, and wide sleeves, so there’s almost no shaping and very little counting.
What makes this project especially satisfying is its modularity. Work a stack of squares whenever you have a spare moment, then lay them out like tiles until the arrangement feels right. Because each square is finished with the same final round color, the garment looks cohesive even with scrappy centers.
Fit is intentionally relaxed. The drop-shoulder silhouette and generous sleeves create a drapey layer that works over dresses, tees, and turtlenecks. You control size by the square size and by how many squares you use across and down—so it’s easy to customize for any body.
If you’ve never made a garment, this cardigan is a friendly first step. You’ll crochet squares, block them to a consistent size, seam them into panels, and add a tidy edging. That’s it. No shaping, no complicated math—just steady, soothing stitches that come together into a wearable heirloom.
Materials
- Worsted or DK cotton/acrylic/wool blend
- Approx. yardage (Worsted, adult lengths): S/M 900–1100 m, L/XL 1200–1400 m, 2X/3X 1400–1700 m
- Colors shown: black, white/cream, light & medium greys
- Hook to meet gauge (typically 4.5–5.0 mm with Worsted; 4.0 mm with DK)
- Tapestry needle, scissors, blocking tools, stitch markers
Gauge & Square Size
- Blocked “sunburst” granny square = 4″ (10 cm) across.
- If your square is smaller, add a round; if larger, drop a hook size.
Sunburst Granny Square (US terms)
Work all rounds RS; join with sl st; change colors as desired.
- Rnd 1: MR, ch 2 (doesn’t count), 16 dc in ring, join.
- Rnd 2: (Puff: yo, pull up loop)×4 in next st, yo, pull through all loops, ch 1; repeat in each st around → 16 puffs, join in first puff.
- Rnd 3: [2 dc, ch 1] in each ch-1 space around, join.
- Rnd 4 (square it): In any ch-1 sp: (3 dc, ch 2, 3 dc)=corner; next sp 3 dc; next sp 3 dc; repeat around making a corner in every 3rd space. Join, fasten off or add a Rnd 5 of sc to hit your target size.
Make all your squares identical in size. Light steam-block for consistency.
How Many Squares Do I Need?
Using 4″ squares (after blocking):
| Size | Back (W×L) | Each Front (W×L) | Each Sleeve (circ × L) | Total Squares* |
|---|---|---|---|---|
| S/M | 6 × 5 | 3 × 5 | 4 × 3 | ~52 |
| L/XL | 7 × 5 | 4 × 5 | 5 × 3 | ~66 |
| 2X/3X | 8 × 5 | 4 × 5 | 6 × 3 | ~78 |
*Add 2–6 extra for collar options/length tweaks.
- W×L = squares across (width) × squares down (length).
- Sleeve “circ × L” means squares around the arm and down to the cuff (kimono-wide).
Layout at a Glance
- Back panel: one rectangle.
- Left/Right fronts: two matching rectangles.
- Sleeves: rectangles seamed into tubes (or left open for extra drape).
- Assembly: seam shoulders, add sleeves to the armhole edge, then seam underarm & sides.
Step-by-Step
1) Make & Block Squares
- Crochet the required number of sunburst granny squares.
- Weave in centers now (faster than later!).
- Block every square to 4″ so seams align perfectly.
2) Join Squares into Panels
Choose a join method:
- Whip stitch or mattress stitch through back loops (flat, invisible).
- Join-as-you-go (JAYGO) with slip stitches in the final round (decorative ridge).
Join into:
- Back: grid for your size (e.g., S/M = 6×5).
- Fronts: two grids (e.g., S/M = 3×5 each). Keep your favorite squares near the neckline/hem.
3) Seam Shoulders
- Place fronts on back, RS together.
- Seam the top rows from each outer edge toward the neck, leaving a neck opening of 1–1½ squares (4–6″) centered.
4) Build Sleeves
Option A – Tube sleeves (structured):
- Join the sleeve rectangle’s short edges to form a tube.
- Mark the top center of the tube and the shoulder seam. Pin/clip the sleeve evenly around the armhole opening (aim for 3 body squares deep). Seam around.
Option B – Open kimono sleeves (extra drape):
- Leave sleeve rectangle flat. Center it on the shoulder seam and sew long edge to the armhole opening.
- Close only the underarm seam later.
5) Close Sides & Underarms
- With RS together, seam from hem up to the sleeve cuff in one continuous line, leaving as much room as you like at the underarm (try on and adjust).
6) All-Around Edging
Work 1–3 finishing rounds around front edges, hem, and neckline:
- Round 1: sc evenly (2 sc per square side, 3 sc in each outside corner).
- Round 2 (optional): sc, ch 1, skip 1 mesh for a neat frame, or work [sc, ch 2, sc] at corners.
- Cuffs: 1–2 rounds of sc or reverse-sc (crab stitch) to firm up the edges.
Want a deeper collar? Add more rounds up the fronts and across the back neck, or attach an extra column of squares along the front edges.
Fit & Customization
- Length: add a row of squares to fronts/back (and 1 row to sleeves if needed).
- Bust width: add 1 square to each front and the back (adds ~12″ around).
- Color play: keep the last round of each square one color (e.g., cream) for cohesion while mixing black/greys in the centers.
- Closures: sew on toggles or add button loops in the edging.
Care
Hand-wash cool or machine on gentle in a mesh bag; lay flat to dry. Steam lightly to refresh the squares and keep edges flat.