A Handmade Crochet Organizer: Where Creativity and Order EmbraceBy
There’s a quiet joy in creating something beautiful with your hands — something that not only brings color and personality to your space, but also serves a practical purpose in your daily life. As crafters, we often find ourselves surrounded by bits of yarn, scattered hooks, and those elusive scissors that always seem to disappear at the wrong moment. This crochet organizer is the answer — a perfect blend of style and utility.
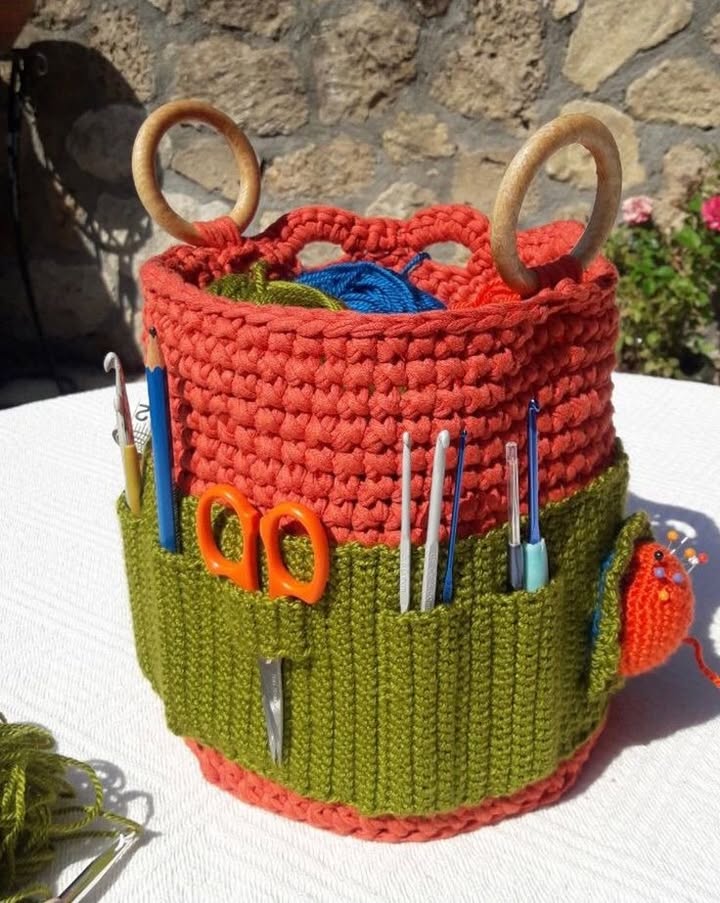
Crafted with sturdy stitches and thoughtful design, this cylindrical crochet basket isn’t just a container — it’s a statement. With a cozy, textured body and contrasting color pockets, it becomes a home for your tools and a testament to your skill. The wooden ring handles add a rustic charm, making it both a decorative piece and a highly functional one. Whether you keep it on your craft table or carry it to crochet meetups, this organizer is bound to turn heads and spark conversation.
Even more than that, this project is deeply satisfying — quick enough to finish in a few sessions, yet detailed enough to feel substantial. It’s a rewarding make for yourself or a thoughtful handmade gift for another maker in your life.
Now, let’s dive into how to bring this beautiful organizer to life!
🧶 Materials Needed:
- Cotton or t-shirt yarn in two contrasting colors (approx. 400g total)
- 4 mm or 5 mm crochet hook (depending on yarn thickness)
- 2 wooden rings (for handles)
- Yarn needle
- Scissors
- Stitch markers (optional)
🪡 Instructions:
Base (in red yarn):
- Start with a magic ring, work 6 single crochets (sc) into the ring.
- Increase each round in multiples of 6 until the base reaches your desired diameter (e.g., 72 stitches for a medium size).
- Use sc in spirals, placing a marker to keep track of rounds.
Main Body (red):
- Once base is complete, work 1 round in back loop only to create a neat edge between the base and body.
- Continue with sc in the round for about 20–25 rounds (or height of the basket you want).
- In the last 2 rounds, create small loop holes for inserting the wooden handles (skip 2-3 stitches and chain 2–3, then sc next). Make sure both sides align.
Outer Pocket Band (green yarn):
- Foundation chain: Chain a length long enough to wrap around the basket’s circumference snugly.
- Work in back-and-forth rows of single crochet for approx. 6–7 cm high.
- To form pockets, fold the band and sew vertically every 4–5 stitches with green yarn or whip stitch.
- Attach the entire band around the basket by sewing or crocheting together.
Finishing Touches:
- Insert wooden rings through the loops on top to serve as handles.
- Weave in all ends neatly.
- Add your tools — hooks, scissors, needles — and your organizer is ready!
💡 Tips:
- Use a firm, thick yarn to help the basket hold its shape.
- Block the finished piece lightly for a clean, crisp look.
- Customize with buttons or small appliqués!
This organizer basket is more than storage — it’s a celebration of what our hands can do.
Functional, decorative, and entirely made by you — the perfect addition to any craft space.