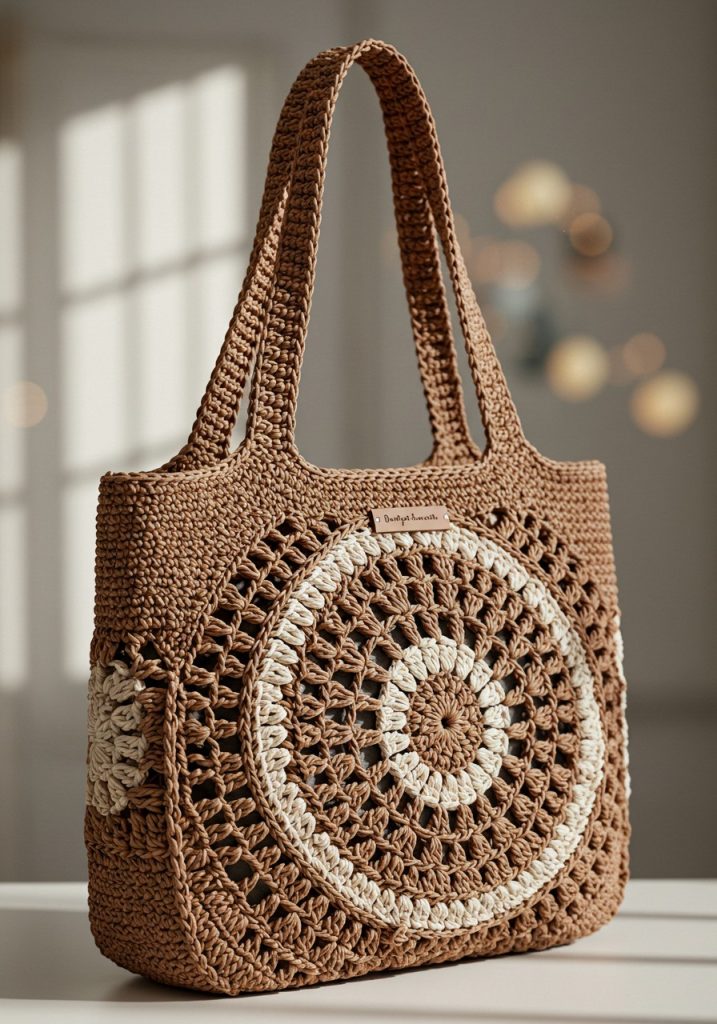
Boho Sun-Medallion Market Tote — Step by Step
Handmade totes don’t just carry things—they carry personality. This boho market bag pairs a sturdy rectangle body with a lacy circular “sun” medallion, so you get structure for everyday use and beautiful openwork for style. Worked in matte cotton (or raffia-style tape), it’s light on the shoulder yet strong enough for books, a tablet, or your yarn project.
The design is modular and beginner-friendly: make two flat rectangles for the front and back, crochet two round medallions, then stitch them on like appliqués. A simple side/bottom gusset gives depth, and doubled straps keep the bag comfortable. Because the medallion is separate, you can play with color (contrast rings or full monochrome) without changing the construction.
I sized the sample to a roomy 12½″ W × 11″ H × 3″ D (32 × 28 × 8 cm), but you can scale everything up or down by adding/subtracting rows on the rectangles and a round or two on the medallions. If you prefer a softer look, choose recycled cotton; for a beach-ready bag, try raffia or ribbon yarn.
Use this as a palette cleanser between bigger projects: the stitch repeats are relaxing, the pieces travel well, and assembly is quick. Let’s make it!
Materials
- Worsted or aran cotton (or raffia-style tape)
- Main color (MC): ~400–450 g
- Contrast (CC): ~80–120 g for the medallion rings
- Hooks: 5.0 mm (H/8) for body, 5.5 mm (I/9) for medallions if you crochet tightly
- Tapestry needle, markers, scissors
- Optional: fabric lining, magnetic snap
Gauge (not critical): in sc, 14 sts × 16 rows = 4″/10 cm. Adjust hook for a firm fabric that stands up.
Abbreviations (US): ch chain, sl st slip stitch, sc single crochet, hdc half double crochet, dc double crochet, st(s) stitch(es), sp space, rep repeat, BLO back loop only.
Finished Pieces Overview
- Front & Back rectangles (make 2): 12½″ × 11″ (32 × 28 cm), dense sc
- Medallion (make 2): ~9½–10″ (24–25 cm) diameter
- Gusset/Side strip (make 1): 3″ × ~46″ (8 × 117 cm)
- Straps (make 2): 1¾″ × 24–26″ (4.5 × 61–66 cm), double-layered
Pattern
A) Front & Back Rectangles (make 2)
With MC and 5.0 mm:
- Foundation: ch 90 (≈ 12½″). Row 1 sc in 2nd ch from hook and across (89 sts).
- Rows 2–44: ch1, turn, sc across (89). Work more/fewer rows to reach ~11″/28 cm.
- Edging: ch1, sc around all four sides with 3 sc in each corner, sl st to join. Fasten off.
B) Sun Medallion (make 2)
With 5.5 mm. Work tight joins; sl st to first st each round. Counts show sts after the round.
- R1 (MC): MR, ch2 (doesn’t count), 12 dc in ring; pull tight (12).
- R2 (MC): ch3 (counts dc), dc inc in each dc around (24).
- R3 (MC): (dc inc, dc in next) rep (36).
- R4 (MC): (dc inc, dc in next 2) rep (48).
- R5 (CC): (dc in next, ch1, sk1) around; end with dc, ch1; join in dc (48 dc + 48 ch-1 sps).
- R6 (CC): (V-st in next dc = dc, ch1, dc; ch1 over next ch-sp) around (48 V-sts).
- R7 (MC): dc in every dc and in each ch-sp around (increase back to a solid ring).
- R8 (MC): (dc inc, dc in next 6) around (approx. +8 increases evenly to keep flat).
- R9 (MC): (ch2, sk1, dc) shells: [dc, ch2, dc] in same st, sk1, dc in next repeat—gives airy outer ring.
- R10 (MC): dc around, placing 2 dc in each ch-2 sp and dc in each dc, increasing as needed to keep the circle flat and reach 9½–10″ diameter. Fasten off, leave a long tail for sewing.
Tip: If your circle cups, add a few extra increases; if it ruffles, skip one increase set.
C) Attach Medallions to Rectangles
- Center the medallion on a rectangle (right side up).
- Pin. Using the long tail and tapestry needle, whipstitch through the back loops of the medallion into the rectangle to keep the lace open. Repeat for the second panel.
D) Gusset / Side-Bottom Strip
With MC and 5.0 mm:
- Foundation: ch 15 (≈ 3″). Row 1 sc in 2nd ch and across (14).
- Rows 2–(to length): ch1, turn, sc BLO across (14).
Keep working until the strip measures the perimeter of one rectangle (≈ 46″ / 117 cm). Fasten off, leave a long tail.
E) Assembly
- With wrong sides together, sc the gusset to the first rectangle all the way around (one sc per row end/ per stitch; work 3 sc at rectangle corners).
- Join the second rectangle to the free edge of the gusset the same way.
- Steam lightly and square the edges.
F) Straps (make 2)
With MC:
- ch 8, Row 1 sc in 2nd ch and across (7).
- Rows 2–90 (or to 24–26″): ch1, turn, sc across (7).
- Fold lengthwise, sl st the long edges together to double the strap.
- Sew ends to the inside top edge, spacing them to straddle the medallion (about 4″ / 10 cm apart). Reinforce with an X-box of stitches.
Optional: add a small leather/wood label at the top edge; sew in a fabric lining and magnetic snap if desired.
Finishing
- Weave in all ends, block gently (steam or wet block for cotton).
- For a crisp top edge, work one final round of reverse sc (crab stitch) around the opening.
- Add a tassel or charm to one strap ring if you like.
Make it Yours
- Neutral body + ivory rings = minimal chic; try terracotta + cream (as in the photo) or black + flax.
- Add a crossbody strap by attaching D-rings on the inside gusset seam.
- Scale up: add two rounds to the medallion and four rows to the rectangles; lengthen the gusset to match.