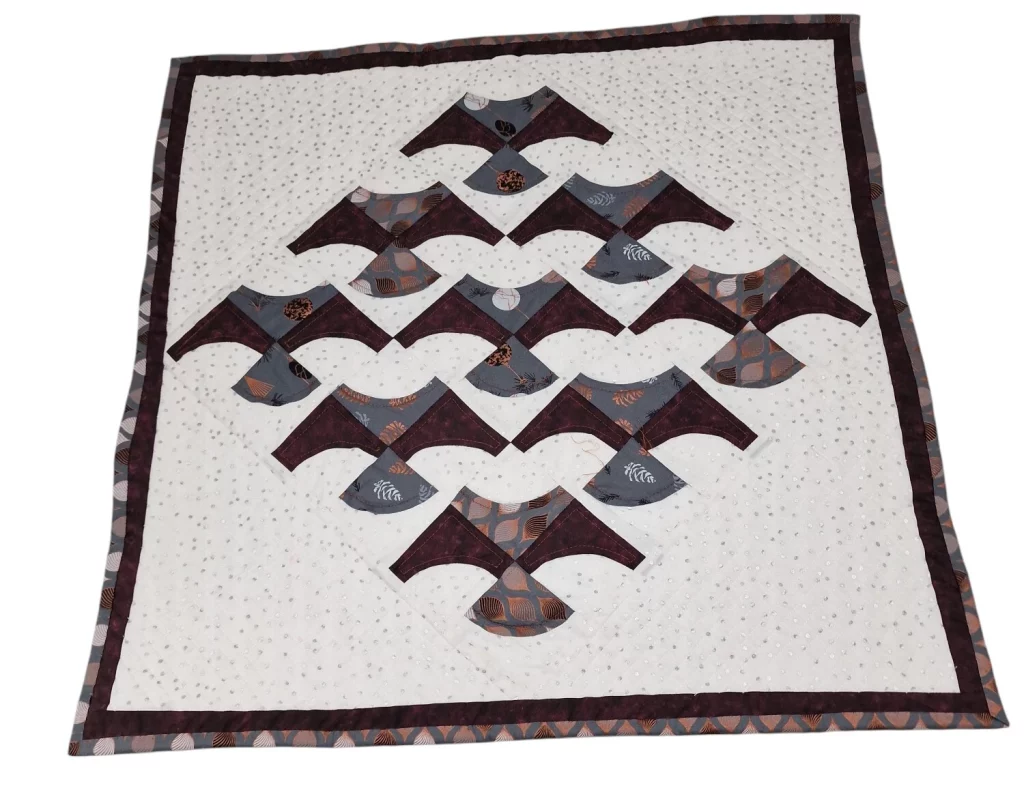
Bluebird Flight Quilt: A Graceful Dance in Fabric
There’s something enchanting about a quilt that captures movement, spirit, and nature all in one. The Bluebird Flight Quilt does exactly that. With elegant curves and careful piecing, this pattern brings to life the poetic imagery of birds in mid-flight. Using shades of deep blue and soft neutrals, this project marries traditional techniques with a distinctly modern aesthetic.
Each bird-shaped block conveys a sense of motion, reminding us of how quilts can be both decorative and symbolic. Whether you’re making it as a wall hanging or a lap quilt, this project is a delightful challenge for confident beginners and experienced quilters alike. It’s a great opportunity to play with curved seams, gradient color placement, and dynamic quilting lines.
This quilt also encourages intentional fabric selection. The tonal blues give the illusion of shadows and feathers, while the off-white background adds contrast and highlights the beautiful arc of each block. Whether you’re aiming for serenity or symbolism, this quilt will take your creativity soaring.
Here’s how you can create your own version of this graceful quilt.
Materials You’ll Need:
- Assorted blue fabrics (light, medium, and dark shades)
- Solid or off-white background fabric
- Fabric for binding and backing
- Rotary cutter, cutting mat, and ruler
- Fabric marking pen or chalk
- Templates for curved bird pieces (you can draft them using flexible rulers or quilting arcs)
- Pins or clips
- Sewing machine with 1/4″ presser foot
- Iron and ironing surface
- Optional: walking foot or free-motion foot for quilting
Step-by-Step Instructions
Step 1: Create Your Templates
Start by drafting two curved templates:
- Top wing arc: This is the top silhouette of the bird’s wings.
- Body inset piece: This is the bottom semi-circle that creates the illusion of the bird’s belly or wing underside.
You can use a plate, compass, or French curve ruler to create smooth, repeatable curves.
Step 2: Cut Your Fabrics
From your blue fabric scraps, cut:
- (1) Top wing arc per block
- (1) Body semi-circle per block
From background fabric:
- (1) background square per bird block (size depends on your bird design, e.g., 8.5″ square)
Cut enough for a grid of 4×5 or 5×6 bird blocks.
Step 3: Sew the Curves
- Mark the center of the arc and the body piece.
- Pin the center of both pieces together.
- Slowly ease the curve into place, pinning or clipping frequently.
- Sew with a 1/4” seam allowance.
- Press seams open or toward the darker fabric.
Repeat for each block. Accuracy on curves makes all the difference!
Step 4: Assemble the Quilt Top
- Lay out your blocks on a design wall or the floor.
- Rotate each block so the “birds” are arranged in alternating rows to suggest flight.
- Sew blocks together into rows.
- Press seams in alternating directions.
- Sew rows together to complete the quilt top.
Optional: Add a dark blue border to frame the birds in flight.
Step 5: Quilting
For quilting:
- Use diagonal echo lines to enhance the flying effect.
- You can stitch in the ditch around each bird shape or outline them for dimension.
- A walking foot or free-motion quilting can add texture to mimic feathers or wind.
Step 6: Finishing
- Trim excess batting and backing.
- Bind your quilt using your favorite method.
- Label and admire your work!
Final Thoughts
The Bluebird Flight Quilt is more than a patchwork—it’s an expression of grace, motion, and storytelling. With each stitched curve, you’ll gain confidence and a deeper appreciation for the art of quilting. This pattern can also be transformed with other color schemes like sunset pinks, forest greens, or even a rainbow spectrum for a playful touch.