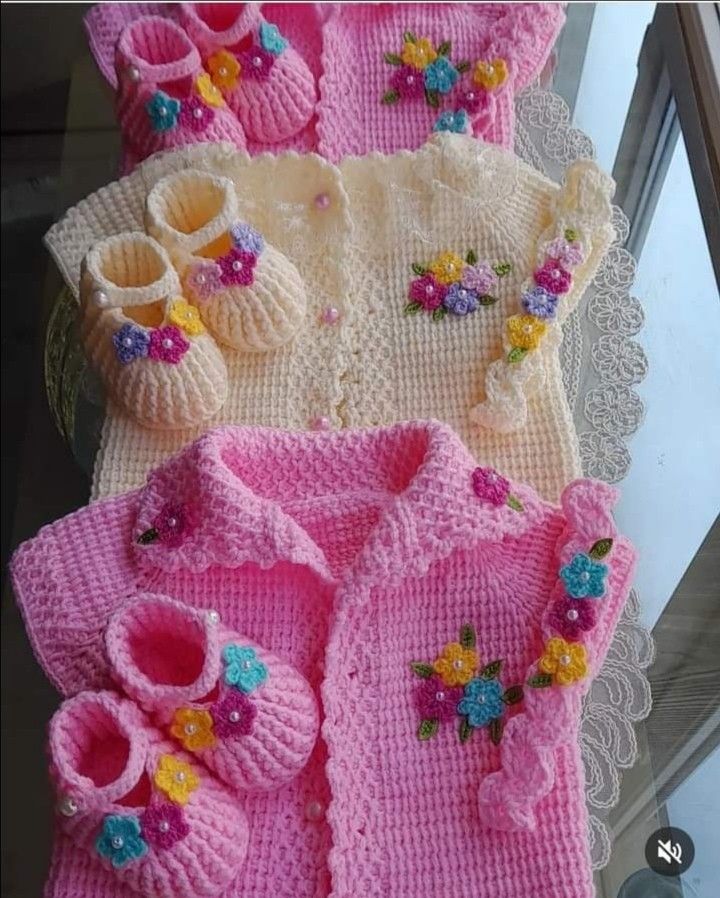
Baby Flower Cardigan (0–12 months)
Crochet baby cardigans are timeless keepsakes—soft to touch, photo-ready, and practical all year round. This pattern focuses on comfort and charm: a gently textured body (so it’s cozy but not bulky), fluttery sleeve frills, and dainty blossom appliqués you can stitch in your favorite colors. It’s a great “special occasion” set, yet sturdy enough for everyday wear.
Construction is beginner-friendly: we crochet flat pieces (back, two fronts, sleeves), seam them, then add a simple button band and collar. The texture is made with a calming, rhythmic repeat—perfect TV crochet. Finally, tiny two-round flowers and leaves are sewn on top for that heirloom look.
Choose soft baby acrylic or cotton-blend yarn for easy care, or go luxe with merino for gift-giving. Work the whole cardigan in one pastel shade or mix cream and pink like in the picture—then sprinkle blossoms as you please.
If you’ve never made a garment, this is a gentle first step. The shaping is minimal, the fit is forgiving, and the finishing steps are clearly laid out below. Let’s make a keepsake!
Sizes, Yarn & Tools
Sizes: 0–3 mo (3–6 mo, 6–12 mo)
Finished chest: ~18″ (19½”, 21″) / 46 (50, 54) cm
Back length: ~10″ (11″, 12″) / 25 (28, 30) cm
Yarn: DK / Light Worsted (Category 3), ~ 350 (400, 450) m main color (MC)
Flower scraps: small amounts in 2–4 colors + a little green for leaves
Hook: 4.0 mm (G-6) or size to meet gauge
Notions: 4–5 small buttons, tapestry needle, stitch markers, blocking tools, optional small pearls for flower centers
Gauge (blocked): in waffle pattern = 18 sts × 12 rows = 10 × 10 cm (4″ × 4″).
Adjust hook to match.
Abbreviations (US)
ch chain, st stitch, sl st slip stitch, sc single crochet, hdc half double crochet, dc double crochet, fpdc front-post dc, inc increase (2 sts in one st), dec decrease (dc2tog)
Special stitch – Waffle (flat):
Row A: dc across.
Row B: fpdc around next dc, dc in next 2 dc rep to end.
Row C: dc across.
Row D: dc in next 2 dc, fpdc around next dc rep to end.
Repeat Rows A–D for texture.
Schematic notes (pieces worked flat)
- Back: rectangle in waffle stitch.
- Fronts (L/R): rectangles with a small neckline slope at the top.
- Sleeves: flat tubes; slight widening optional.
- Finishing: seam shoulders & sides, set sleeves, add button bands, collar, sleeve ruffles, and flowers.
Back
With MC, ch 44 (50, 56) — this equals multiple of 3 + 2.
Row 1 (WS): dc in 3rd ch from hook and across. (42, 48, 54 dc)
Work Waffle Rows A–D until piece measures 9 (10, 11)” / 23 (25.5, 28) cm from start, ending after Row C to keep edges straight.
Fasten off. Place a marker 11 (12, 13) cm from the top on each side to indicate armhole depth when seaming later.
Left Front
Ch 23 (26, 29) = multiple of 3 + 2.
Row 1: dc in 3rd ch from hook and across.
Work Waffle Rows A–D until front measures same length as Back to shoulder.
Neck slope (last 4 rows):
Row 1 (RS): work across until last 4 sts, dec, dc in next, dc in last.
Row 2: work even in pattern.
Row 3: rep Row 1.
Row 4: work even.
Fasten off.
Right Front
Make as Left Front, mirroring the neck slope (dec near neckline edge).
Sleeves (make 2)
Ch 24 (27, 30).
Row 1: dc in 3rd ch from hook and across.
Work Waffle Rows A–D for 6 (7, 8)” / 15 (18, 20) cm.
Optional gentle flare: on every 6th row, inc 2 sts evenly across the row, 2–3 times total.
Fasten off. (Seam into a tube after blocking.)
Assembly
- Block all pieces lightly to measurements.
- Seam shoulders: place fronts to back (RS facing), whip stitch 1–1½” (2.5–4 cm) at each shoulder.
- Sleeves: seam sleeves into tubes; match sleeve center to shoulder seam and sew around armhole.
- Side seams: sew from hem to underarm, leaving armhole depth open (to your markers).
Button Bands
With RS facing and working up the Right Front edge first:
Right Band (buttonholes):
Row 1: join yarn at hem, sc evenly up edge to neck; aim for ~3 sc per 2 rows.
Row 2: sc across, space 4–5 buttonholes evenly: (ch 2, sk 2) for each hole.
Row 3: sc across, placing 2 sc in each ch-2 space. Fasten off.
Left Band: work 3 rows of sc evenly (no holes).
Simple Collar
Join yarn at the left neckline, RS facing.
Row 1: sc evenly around neckline (skip the button bands), join, ch 1.
Rows 2–5: hdc around; turn each row at the bands for a neat fold.
Optional scallop edge: (sl st, ch 1, 5 dc) in next st, sk 1 st, sl st in next repeat around collar edge.
Fasten off and weave ends.
Sleeve Ruffles (optional but adorable)
With RS facing at sleeve edge:
Round 1: sc evenly around.
Round 2: (sl st, ch 1, 5 dc) in same st, sk 1 st repeat for a soft frill.
Fasten off.
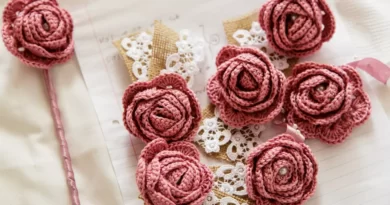
Tiny Flowers & Leaves (appliqués)
5-Petal Flower (make many):
Round 1: with color A, magic ring, 10 sc, join.
Round 2: (sl st in next st, ch 2, 3 dc in same st, ch 2, sl st in same st) = 1 petal; rep 5×.
Fasten off leaving a long tail. Add a tiny pearl or French knot to the center if desired.
Leaf (make several):
Ch 6; sc in 2nd ch from hook, hdc in next, dc in next 2, (hdc, sc) in last; rotate and work along the other side of chain: hdc in next, dc in next 2, hdc in next, sl st to first sc. Fasten off with a tail.
Placement: Arrange flowers in small clusters on the left chest, right shoulder, and near the hem. Pin, then sew through the back loops only so the petals sit slightly raised.
Buttons & Finishing
- Sew buttons to the Left Band to match buttonholes.
- Weave in all ends securely.
- Lightly steam-block just the bands and collar to shape; avoid over-blocking the texture.
Customization Tips
- Swap the waffle for griddle stitch (alt sc, dc) for a smoother fabric.
- Make a matching pair of booties and a simple beanie using the same flower motif for a gift set.
- For a spring look, try buttercream + lilac; for classic, cream + blush; for unisex, mint + butter yellow.