Autumn Scarecrow Amigurumi – Step by Step (US Terms)
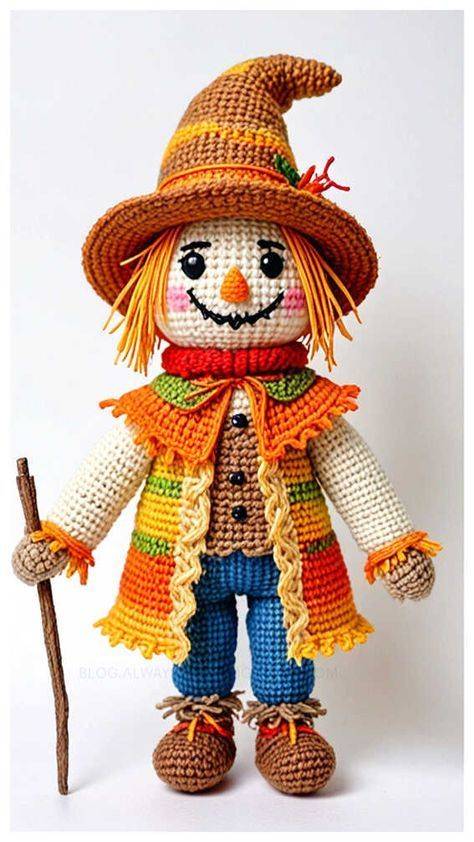
Crochet dolls have a special way of capturing the seasons, and this scarecrow brings autumn straight to your shelf. With his floppy hat, bright poncho, and straw peeking from sleeves and boots, he’s charming without being complicated. The body is worked in simple spirals, and the clothing is built from easy rectangles and rounds.
This project is perfect for using scraps: work the poncho in sunset stripes, add a pop color scarf, and choose denim blues for the pants. If you prefer a softer palette, swap to dusty pastels—the structure stays the same, only the mood changes. Because most pieces are modular, you can crochet a little each evening and assemble at the end.
The scarecrow stands about 25–28 cm (10–11″) tall with worsted cotton and a 3.0–3.25 mm hook. Stitches are tight so the stuffing doesn’t show; if you crochet loosely, drop a hook size. Safety eyes are cute for display pieces, but embroider features if the doll is for a young child.
What looks advanced is really just layering: a basic doll base, a striped poncho with scallops, and a brimmed hat. A handful of “straw” strands transforms sleeves and boots instantly. Take your time with assembly and he’ll have tons of personality.
Materials
- Worsted (Cat 4) cotton or acrylic in:
- Skin (beige), Shirt (cream), Pants (denim blue), Boots (brown),
- Hat (tan/brown), Poncho stripes (orange, yellow, green),
- Scarf (red), Straw (gold/orange), small black for embroidery
- Hook 3.0–3.25 mm (tight amigurumi gauge)
- Safety eyes 8–10 mm (or embroidery)
- Fiberfill, yarn needle, stitch markers, scissors
- Optional: small buttons, thin stick for staff
Abbreviations (US)
MR = magic ring • sc = single crochet • inc = 2 sc in same st
dec = sc2tog • sl st = slip stitch • ch = chain • BLO/FLO = back/front loop only
(…)×N = repeat N times • R = round • st(s) = stitch(es)
Work the body parts in a spiral unless noted. Use a stitch marker at the first stitch of each round.

Pattern
Legs (make 2) – boots → pants
Boot (brown)
R1: MR 6 sc. (6)
R2: inc around. (12)
R3: (sc, inc)×6. (18)
R4: (2 sc, inc)×6. (24)
R5: sc in BLO around (raise the side). (24)
R6–R7: sc around. (24)
R8: (6 sc, dec)×3. (21)
R9: (5 sc, dec)×3. (18)
R10: (4 sc, dec)×3. (15)
R11: sc around; stuff the shoe firmly.
Sock & pant leg
Change to cream (1 round) then to denim blue.
R12 (cream): sc in BLO around. (15)
R13–R24 (blue): sc around 12 rounds. (15)
Fasten off first leg only. Do not cut yarn on the second leg.
Join for Body (pants → shirt)
With the second leg yarn, ch 4, join to the first leg with sc to form the crotch bridge.
Pants (blue)
R25: sc around first leg 15, sc along ch-4 (4), sc around second leg 15, sc along other side of ch-4 (4). (38)
R26–R28: sc around; stuff the legs and lower body.
Belt line
R29 (BLO): sc around in brown or black (optional belt). (38)
Shirt (cream)
R30: change to cream; sc around and dec 4 evenly. (34)
R31–R34: sc around 4 rounds.
R35: (7 sc, dec)×4. (30)
R36: (3 sc, dec)×6. (24)
R37: sc around. (24)
Do not finish; we’ll attach arms later. Stuff firmly.
Head (skin tone)
R1: MR 6. (6)
R2: inc around. (12)
R3: (sc, inc)×6. (18)
R4: (2 sc, inc)×6. (24)
R5: (3 sc, inc)×6. (30)
R6: (4 sc, inc)×6. (36)
R7–R12: sc around. (36)
Insert safety eyes between R9–R10 about 7–8 sts apart.
R13: (4 sc, dec)×6. (30)
R14: (3 sc, dec)×6. (24)
R15: (2 sc, dec)×6. (18)
Stuff head firmly.
R16: (sc, dec)×6. (12)
R17: dec around, close and weave in.
Attach head to body: sew the head opening to R37 of the shirt; add more stuffing as you go.
Nose (orange)
R1: MR 4 sc. (4)
R2: (sc, inc)×2. (6)
R3: sc around; leave tail and stitch centered between eyes.
Add blush with a little pink yarn (optional).
Smile & lashes: backstitch with black; add tiny stitches for rosy cheeks if you like.
Arms (make 2)
Glove (brown)
R1: MR 6. (6)
R2: (sc, inc)×3. (9)
R3–R4: sc around. (9)
Sleeve (cream)
R5: change to cream; sc in BLO. (9)
R6–R14: sc around 9 rounds. Lightly stuff only the hand and first part of the sleeve.
Straw cuff (gold/orange)
R15: join straw color FLO of R5: (ch 4, sl st next st) around to make fringe. Fasten off.
Leave long tail to sew later.
Hat (tan/brown)
Crown
R1: MR 6. (6)
R2: inc around. (12)
R3: (sc, inc)×6. (18)
R4: (2 sc, inc)×6. (24)
R5: (3 sc, inc)×6. (30)
R6–R9: sc around. (30)
Brim
R10 (BLO): (4 sc, inc)×6. (36)
R11: (5 sc, inc)×6. (42)
R12: (6 sc, inc)×6. (48)
R13: sc around; sl st to finish.
Optional band: join contrast color, sc one round; add a tiny leaf: ch 5, back with sl st, sew to band.
For a jaunty tip: place a stitch or two pulling the top slightly to one side.
Poncho (striped)
Work flat from neck to hem; stripes every 2 rows.
Neckband (red): ch 44, join to ring (do not twist).
R1: sc around (44).
Body (increase at four points):
R2: switch to stripe color; (sc 10, ch1, sc 1 in same = increase corner) ×4 (distribute evenly).
R3: dc around, (dc, ch2, dc) in each ch-1 corner.
R4+: repeat R3, changing colors every 2 rows, until the poncho hits the hips.
Edging: one round of (sc, skip 1, 5 dc in next = shell) around for a ruffled hem.
Front opening: cut one stitch at center front of neckband, secure ends, and edge both sides with sc. Add a chain-tie with small pompoms if desired.
Scarf (red)
Ch long enough to wrap once (70–80 ch). Row 1: hdc in each ch; Row 2: hdc back; fringe the ends.
Hair (straw)
Cut many 12–14 cm strands in gold/orange. Latch-hook them around the head under the hat line and at sleeve/boot cuffs. Trim to a shaggy bob.
Assembly
- Sew arms to the body at R34–R35, slightly angled outward; add a few straw strands poking out.
- Place poncho over the shoulders; add a tiny vest if you want (a small rectangle in brown with two buttons).
- Fit the hat snugly; take a tiny tack stitch to hold the tilt.
- Tie on the scarf.
- Embroider buttons down the vest; add patches on pants with whipstitch.
- Optional: give him a stick staff—wrap a twig with yarn and stitch to one hand.
Safety & Care
- For children under 3, embroider eyes and avoid buttons/small parts.
- Hand-wash, shape gently, and air dry.


