Pattern: Stacked Pumpkins Wall Hanging (Appliqué Quilt)
Intro (4 paragraphs in English)
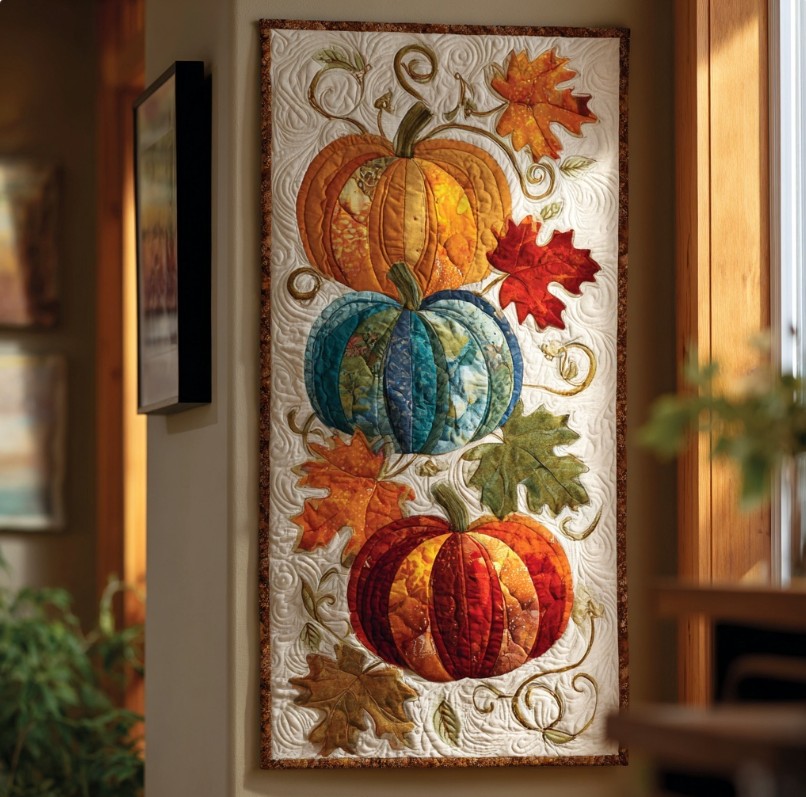
Nothing says cozy fall like a cascade of pumpkins on the wall. This Stacked Pumpkins Wall Hanging blends scrappy piecing with curvy raw-edge appliqué to create luscious, dimensional gourds and drifting leaves. It’s a perfect weekend project: small enough to finish quickly, yet detailed enough to become the focal point of your seasonal décor.
The design features three layered pumpkins—warm orange, teal, and russet—set on a light, high-contrast background with swirling free-motion quilting. Variegated prints give each pumpkin depth while big, stylized maple leaves add movement. If you’ve been wanting to try appliqué without committing to a full quilt, this bite-size format is ideal.
Beginners comfortable with a rotary cutter and zigzag (or blanket) stitch will do great. Experienced quilters can lean into thread-painting and fancy quilting motifs. The wall hanging finishes around 18″ × 36″ (45 × 90 cm), but you can resize the background and appliqué templates to suit your space.
Use what you have—this project is scrap-friendly. Pull oranges from one bin, teals from another, plus creams for the background. A pop fabric for stems and a handful of greens for leaves are all you need. Ready to make some fall magic? Let’s sew!
Materials
- Assorted orange, rust, and teal scraps for pumpkin segments (fat eighths or strips work well)
- Assorted greens for leaves + brown/olive for stems/tendrils
- 1 yd (0.9 m) low-volume/cream for background and backing (or pieced black-and-white if you prefer contrast)
- Batting: 20″ × 38″ (50 × 97 cm)
- Fusible web (paper-backed), ~2–3 yards (Steam-A-Seam, HeatnBond, etc.)
- Matching threads (piecing + appliqué; optional variegated for quilting)
- Binding: ½ yd (0.45 m) or 2¼” (5.7 cm) × 160″ (4 m) strip set
- Hanging sleeve supplies (optional): 4½” × width of quilt, hand-stitching needle
Cutting & Background
- Cut background to 18½” × 36½” (trim later).
- Option A (simple): one solid/low-volume panel.
Option B (checkerboard): piece 3½” squares into a 6 × 12 grid for subtle texture. Press seams open and square to target size.
Make the Pumpkin & Leaf Templates
- On paper, draw three oval pumpkins (approx. top 9″ wide, middle 11″, bottom 13″). Divide each into 7–9 curved segments.
- Draw 6–8 maple/oval leaves in varying sizes plus three short stems and a few curly tendrils.
- Reverse the drawings (or trace on the paper side of the fusible which reverses automatically).
Fuse & Cut the Appliqué
- Press fusible to the wrong side of your scrap fabrics. Use oranges/rusts for one pumpkin, teals for another, red-orange for the third; greens for leaves; brown/olive for stems.
- Cut out all segments right on the lines. Keep each pumpkin’s pieces grouped.
Build the Pumpkins (Layering Order)
- On the background, mark a gentle vertical center line.
- Arrange the bottom pumpkin first, slightly overlapping the lower edge to feel abundant. Fan segments from center outward, alternating lights and darks for dimension. Add stem.
- Place the teal middle pumpkin so it overlaps the bottom by ~1″. Then the top pumpkin overlaps the middle. Tuck stems behind segments as needed.
- Scatter leaves to “frame” the stack; angle a few off the edges for movement. Add slender tendrils (narrow bias or fusible strips).
- When you love the layout, lightly fuse in place. Final press after stitching.
Stitch the Appliqué
- Edge-finish each shape with your choice:
- Blanket stitch (length 2.8–3.0, width 2.5–3.0)
- Narrow zigzag/satin (width 2.0–2.5)
- Or raw-edge straight stitch 1/16″ from the edge for a rustic fray.
- Change thread colors to blend or contrast. Stitch veins on leaves with straight stitches. Add a little thread-painting where segments meet to enhance shading.
Quilt Sandwich
- Layer backing (right side down), batting, and top. Baste with spray or pins.
- Quilting ideas:
- Background: loose swirls/feathers to mimic wind.
- Pumpkins: echo-quilt inside each segment following the curve to emphasize roundness.
- Leaves: vein lines and echo once.
- Trim to ~18″ × 36″ square and true the edges.
Binding & Hanging Sleeve
- Bind with 2¼” double-fold binding; join ends with a diagonal seam.
- For hanging: press a 4″ sleeve, stitch to the top back by hand. Add a label.
Variations & Tips
- Swap teal for plum or sage; add metallic thread accents for sparkle.
- Prefuse the entire stack on non-stick applique sheets, assemble off the quilt, then transfer as one unit.
- If you prefer needle-turn appliqué, trace shapes onto fabric and add ¼” seam allowance; hand-appliqué instead of fusing.
- Scale up to a door banner (24″ × 48″) or down for a table runner by printing templates at 125% or 75%.
Finished Size: ~18″ × 36″ (45 × 90 cm)
Skill Level: Confident beginner (appliqué)
Time: 1–2 weekends