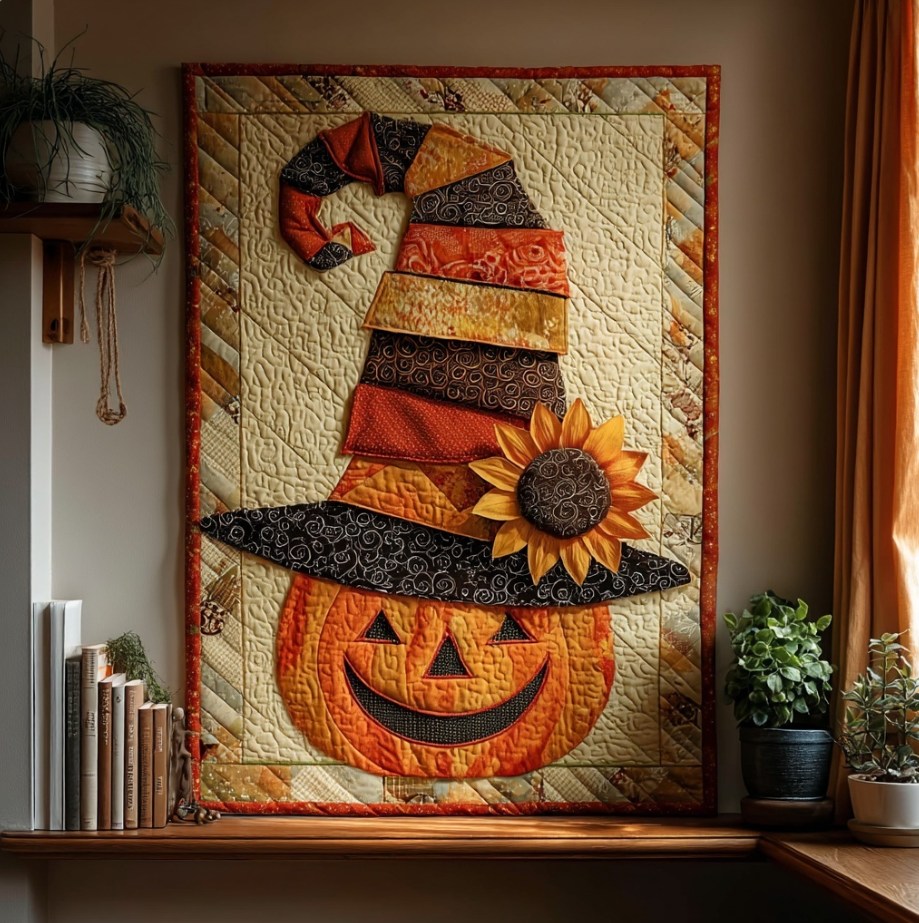
Pumpkin Witch Hat Quilt – Step by Step Tutorial
Quilts are more than just blankets; they are pieces of art that tell a story. The Pumpkin Witch Hat Quilt combines the charm of autumn with the playful spirit of Halloween, making it a perfect seasonal decoration. This quilt is designed as a wall hanging, featuring a cheerful jack-o’-lantern face topped with a whimsical witch hat adorned with a sunflower. It brings warmth, character, and a festive touch to any home.
One of the most captivating aspects of this quilt is its combination of bold colors and appliqué work. The bright oranges, deep blacks, warm golds, and rich reds come together to create a piece that feels both cozy and fun. The sunflower accent adds a rustic harvest detail that balances the playful Halloween design with autumn beauty.
This project is ideal for intermediate quilters, but beginners with some basic knowledge of appliqué can also give it a try. It’s a wonderful opportunity to practice piecing borders, adding dimension with appliqué, and experimenting with quilting textures. The wall-hanging format makes it a manageable size, perfect for decorating smaller spaces or gifting.
In this tutorial, we’ll cover how to choose fabrics, prepare the pumpkin and hat appliqué, assemble the quilt top, and add finishing details. By the end, you’ll have a quilt that not only showcases your creativity but also becomes a conversation piece during fall gatherings.
Step-by-Step Instructions
Materials Needed:
- Assorted fabrics in orange, black, yellow, gold, and cream
- Fusible web for appliqué
- Fabric scraps for sunflower and details
- Batting and backing fabric
- Sewing machine, thread, scissors, and quilting tools
Step 1: Cutting and Preparing Fabrics
- Cut a large cream or beige background fabric as the quilt base.
- Select orange fabrics in different shades for the pumpkin body.
- Choose patterned blacks and golds for the witch hat.
- Cut strips of autumn colors for the border.
Step 2: Creating the Pumpkin and Hat Appliqué
- Draw and cut the pumpkin base and jack-o’-lantern facial features from orange and black fabrics.
- Prepare the witch hat in separate fabric strips for a patchwork look.
- Fuse all pieces onto the background fabric.
- Stitch appliqué edges using a zigzag or blanket stitch.
Step 3: Adding the Sunflower Accent
- Cut petals from yellow/gold fabric and a circle center from brown or patterned fabric.
- Arrange petals around the circle, then appliqué onto the hat brim.
- Add embroidery details if desired for extra texture.
Step 4: Assembling and Quilting
- Sew the borders around the central panel using autumn-colored strips.
- Layer quilt top, batting, and backing.
- Quilt around the pumpkin, hat, and sunflower for emphasis.
- Use free-motion quilting on the background to create swirls or vines.
Step 5: Binding and Finishing
- Bind the quilt with orange or patterned fabric for a polished look.
- Add a sleeve on the back if you plan to hang it as wall art.
✨ Your Pumpkin Witch Hat Quilt is now ready to brighten your walls with festive fall spirit! 🎃🧡