Patchwork Jack-o’-Lantern Mini Quilt – Step by Step
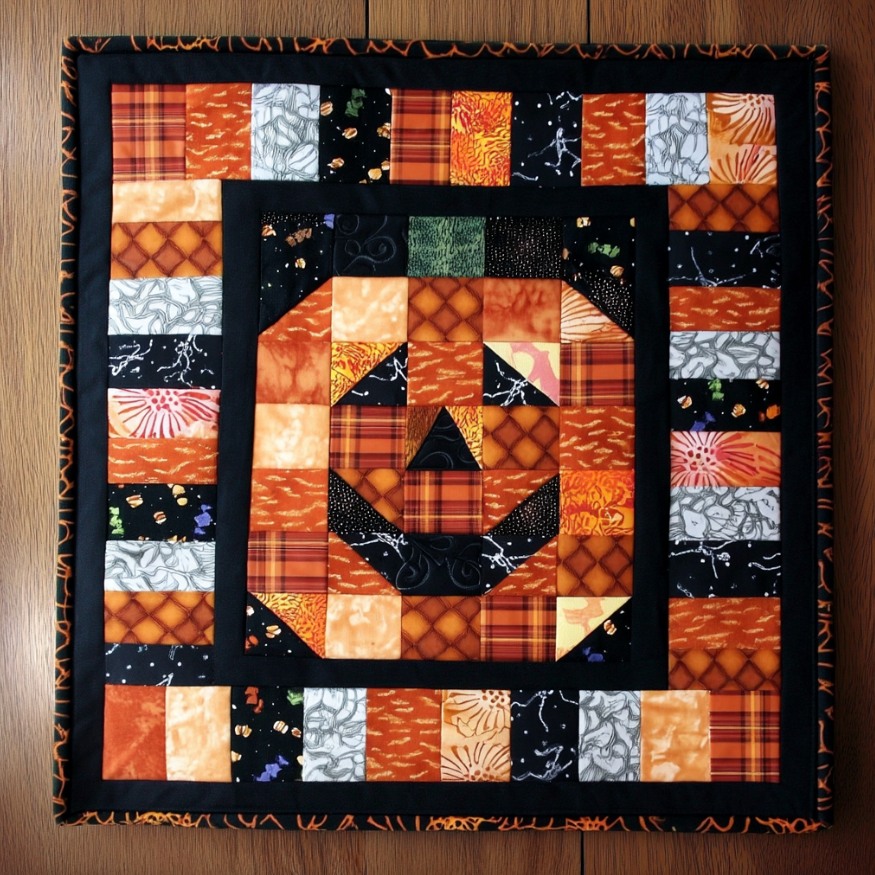
Nothing says Halloween like a grinning jack-o’-lantern. This mini quilt mixes scrappy oranges with moody blacks and low-volume prints, then frames everything with bold black sashing and a pieced outer border. The look is graphic and festive, yet the construction is beginner-friendly.
The pumpkin face is built like “pixel art”: an 8×8 grid of 2½″ squares (2″ finished). A few quick half-square triangles (HSTs) clip the corners and shape the smile. Because the design is scrappy, you can raid your stash—plaids, batiks, dots, even novelty prints all play well here.
Framing does the magic. A skinny black inner border sharpens the pumpkin and gives the eye a rest; the outer border is a simple piano-key patchwork that shows off every fabric. Quilt with wavy or echo lines for texture and bind in a Halloween print.
Sized at about 24″ square, it works as a wall hanging, door quilt, or oversized table topper. Want a throw? Just enlarge the center grid or add extra borders—this pattern scales beautifully.
Finished Size
Approx. 24″ × 24″
Materials
- Scraps/strips of orange prints (pumpkin)
- Scraps of black prints & low-volume (background/contrast)
- Solid black for sashing/border: ⅜ yd
- Backing: 28″ square • Batting: 28″ square
- Binding: ¼ yd (or scrappy)
Cutting
- From oranges: at least 32 squares 2½″ × 2½″
- From blacks/low-volumes: 32 squares 2½″ × 2½″ (for center background; mix mostly black with a few gray/white)
- For HSTs: cut (8) orange 2½″ squares and (8) black 2½″ squares (pair to make 8 HSTs)
- Inner black border: (2) 1½″ × 16½″, (2) 1½″ × 18½″
- Outer piano-key border: cut assorted 2½″ × 4½″ rectangles (about 36–40)
- Optional cornerstones for the outer border: (4) 2½″ squares (black)
Tip: Keep your ¼″ seam true. Press after every seam (toward darker fabrics or open—your choice).
Make the Units
1) Half-Square Triangles (8 total)
- Pair 1 orange + 1 black 2½″ square RST. Draw a diagonal, sew ¼″ on each side, cut on the line, press to black, and trim to 2½″.
- You’ll use these to “clip” pumpkin corners and to round the smile.
2) Plan the 8×8 Face Grid (center panel = 16½″ unfinished)
Lay out an 8 × 8 grid of 2½″ pieces on a board or design wall using this guide:
- Pumpkin body: fill the middle with scrappy orange squares arranged as a soft octagon (about 6×6 area).
- Clip corners: place 4 orange/black HSTs at the four outer pumpkin corners with the black triangles pointing outward (this rounds the pumpkin).
- Eyes: use 2 black squares about row 2–3 down from the top and spaced ~2 squares apart. Angle them by replacing the outer corners with 2 black/orange HSTs if you like a slanted look.
- Nose: 1 black square centered a couple of rows below the eyes (or make a small on-point diamond by sewing two tiny orange/black HSTs together).
- Mouth: a shallow grin using 4–5 black squares across the lower third, ending with 2 HSTs (black triangles pointing inward) to curve the smile.
- Background: fill remaining positions in the grid with mostly black prints, with an occasional gray/low-volume for sparkle.
Exact placement can be playful—audition until it “reads” like a pumpkin face from a few steps back.
Sew the Face Panel
- Sew squares into eight rows of eight. Press rows in alternating directions to nest seams.
- Join rows to complete a 16½″ × 16½″ pumpkin panel.
Add Borders
1) Skinny Inner Border (solid black)
- Sew the 1½″ × 16½″ strips to the top/bottom; press out.
- Sew the 1½″ × 18½″ strips to the sides; press.
- Center now measures 18½″ square.
2) Piano-Key Outer Border
- Join 2½″ × 4½″ rectangles end-to-end to make two 18½″ strips and two 22½″ strips. (Use cornerstones if desired.)
- Attach the shorter strips to the top/bottom; press.
- Attach the longer strips to the sides; press.
- Top should measure about 24½″ square (24″ finished).
Baste, Quilt & Bind
- Layer backing (WS up), batting, and quilt top (RS up). Baste.
- Quilting ideas:
- Gentle wavy lines across the pumpkin.
- Echo around eyes/nose/mouth ¼″ from seams.
- Straight-line quilting in the borders to frame the center.
- Trim and bind (black or a fiery orange/black print looks great).
Variations
- Make a cat face by replacing the grin with a triangle nose and whisker lines.
- Upsize to a throw: use a 12×12 grid of 2½″ squares (24″ center), then scale borders.
- Add glow: swap a few orange squares for yellow near the features.
That’s it—your cheerful Jack-o’-lantern mini is ready to hang for Halloween! Want a printable PDF with a color chart of the 8×8 grid? I can generate it for you.