Radiant Blue Harmony: A Geometric Quilt That Captures the Sky and Sea
There’s something deeply peaceful and restorative about the color blue. It evokes calm oceans, clear skies, and cool breezes on warm days. This quilt design brings all of that serenity into your home in the form of a stunning geometric masterpiece. Whether you’re a seasoned quilter or just beginning your journey, this project is a true celebration of movement, symmetry, and the joy of color play.
This radiant quilt captures attention not just for its size but for its precise piecing and harmonious blend of blues, greens, and sunny yellow accents. It’s perfect for those who love bold structure softened by color variation. Whether draped across a bed, hung as an art piece, or gifted to a loved one, it tells a story of patience, skill, and creativity.
In this step-by-step guide, you’ll learn how to create this quilt using half-square triangles, strip piecing, and a strong border that frames the central design like a work of art. Let’s begin!
Materials Needed:
- Fabric in various shades of blue, green, and yellow
- Background fabric (light blue or white)
- Rotary cutter and mat
- Quilting ruler
- Sewing machine
- Thread to match
- Iron and ironing board
- Quilt batting and backing fabric
- Measuring tape
- Binding fabric
Step-by-Step Instructions:

1. Choose and Prepare Your Fabrics
Select a range of blue tones from deep navy to sky blue, complemented by fresh greens and pops of yellow. Prewash and iron all your fabrics for best results.
2. Cut Your Strips and Squares
Cut long strips from each color, approximately 2.5” to 3” wide. You’ll use these for strip piecing the geometric blocks. Also, cut background squares and rectangles based on your desired quilt size.
3. Create Half-Square Triangles (HSTs)
Pair contrasting fabric strips (such as blue and white or green and yellow), sew along both long edges, and cut on the diagonal to create HST units. Square them up to a consistent size, such as 5”.
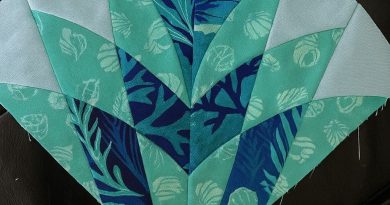
4. Arrange the Blocks
Lay out your quilt blocks in a diamond or chevron-style pattern, alternating direction for movement. Use a design wall or open floor space to preview your layout.
5. Sew the Rows Together
Stitch the blocks into rows, pressing seams open or to one side. Then sew the rows together, ensuring that points and corners align for a clean geometric look.
6. Add the Borders
Use a wide border in a floral or contrasting print (as in the photo) to frame the design. Measure carefully and attach the borders evenly on all sides.
7. Layer the Quilt Sandwich
Lay out your backing fabric, quilt batting, and quilt top. Smooth out any wrinkles and baste using pins or spray adhesive.
8. Quilt as Desired
Use straight-line quilting, echoing the angles of your design, or opt for free-motion quilting for a flowing contrast.
9. Bind the Quilt
Cut binding strips, join end to end, fold in half, and attach around the edges of your quilt using your preferred method.
10. Finishing Touches
Label your quilt, admire your work, and enjoy! Wash gently and dry flat or on low heat to soften the finish.
Conclusion:
This geometric blue quilt is not only a visual statement but a project that invites mindfulness and joy with every stitch. It’s a reminder that structure and creativity can coexist beautifully—and when they do, magic happens. Happy quilting!