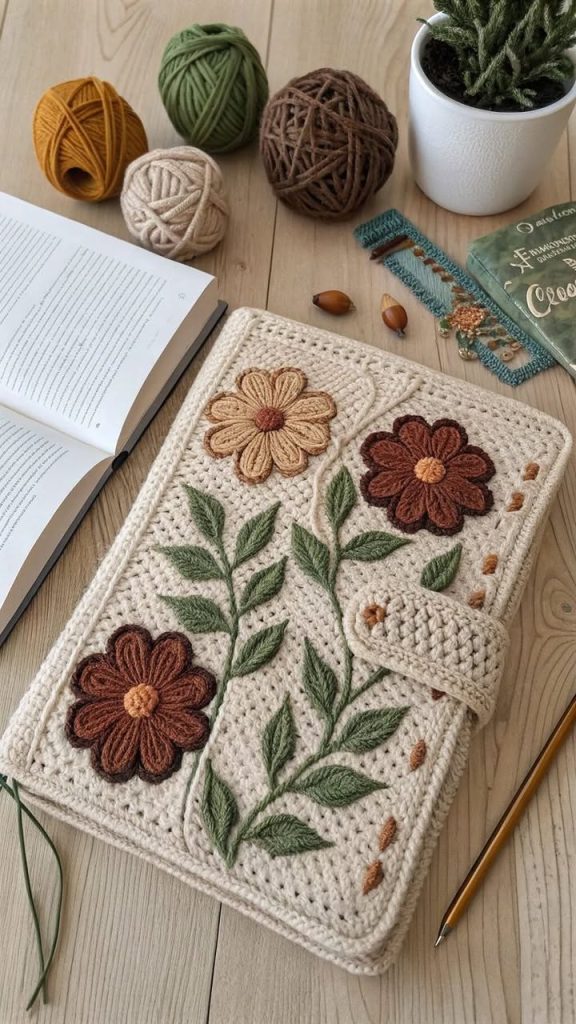
Floral Crochet Notebook Cover – A Whimsical Handmade Project
Introduction:
There’s something undeniably magical about combining crochet with embroidery. When both techniques meet, the result is a piece that carries not only the softness of yarn but the beauty of hand-drawn nature. This floral crochet notebook cover brings that harmony to life.
Perfect for journaling lovers, students, or crafters who love to turn everyday objects into personalized treasures, this project is as practical as it is beautiful. The warm, earthy tones, soft petals, and leafy vines are an ode to fall days, slow stitching, and peaceful moments with a cup of tea.
Whether you’re making it for yourself or as a heartfelt gift, this notebook cover wraps your written thoughts in handmade love. Let’s bring it to life stitch by stitch.
🌼 Materials Needed:
- 100% cotton yarn in:
- Beige (main background)
- Brown, ochre, and terracotta (flowers)
- Green (leaves and stems)
- 3.5 mm crochet hook
- Darning needle
- Embroidery needle
- Notebook (A5 size or preferred size)
- Button for closure
- Scissors
- Stitch markers (optional)
🧶 Step-by-Step Pattern
Step 1: Crochet the Base Panel
- Measure your notebook (height and width when open, including spine).
- Chain enough stitches to match the width of your notebook + 1 cm.
- Single crochet rows until it reaches the height of your notebook (including seam allowance).
- Create flaps by folding the side edges inward and sewing or crocheting to form pockets that will hold the notebook cover.
Step 2: Add the Strap Closure
- On the back side, attach yarn and chain 20–25 stitches (or enough to wrap around your button).
- Secure with slip stitch and fasten off.
- Sew a wooden or matching button to the front panel.
Step 3: Embroider the Flowers and Leaves
- Use an embroidery needle and surface embroidery technique.
- For petals: Use long stitches radiating from a center point to form daisy-like flowers.
- For leaves and stems: Use chain stitches for stems and satin stitches to fill in leaves.
- Outline or accent the shapes using a slightly darker yarn if desired.
💡 Tips for a Professional Finish:
- Block your crochet base before embroidering to ensure an even surface.
- Use a fine embroidery hoop if needed to keep your stitches smooth.
- Stick to a cohesive color palette for a refined look.
- Add a label or embroidered initials for a personal touch.
📘 Why This Project is Special
A crochet notebook cover like this one goes beyond craft—it’s a companion for dreams, prayers, sketches, or recipes. Each stitch carries intention, and each flower blooms with creativity.
Whether displayed on a desk or carried in a tote, it whispers: “This story matters.” So pick up your hook, choose your favorite blooms, and start stitching love into every loop.