Sunbonnet Sue Country Scene Quilt Tutorial – Step-by-Step Guide (English)
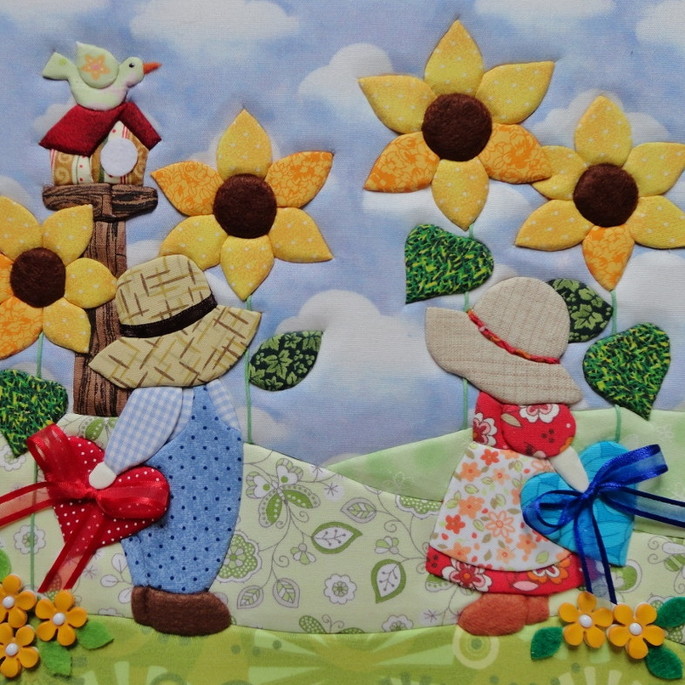
Introduction: Quilting is a beloved tradition that allows us to express nostalgia, warmth, and creativity with fabric. This charming countryside quilt scene, featuring the timeless Sunbonnet Sue characters and vibrant sunflowers, captures the essence of simplicity and innocence. With rolling hills, a peaceful river, and a cozy cottage in the distance, this piece brings a storybook image to life using fabric, thread, and a bit of imagination.
This quilt style is perfect for those who appreciate detailed appliqué and whimsical storytelling through textile art. Ideal for nursery décor, wall hangings, or as a keepsake gift, this pattern combines soft textures, vivid fabrics, and charming motifs to create a heartfelt work of art.
Whether you’re new to quilting or an experienced maker looking for a joyful and expressive project, this quilt will warm hearts and brighten any space.
Materials Needed:
- Base fabric for background (light sky print or solid)
- Assorted cotton prints for hills, water, trees, house, flowers, and sunbonnet girls
- Fusible web
- Embroidery floss (brown, green, red, yellow, pink)
- Trim: lace, ribbon, mini flowers, etc.
- Braided yarn or embroidery floss for hair
- Sewing machine & thread
- Scissors, iron, rotary cutter, mat
- Batting and backing fabric
Step 1: Prepare the Background
- Cut a square piece of base fabric (e.g., 15” x 15”).
- Using green, blue, and printed fabrics, create layered hills, lake, and sky.
- Fuse layers onto the base fabric and stitch along the edges.
Step 2: Appliqué the Landscape Details
- Cut out small pieces for the house (roof, walls, windows), trees, and bushes.
- Arrange them on the background and fuse in place.
- Use embroidery floss or machine stitching to outline and add detail.
Step 3: Create the Sunbonnet Girls
- Cut out body, dress, hat, and sleeve shapes from fabric.
- Fuse or hand-stitch them onto the scene, layering the dress and bonnet.
- Add braided yarn for hair and small lace/ribbon trim to the dresses.
Step 4: Add the Sunflowers
- Cut petal and leaf shapes from yellow and green fabric.
- Fuse or sew them down with a circular brown checkered center.
- Add embroidery for extra detail.
Step 5: Quilting and Finishing
- Create a quilt sandwich with batting and backing fabric.
- Quilt around major shapes and along the hill curves.
- Bind the edges using a matching fabric strip (1” double-folded bias tape works well).
Finishing Touches:
- Embroider fine details like windowpanes, flower stems, and hatbands.
- Add hand-sewn embellishments for extra charm.
- Frame your square or use it as a block in a larger quilt.
This Sunbonnet Sue country scene quilt block celebrates the innocence and whimsy of handmade textile art. Let your creativity shine through every fabric choice and stitch!
Materials Needed:
- Base fabric for background (light sky print or solid)
- Assorted cotton prints for hills, water, trees, house, flowers, and sunbonnet girls
- Fusible web
- Embroidery floss (brown, green, red, yellow, pink)
- Trim: lace, ribbon, mini flowers, etc.
- Braided yarn or embroidery floss for hair
- Sewing machine & thread
- Scissors, iron, rotary cutter, mat
- Batting and backing fabric
Step 1: Prepare the Background
- Cut a square piece of base fabric (e.g., 15” x 15”).
- Using green, blue, and printed fabrics, create layered hills, lake, and sky.
- Fuse layers onto the base fabric and stitch along the edges.
Step 2: Appliqué the Landscape Details
- Cut out small pieces for the house (roof, walls, windows), trees, and bushes.
- Arrange them on the background and fuse in place.
- Use embroidery floss or machine stitching to outline and add detail.
Step 3: Create the Sunbonnet Girls
- Cut out body, dress, hat, and sleeve shapes from fabric.
- Fuse or hand-stitch them onto the scene, layering the dress and bonnet.
- Add braided yarn for hair and small lace/ribbon trim to the dresses.
Step 4: Add the Sunflowers
- Cut petal and leaf shapes from yellow and green fabric.
- Fuse or sew them down with a circular brown checkered center.
- Add embroidery for extra detail.
Step 5: Quilting and Finishing
- Create a quilt sandwich with batting and backing fabric.
- Quilt around major shapes and along the hill curves.
- Bind the edges using a matching fabric strip (1” double-folded bias tape works well).
Finishing Touches:
- Embroider fine details like windowpanes, flower stems, and hatbands.
- Add hand-sewn embellishments for extra charm.
- Frame your square or use it as a block in a larger quilt.
This Sunbonnet Sue country scene quilt block celebrates the innocence and whimsy of handmade textile art. Let your creativity shine through every fabric choice and stitch!.
Materials Needed:
- Base fabric for background (light sky print or solid)
- Assorted cotton prints for hills, water, trees, house, flowers, and sunbonnet girls
- Fusible web
- Embroidery floss (brown, green, red, yellow, pink)
- Trim: lace, ribbon, mini flowers, etc.
- Braided yarn or embroidery floss for hair
- Sewing machine & thread
- Scissors, iron, rotary cutter, mat
- Batting and backing fabric
Step 1: Prepare the Background
- Cut a square piece of base fabric (e.g., 15” x 15”).
- Using green, blue, and printed fabrics, create layered hills, lake, and sky.
- Fuse layers onto the base fabric and stitch along the edges.
Step 2: Appliqué the Landscape Details
- Cut out small pieces for the house (roof, walls, windows), trees, and bushes.
- Arrange them on the background and fuse in place.
- Use embroidery floss or machine stitching to outline and add detail.
Step 3: Create the Sunbonnet Girls
- Cut out body, dress, hat, and sleeve shapes from fabric.
- Fuse or hand-stitch them onto the scene, layering the dress and bonnet.
- Add braided yarn for hair and small lace/ribbon trim to the dresses.
Step 4: Add the Sunflowers
- Cut petal and leaf shapes from yellow and green fabric.
- Fuse or sew them down with a circular brown checkered center.
- Add embroidery for extra detail.
Step 5: Quilting and Finishing
- Create a quilt sandwich with batting and backing fabric.
- Quilt around major shapes and along the hill curves.
- Bind the edges using a matching fabric strip (1” double-folded bias tape works well).
Finishing Touches:
- Embroider fine details like windowpanes, flower stems, and hatbands.
- Add hand-sewn embellishments for extra charm.
- Frame your square or use it as a block in a larger quilt.
This Sunbonnet Sue country scene quilt block celebrates the innocence and whimsy of handmade textile art. Let your creativity shine through every fabric choice and stitch!