Crochet Baby Blanket with 3D Floral Squares – Step by Step Guide
There’s something incredibly special about creating a handmade crochet blanket, especially when it’s made with love, care, and delicate details. This beautiful baby blanket features a charming checkerboard pattern of red and white squares, each adorned with a three-dimensional flower at its center. It’s the perfect heirloom piece for a newborn, a thoughtful baby shower gift, or even a cozy décor accent for a nursery.
The combination of color, texture, and dimensional petals creates a visual delight, and while it looks intricate, it’s made entirely from repeating granny-style squares joined together. If you’re looking for a crochet project that is relaxing, satisfying, and impressive—this is the one.
Let’s walk through the materials, the floral square construction, and how to assemble this stunning crochet baby blanket.
🧶 Materials Needed:
- Baby-safe yarn or soft acrylic yarn in red and white (and a small amount for flower centers)
- Crochet hook (2.5 mm – 3.5 mm depending on yarn weight)
- Yarn needle for joining squares and weaving in ends
- Scissors
- Stitch markers (optional)
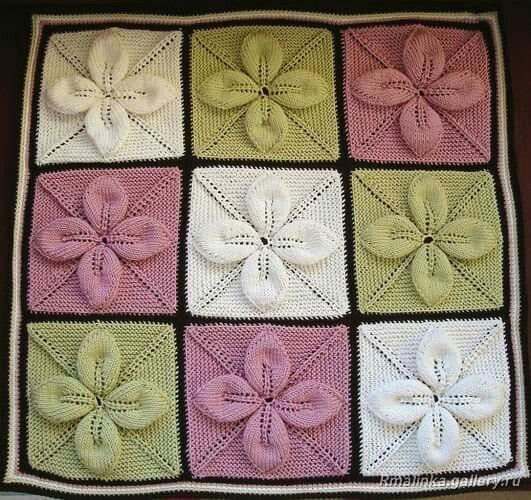
🔲 Crochet Flower Square (Make 36 squares):
Alternate colors to create a checkerboard layout (18 red and 18 white squares).
Step 1 – Starting Circle:
- Chain 4 and join with a slip stitch to form a ring.
- Chain 3 (counts as first dc), then work 11 double crochets (dc) into the ring. Join with a slip stitch to the top of the chain-3. (12 dc total)
Step 2 – 3D Flower Petals:
- Repeat the following petal pattern 6 times:
- Chain 5.
- Work 1 treble crochet (tr) in the same stitch.
- Chain 5 again and slip stitch into the next dc.
- Skip one stitch and repeat until you have 6 petals.
- Optional: add a contrasting center by sewing or gluing a tiny crochet flower or bead in the middle.
Step 3 – Forming the Square Around the Flower:
- Attach your square background color yarn between petals.
- Round 1:
- Chain 3 (counts as dc), work 2 more dc in same space.
- In next space, 3 dc.
- At each corner: (3 dc, ch 2, 3 dc) in same space.
- Continue around to create a square shape.
- Work 2–3 rounds to reach the desired size (~10–12 cm).
🧩 Joining the Squares:
- Arrange squares in a red-and-white checkerboard pattern (6×6 layout).
- Join using:
- Slip stitch through back loops only, or
- Whipstitch with a yarn needle for a clean seam.
🪡 Edging and Border:
- Once all squares are joined, work a border:
- Round 1: Single crochet (sc) evenly around the blanket.
- Round 2: Shell stitch border (work 5 dc in one stitch, skip 2, sc in next, repeat).
- Optional: Add a ribbon, bow, or lace for a vintage touch.
🧸 Optional Embellishments:
- Crochet baby booties or a hat in matching colors to complete the set.
- Sew on tiny buttons or pearls to flower centers for extra charm.
This project is a beautiful balance between classic and playful, perfect for crocheters who enjoy texture and color. Whether you’re gifting it to someone special or keeping it as a keepsake, this 3D floral baby blanket is sure to become a treasured piece.