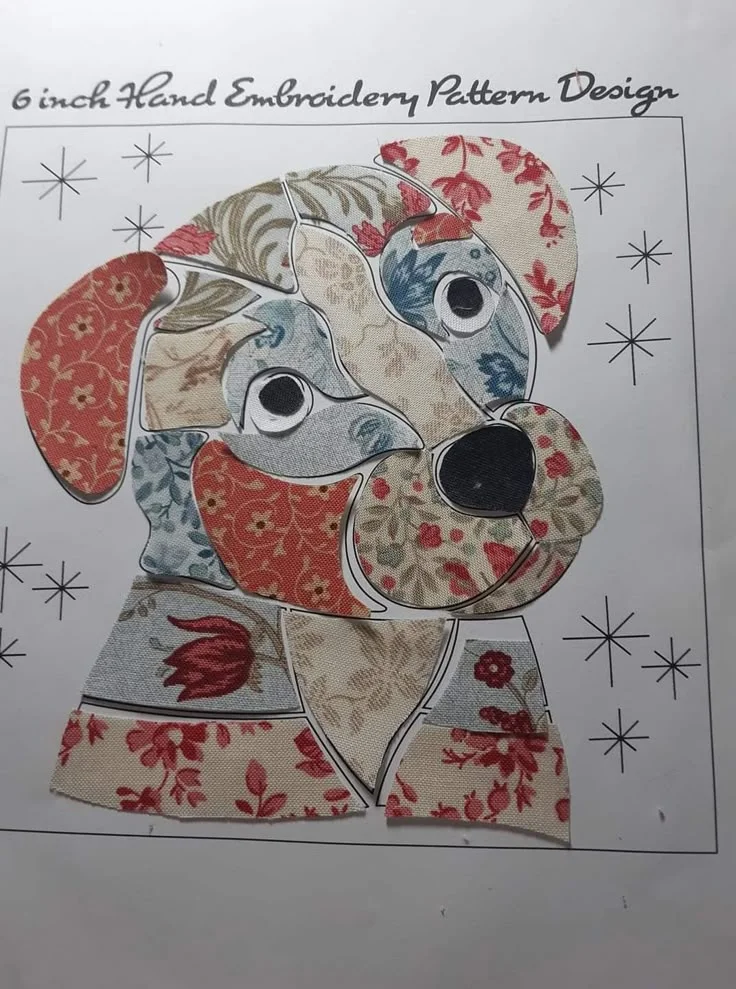
Fabric Appliqué Dog Portrait – A Whimsical Hand-Stitched Keepsake
Transform scraps of beautiful floral fabrics into an adorable dog portrait with this charming hand embroidery and appliqué project. Perfect for dog lovers, this design brings personality and patchwork together to create a unique and heartwarming textile piece.
This 6-inch pattern combines fabric placement and light embroidery to form a puppy’s face using various fabric swatches. Each segment of the dog’s face and body is made with a different floral print, creating a colorful and layered mosaic effect. It’s a fun way to use up your favorite fabric scraps and showcase your creativity.
Whether you use it in a hoop for wall art, incorporate it into a quilt block, or sew it onto a tote bag or cushion, this dog portrait will add charm and personality to your handmade items. This project is ideal for beginners in appliqué and embroidery, but it also gives seasoned sewists a delightful way to relax and experiment with fabric textures.
It also makes a thoughtful handmade gift for pet owners, children’s rooms, or a pet-themed craft fair.
✂️ Materials Needed:
- Light-colored cotton base fabric (for background)
- Assorted floral or printed fabric scraps
- Lightweight fusible web or freezer paper
- Embroidery hoop (6-inch size recommended)
- Embroidery floss (black, white, or coordinating)
- Heat erasable fabric pen or water-soluble marker
- Fabric scissors and paper scissors
- Needle for hand-stitching
- Optional: batting and backing if making a mini quilt or wall hanging
🪡 Step-by-Step Instructions:
1. Print or trace the pattern:
Download or sketch the dog pattern and trace it onto your base fabric using a heat-erasable or water-soluble pen. Keep the lines clean and minimal.
2. Prepare your fabric pieces:
Using the traced pattern as a guide, cut each section out of different printed fabric scraps. You can trace the individual segments onto fusible web and then iron them onto the fabric before cutting.
3. Arrange and fuse the pieces:
Carefully place the fabric pieces on top of your base, aligning them with the drawn outline. Use an iron to lightly fuse them in place if using fusible web.
4. Stitch the outlines:
Use embroidery floss (2 or 3 strands) and a simple stitch like backstitch or running stitch to outline each fabric piece. This helps define the edges and adds a handmade touch.
5. Add details:
Embroider the eyes, nose, and any additional facial features. You can also add whiskers, stars, or paw prints around the portrait.
6. Finish the project:
Place in an embroidery hoop for display or add borders and batting to turn it into a small quilt block. You can also frame it, sew it onto a bag, or use it as a panel for a pillow.