Sunbonnet Quilt: A Classic Quilting Tradition
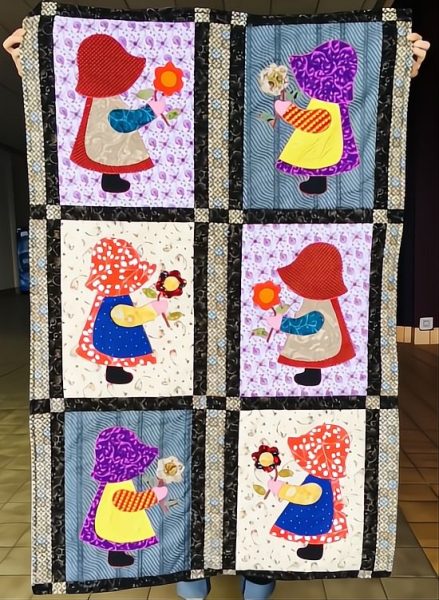
A Sunbonnet Quilt is a timeless and charming quilting project featuring appliqué designs of little girls wearing sunbonnets. This traditional pattern has been beloved for generations and remains a favorite among quilters who appreciate vintage aesthetics and storytelling through fabric.
In this tutorial, we’ll walk you through the process of creating your own Sunbonnet Quilt, from selecting materials to assembling and finishing your piece. Whether you’re a beginner or an experienced quilter, this guide will help you bring this nostalgic design to life.
Materials You Will Need
Before starting, gather the following materials:
- Cotton fabric in different colors and prints – Choose fabrics for the dresses, hats, and backgrounds.
- Neutral background fabric – Serves as the base for your Sunbonnet blocks.
- Coordinating sewing thread – Match or contrast with your appliqué pieces.
- Sewing machine – For piecing the quilt and stitching appliqués.
- Sewing needles and pins – Essential for securing fabric layers.
- Fabric scissors or rotary cutter – For precise cutting.
- Quilting ruler and cutting mat – To ensure accurate measurements.
- Batting (quilt filling) – Adds volume and warmth to the quilt.
- Backing fabric – The fabric for the back of your quilt.
- Iron and ironing board – For pressing fabric pieces.
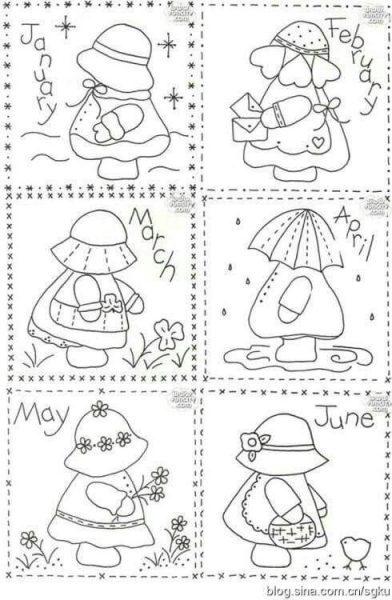
- Sunbonnet pattern – Available online or in quilting books.
- Fabric pencil or marking tool – To trace the appliqué shapes.
- Heat-adhesive paper (optional) – For appliqué bonding before sewing.
Step-by-Step Guide to Making a Sunbonnet Quilt
1. Preparing Your Materials
- Select your fabrics – Choose colorful prints for the dresses and bonnets, and a neutral background fabric for each quilt block.
- Cut the fabric blocks – Standard quilt block sizes range from 8×8 to 10×10 inches, but you can adjust based on your design preferences.
2. Creating the Sunbonnet Appliqués
Trace the pattern – Use your Sunbonnet pattern to trace the different appliqué pieces (dress, hat, body) onto fabric. If using iron-on paper, apply it to the fabric before cutting.
- Cut the appliqués – Carefully cut out each fabric piece for the Sunbonnet girl.
3. Attaching the Appliqués
- Position the appliqués – Arrange the pieces onto each background fabric block, adjusting for the best placement.
- Secure the appliqués – Use pins or iron-on adhesive to temporarily hold them in place.
- Sew the appliqués – Stitch around the edges using a zigzag, blanket, or straight stitch for a clean and professional finish.
4. Assembling the Quilt Top
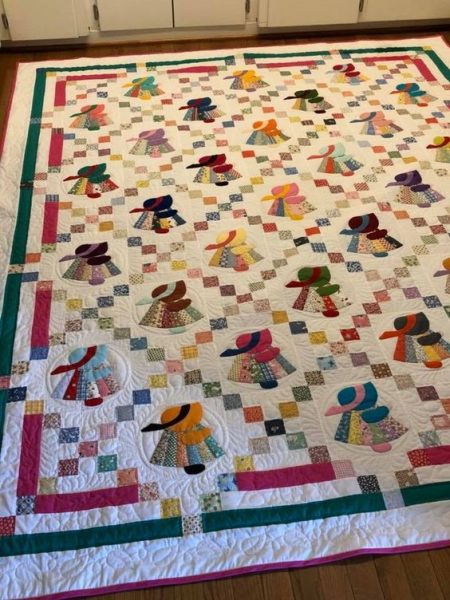
- Arrange your blocks – Lay out the completed Sunbonnet blocks in a pleasing pattern.
- Sew the blocks together – Join the blocks in rows, then sew the rows together to form the quilt top.
- Add a border (optional) – Frame the quilt with a fabric border to enhance the design.
5. Quilting the Layers Together
- Prepare the layers – Cut the batting and backing fabric slightly larger than the quilt top.
- Make the quilt sandwich – Layer the backing fabric, batting, and quilt top together. Smooth out any wrinkles and secure with safety pins.
- Quilt the layers – Use hand quilting or a sewing machine to stitch through all layers. You can outline the Sunbonnet appliqués or create decorative quilting patterns.
6. Finishing the Quilt
- Trim the edges – Cut off excess batting and backing fabric to align with the quilt top.
- Add binding – Cut fabric strips, sew them together, and attach them around the quilt’s edges for a neat finish.
- Final press – Iron the completed quilt for a polished look.
Personalization & Care Tips
- Add embroidery details – Stitch facial features, accessories, or embellishments to personalize your Sunbonnet figures.
- Use a delicate wash cycle – Hand wash or machine wash on a gentle cycle to preserve your quilt.
- Store carefully – Keep in a dry place, folded lightly to avoid deep creases.
Conclusion
Creating a Sunbonnet Quilt is a delightful way to connect with quilting traditions while expressing creativity. Whether you make it for yourself, as a gift, or as a cherished heirloom, this project brings warmth and nostalgia to any home. Enjoy the process, take your time, and happy quilting!