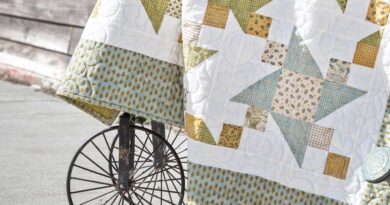
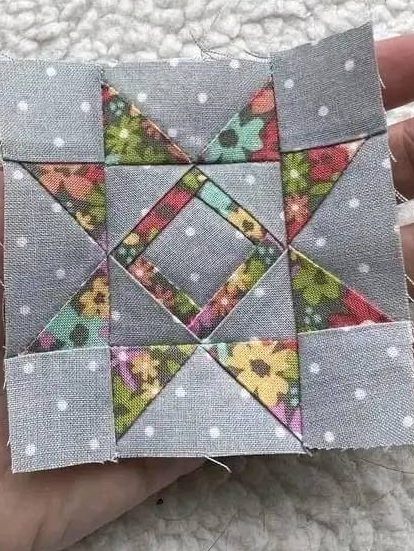
Tiny Economy Star Quilt Block – Step-by-Step Tutorial (3″ finished)
Mini blocks have a special kind of magic: they look intricate, use only a handful of scraps, and sew up surprisingly fast. This tiny star combines a Square-in-a-Square (Economy) center with four mini flying-geese to create crisp points in a palm-sized package.
The sample uses a soft polka-dot background with a ditsy floral print for contrast. Keep the background calm and let a lively print do the talking—or invert the palette for a bold, modern look. Because the pieces are so small, we’ll oversize and trim to perfection (or you can foundation-paper-piece the center for absolute accuracy).
Mini piecing is easier than it looks if you set yourself up for success: starch your fabric, shorten your stitch length (1.8–2.0 mm), and sew a scant ¼″ seam. Press seams open or to one side consistently so the block stays flat.
Use this block as a charm for a zipper pouch, a coaster, or make a whole set for a miniature sampler. Ready? Let’s sew!
Finished & Unfinished Sizes
- Block: 3″ finished (3½″ unfinished)
- Center (economy) unit: 1½″ finished (2″ unfinished)
- Flying geese (each): ¾″ × 1½″ finished (1¼″ × 2″ unfinished)
- Corner squares: 1¼″ unfinished
Fabric & Cutting (for one 3″ block)
Background (gray with dots)
- 4 squares 1¼″ × 1¼″ (outer corners)
- 8 squares 1¼″ × 1¼″ (sky for geese)
Feature print (floral)
- 4 rectangles 2″ × 1¼″ (goose rectangles)
Economy center (two options)
- Option A – Oversized traditional (no paper)
- Center square (background): 1⅝″
- Side triangles (feature print): cut two 2⅜″ squares, then cut once diagonally to yield 4 triangles
- Option B – FPP (recommended for minis)
- Print or draw a 2″ unfinished Economy-block template. Use background for the center (A1) and feature print for the four sides (A2–A5).
Tip: Lightly starch pieces before cutting for crisp trimming.
Step-by-Step
1) Make the Economy (Square-in-a-Square) Center – 2″ unfinished
Option A – Traditional (oversized & trim):
- With the 1⅝″ center square on point, sew one print triangle to each side using ¼″ seams.
- Press away from the center after each addition.
- Trim the unit to 2″ × 2″ unfinished, keeping the center diamond straight and the points ¼″ from the edges.
Option B – FPP:
- Shorten stitch length to ~1.5–1.8 mm.
- Piece the center (A1) and add the four print sides (A2–A5) to the template.
- Trim on the outer line to 2″ unfinished and remove the paper (or leave it until the block is assembled).
2) Sew Four Tiny Flying-Geese – 1¼″ × 2″ unfinished
- Place one 1¼″ background square RST on the left end of a 2″ × 1¼″ print rectangle. Draw a diagonal from top-inner to bottom-outer corner, sew on the line, trim ¼″ away, and press out.
- Repeat on the right end with a second background square, mirroring the diagonal so the print forms the “goose.”
- Trim the unit to 1¼″ × 2″. Make 4 units total.
3) Assemble the Block
- Layout: flying-geese on all four sides of the economy center, geese pointing in; add a 1¼″ background square to each corner.
- Sew the top row (square–goose–square) and bottom row; press seams toward the squares.
- Sew the center column (goose–economy–goose); press away from the economy center.
- Join rows to the center column, nesting seams.
- Square to 3½″ unfinished (3″ finished).
Pro Tips for Mini Precision
- Use a scant ¼″ and trim after each unit.
- Press with the tip of the iron; avoid stretching bias edges.
- If points look tight, increase seam allowance ever so slightly on the next unit or trim less aggressively.
- Chain-piece multiples and keep units clipped together by block to stay organized.