Stained Glass Window Quilt – Step by Step
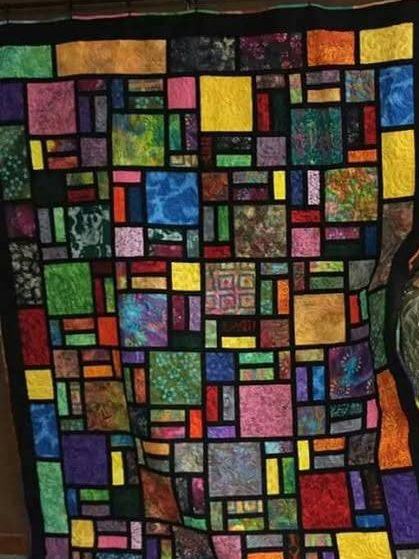
Quilting has always been about creativity and expression, and the stained glass window quilt is the perfect example of how traditional patchwork can transform into a bold, artistic statement. Inspired by the look of cathedral windows, this design uses bright, contrasting fabrics framed in black sashing to mimic the vibrant glow of stained glass against a dark lead outline. It’s striking, modern, and endlessly customizable.
One of the best features of this quilt is its versatility. You can use scraps, fat quarters, or coordinated bundles, making it an excellent project for fabric you already have. The more variety in your fabric choices—florals, batiks, solids, or prints—the more dynamic and artistic the finished quilt will appear.
This quilt is also approachable for beginners, even though it looks complex. The key is working with simple rectangles and squares of various sizes, adding black sashing to each piece, and then assembling them like a puzzle. The irregularity of block sizes adds to its charm, so there’s no need for perfection—every quilt will look unique.
Finished, this quilt becomes a show-stopping piece for a bed, sofa, or wall hanging. Whether you make it small or king-size, it will always draw attention and admiration. Let’s get started on how to recreate this colorful stained glass window quilt for yourself.
Materials
- Fabric: assorted bright prints, solids, or batiks (scraps and fat quarters work perfectly)
- Sashing fabric: solid black cotton, about 1½–2 yards depending on size
- Backing fabric: to fit finished quilt size
- Batting of choice
- Rotary cutter, ruler, cutting mat
- Sewing machine with ¼″ foot
- Thread (black for sashing, neutral for piecing)
Cutting & Layout
- Choose fabrics: Cut an assortment of rectangles and squares in different sizes. Examples:
- 3″ × 5″, 4″ × 6″, 5″ × 7″, 6″ × 8″, and some smaller filler squares like 3″ × 3″ or 4″ × 4″.
(No need to match exact sizes—variety is the charm!)
- 3″ × 5″, 4″ × 6″, 5″ × 7″, 6″ × 8″, and some smaller filler squares like 3″ × 3″ or 4″ × 4″.
- Cut sashing strips:
- Black strips cut at 1½″ wide (this finishes at 1″ when sewn).
- You’ll need enough to border each piece and to join rows.
- Arrange layout:
- On a design wall or floor, arrange your colored rectangles randomly.
- Try to spread out colors and textures evenly.
- Insert smaller blocks in gaps to create a “mosaic” look.
Sewing Instructions
- Frame each block: Sew black sashing strips to the sides of each rectangle/square, then trim flush. Add strips to the top and bottom, creating a black frame around each piece. Press seams open.
- Assemble into rows: Once framed, arrange the blocks into horizontal rows. Join them with additional vertical black sashing between blocks. Press seams open.
- Join rows together: Add long horizontal black strips between each row to separate them. Continue until all rows are joined.
- Outer border: Finish with a wider black border (2½–3″) to frame the entire quilt.
- Quilting: Use straight-line quilting in black thread to enhance the stained glass effect, or free-motion quilt in patterns like swirls or meanders.
- Binding: Bind with black for continuity, or add a bright pop of color if you prefer.
✅ Finished size will depend on how many blocks you create, but this method works for crib-size up to king-size.