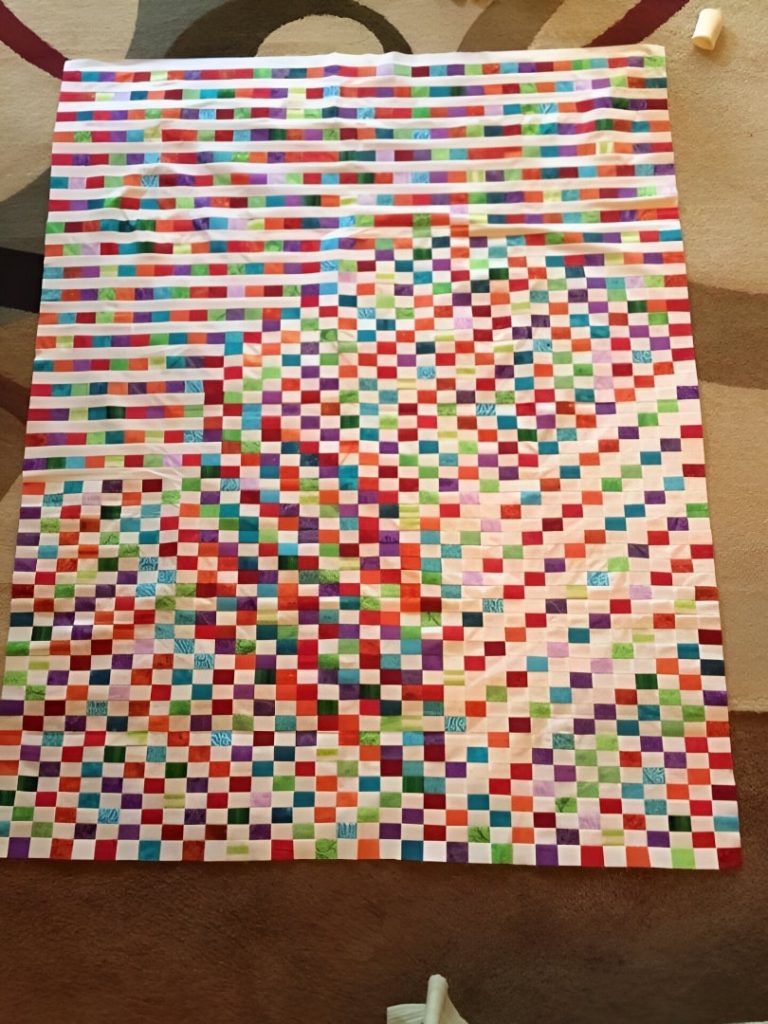
Rainbow Pixel Ripple Quilt – Step-by-Step Tutorial
This quilt is pure joy: tiny “pixel” squares in lots of colors dancing across a clean white background. The top section has calmer, straight “strip” rows, and then it blends into a more playful, scattered ripple where the colors drift and shift like a digital wave.
It’s also a fantastic project for scraps, charm squares, and leftover strips—because the magic comes from mixing lots of different prints in the same color family.
Best of all: you don’t have to be “perfect” with the color placement. This style looks even better when it feels a little random and organic, just like the quilt in your photo.
Materials
- White/background fabric: ~2.5 to 4 yards (depends on quilt size)
- Scraps/prints in many colors: at least 150–400 small squares (again, depends on size)
- Backing fabric: quilt top size + 4″ on each side
- Batting: same as backing
- Binding: ½ yard (or ⅝ yard for bigger sizes)
- Thread, rotary cutter, ruler, pins/clips, iron
Finished Size Options (choose one)
Baby/Crib (approx. 40″ x 50″)
- Pixel squares finish around 1″
- Great for scraps
Throw (approx. 60″ x 75″)
- Same method, just more rows
You can scale this pattern easily: it’s built row-by-row.
Key Block Sizes (Recommended)
To get a “postage stamp” look like your quilt:
- Pixel squares (cut): 1½” x 1½”
(this finishes at 1″ once sewn) - White sashing strips (cut): 1½” tall x width of quilt
(also finishes at 1″ tall)
So the quilt becomes a grid of 1″ finished pixels.
Step 1 — Plan Your Look (Easy Version)
This quilt has two moods:
A) “Calm Stripe” Area (top section)
Mostly straight horizontal rows with scattered colored squares.
B) “Pixel Ripple” Area (main section)
Rows where the colored squares shift left/right a little each row, creating movement.
You can sketch a simple idea on graph paper, but you can also improvise as you sew.
Step 2 — Cutting
1) Cut your pixel squares
Cut lots of 1½” squares from your colorful fabrics.
Tip:
Mix solids + small prints. Avoid huge prints (they disappear at this tiny size).
2) Cut background white strips
Cut 1½” x WOF (width of fabric) strips from your white fabric.
You’ll use these as the “white rows” and also as filler pieces inside rows.
Step 3 — Make “Pixel Strips” (the fun part)
You’ll build rows that look like:
white – pixel – white – pixel – white – pixel – white…
How:
- Cut some white strips into 1½” x 3½”, 1½” x 5½”, and 1½” x 7½” pieces (variety helps).
- Sew like this:
- White piece + 1 pixel square + white piece + 1 pixel square…
- Keep each strip 1½” tall.
- Press seams toward the white (it keeps the color squares crisp).
Make a bunch of these pixel strips in different lengths.
Step 4 — Build Each Row Across the Quilt
Now you create one full row at a time.
For each row:
- Lay out:
- Some long white pieces
- Some pixel strips
- A few single pixel squares between white pieces
- Continue until the row is the full quilt width.
- Sew the row together (keeping everything 1½” tall).
- Press.
Repeat to create many rows.
Step 5 — Create the “Calm Stripe” Top Section
To match the look in your photo, start with 8–12 rows that are mostly straight and evenly spaced.
A simple formula:
- Row 1: Mostly white + scattered pixels
- Row 2: White sashing (solid white strip)
- Row 3: Pixel row again
- Row 4: White sashing
…repeat…
This gives that clean “striped header” effect.
Step 6 — Create the “Ripple / Scatter” Main Section
Here’s how to get the moving, drifting look:
Method (super easy):
- In Row 1, place a cluster of pixels slightly left.
- In Row 2, shift that cluster a few inches right.
- In Row 3, shift again.
- Sometimes “break” the cluster into smaller pieces.
- Occasionally toss a few single pixels far away from the main group.
You’re basically drawing with pixels.
Pro tip:
Take a quick photo of your layout every 5–6 rows. It helps you see the movement and balance.
Step 7 — Sew Rows Together
Once you have all your rows:
- Lay them all out on the floor (or design wall).
- Rearrange until it feels balanced.
- Sew rows together in order.
- Press seams open or alternate directions row-to-row to help nesting.
Step 8 — Square Up the Quilt Top
Trim the edges straight:
- First trim one side straight
- Then trim the opposite side
- Repeat top/bottom
If you want a crisp frame like the photo, add:
- A thin white border: 1½” strips
or - A thicker border: 3½” strips
Step 9 — Quilting Ideas (that look amazing here)
This design loves simple quilting:
- Straight-line horizontal quilting (matches the pixel flow)
- Wavy lines (adds motion!)
- Diagonal lines (modern and clean)
- Dense “stitch-in-the-ditch” around the pixel clusters (if you like texture)
Step 10 — Binding
Bind with:
- Solid white for a clean gallery look
or - A bright color (red, teal, purple) to make it pop
or - A rainbow stripe binding if you want maximum fun
Extra Tips (so it turns out crisp)
- Use a ¼” seam consistently.
- Tiny pieces love a short stitch length (2.0–2.2).
- Press often (don’t skip this).
- If seams feel bulky, press some seams open in the densest pixel area.