Patchwork Apple with Embroidery – Step by Step Tutorial
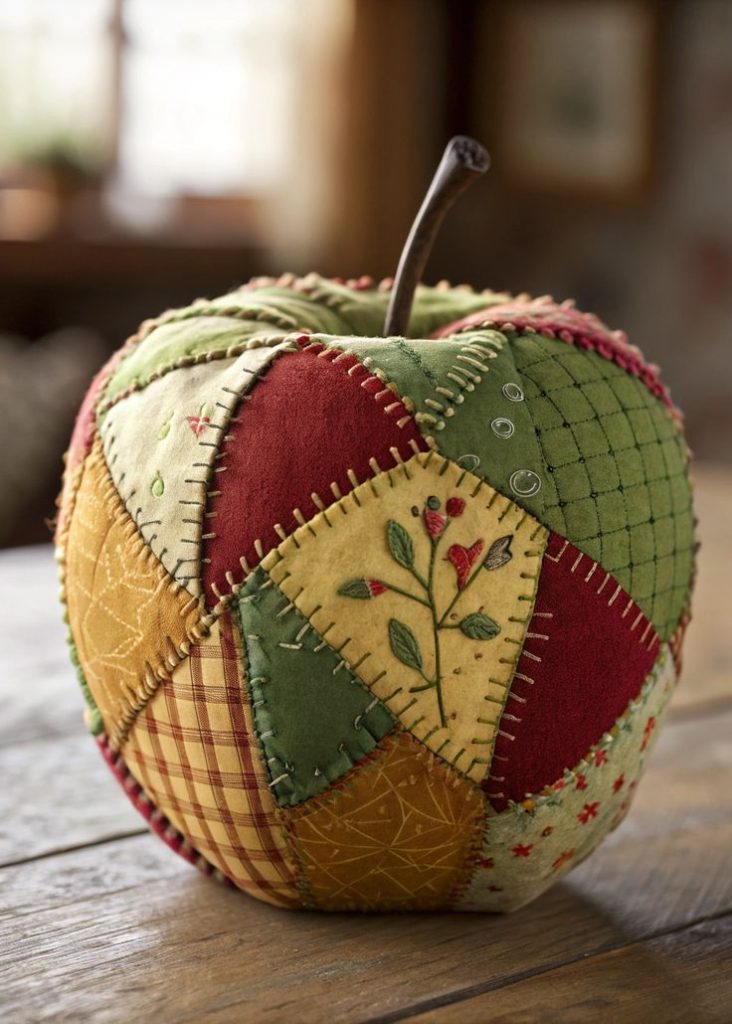
Handmade crafts often bring a touch of warmth and nostalgia, and this patchwork apple is the perfect example of that. Combining quilting techniques, embroidery, and soft stuffing, it creates a decorative piece that feels both rustic and cozy. This project is ideal for autumn décor, farmhouse-style decorations, or even as a gift for someone who loves handmade treasures.
What makes this apple so special is the combination of different fabric textures and colors. The warm palette of greens, golds, yellows, and reds captures the feeling of harvest season while the hand-stitched embroidery adds a delicate, personal touch. Each piece of fabric is joined with visible blanket stitches, which not only secure the seams but also add to the charming, homemade look.
This craft project is also a wonderful way to use up fabric scraps from your quilting stash. Small squares, plaids, florals, or solids can all come together in a unique arrangement, making each apple completely one-of-a-kind. The shape is created with careful sewing and stuffing, while a small stick or wooden dowel serves as the stem, giving the piece a realistic finish.
Whether displayed on a wooden table, added to a seasonal centerpiece, or gifted as part of a handmade set, this patchwork apple is guaranteed to stand out. It’s simple enough for beginners but detailed enough to satisfy experienced crafters looking for a relaxing and rewarding project. Let’s go through the step-by-step process to make your own.
Materials Needed
- Assorted fabric scraps (greens, reds, yellows, golds, and plaids)
- Embroidery floss in matching and contrasting colors
- Embroidery needle
- Sewing needle and thread
- Fabric scissors
- Fiberfill stuffing
- Small stick or wooden dowel (for the stem)
- Hot glue or strong craft glue
Step-by-Step Instructions
Step 1 – Cutting the Pieces

- Cut 6 to 8 fabric panels in slightly curved shapes (similar to apple wedges).
- Ensure all panels are roughly the same size for even assembly.
- Choose a mix of colors and patterns for variety.
Step 2 – Stitching the Panels
- Place two fabric pieces right sides together and sew along one edge.
- Continue adding panels until you form a rounded ball shape.
- Leave an opening at the top for stuffing.
- Use blanket stitch or visible embroidery stitches to reinforce and decorate the seams.
Step 3 – Adding Embroidery
- Before stuffing, embroider small motifs like leaves, flowers, or vines on selected fabric pieces.
- Use contrasting floss to make the designs pop.
- Simple backstitch, lazy daisy, and French knots work beautifully.
Step 4 – Finishing the Apple
- Stuff the apple firmly with fiberfill.
- Close the opening with strong stitches.
- Insert a small stick into the top and secure with glue to create the stem.
- Optionally, add a felt leaf for extra detail.
✨ Now you have a charming handmade patchwork apple that combines quilting, embroidery, and soft sculpture. Each one turns out slightly different, making this a truly unique piece of handmade art.


