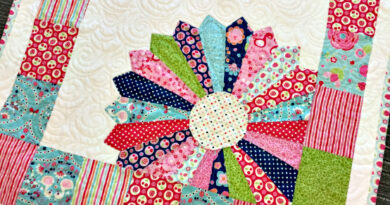
Feathered Mandala Quilt
Quilting is an art form that combines creativity, patience, and technical skill, and the Feathered Mandala Quilt is a stunning example of this tradition. With its intricate feather and floral mandala designs stitched into each block, this quilt captures a sense of elegance and sophistication. The light, neutral palette allows the texture of the quilting itself to shine, turning simple fabrics into a breathtaking piece of art.
One of the most impressive aspects of this quilt is how the quilting motifs enhance the pieced design. The feather patterns, circular mandalas, and surrounding textures create dimension and movement across the fabric. This makes the quilt not only warm and functional but also an artistic statement that can be proudly displayed in any home.
Although it looks complex, creating a quilt like this can be approached step by step. By breaking down the process into piecing, layering, and quilting, quilters of all skill levels can achieve beautiful results. A longarm quilting machine is often used for such intricate patterns, but similar effects can be created with patience on a domestic machine as well.
The Feathered Mandala Quilt is a project that challenges quilters to refine their skills while offering immense satisfaction upon completion. Whether used as a bedspread, wall hanging, or heirloom gift, it represents the artistry and dedication that quilting is all about. Let’s go through the step-by-step guide to creating one.
Step-by-Step Instructions
Materials Needed:
- Neutral fabric in light shades (white, cream, gray)
- Backing fabric
- Batting (cotton or wool for definition)
- Thread in matching or contrasting tones
- Quilting machine (longarm recommended) or domestic sewing machine

Step 1: Piecing the Quilt Top
- Cut fabric squares in coordinating light tones.
- Arrange them in a grid layout, alternating between plain blocks and pieced designs.
- Sew the blocks together with a ¼” seam allowance, pressing seams open.
Step 2: Preparing the Quilt Sandwich
- Lay out the backing fabric, batting, and quilt top in layers.
- Baste them together using safety pins, spray adhesive, or temporary stitches.
Step 3: Quilting the Mandalas and Feathers
- Mark quilting motifs lightly with washable fabric pens if needed.
- Quilt large circular mandalas in designated blocks.
- Add feather motifs around the circles and filler designs like pebbles or swirls for contrast.
Step 4: Finishing the Quilt
- Trim the excess batting and backing.
- Attach binding around the edges of the quilt using a sewing machine or by hand.
- Wash gently to remove any markings and let the quilted texture bloom.
✨ The result is a timeless quilt that blends traditional feather quilting with modern mandala patterns. A piece like this will be treasured for generations.