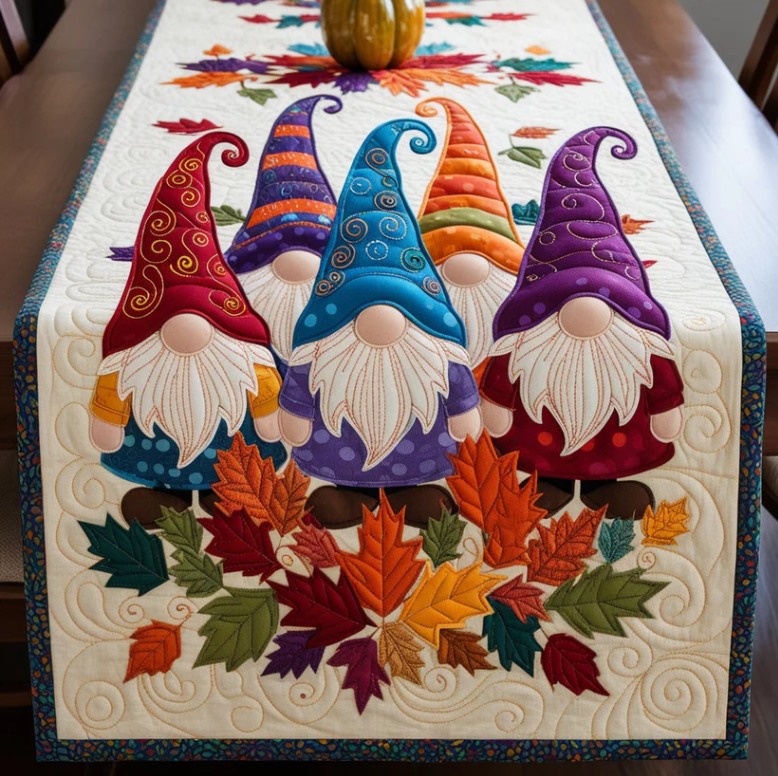
Autumn Gnome Quilted Table Runner
Introduction
As the crisp air of autumn fills our homes, it’s the perfect season to add warmth and charm to your dining table. This delightful quilted table runner featuring whimsical gnomes surrounded by vibrant fall leaves is a wonderful project to celebrate the beauty of the season. With its playful design and rich palette of reds, oranges, purples, and greens, it instantly brings a festive and cozy touch to any space.
One of the joys of quilting is the opportunity to tell stories through fabric, and this project captures the magic of fall gatherings. The gnomes, each wearing a colorful hat and tunic, add a sense of playfulness, while the quilted leaves represent the beauty of change and abundance. It’s more than just a table runner — it’s a seasonal statement piece.
This project is also a great way to practice both quilting and appliqué skills. The combination of patchwork, appliqué gnomes, and free-motion quilting swirls makes it a versatile project for quilters of all skill levels. Beginners will find it approachable with simple steps, while more experienced quilters can get creative with embellishments and stitching designs.
Once completed, your Autumn Gnome Quilted Table Runner will become the centerpiece of your dining table. Imagine serving warm meals or gathering for coffee with loved ones while this cheerful handmade piece adds color and joy to your home. It’s a project that celebrates both creativity and the season of gratitude.
Step-by-Step Instructions
Materials Needed
- Background fabric (cream or beige, approx. 1 yard)
- Border fabric (dark floral or patterned, approx. ½ yard)
- Assorted cotton fabrics in fall colors (reds, oranges, yellows, greens, purples, blues) for gnomes and leaves
- Fusible web for appliqué
- Batting (same size as table runner)
- Backing fabric
- Sewing machine with quilting foot
- Thread in matching and contrasting colors
- Scissors, rotary cutter, cutting mat, and ruler
- Iron and pressing board
Step 1: Prepare the Background and Borders
- Cut a rectangle of cream/beige fabric to the desired size of your table runner (approx. 15” x 60”).
- Cut strips of border fabric (about 2.5” wide) and sew them around the edges of the background piece. Press seams flat.
Step 2: Create the Gnome Appliqués
- Using templates (you can draw them or trace from inspiration), cut out gnome shapes: hats, beards, noses, shirts, and boots.
- Fuse fusible web to the back of each fabric before cutting to make the appliqué process easier.
- Arrange 4–5 gnomes at one end of the table runner, overlapping slightly for a group effect.
Step 3: Add the Fall Leaves
- Cut a variety of leaf shapes in red, orange, yellow, green, and purple fabrics.
- Fuse them to the background fabric around the gnomes, creating a “pile of leaves” effect.
- Press them well so they adhere before stitching.
Step 4: Appliqué the Motifs
- Use a tight zigzag stitch, blanket stitch, or free-motion appliqué around each gnome and leaf shape.
- Switch thread colors to match the fabric for a neat finish.
- Add decorative stitching (like swirls on the hats) to give texture and personality.
Step 5: Layer and Quilt
- Make your quilt sandwich: backing fabric (right side down), batting, and top.
- Pin or baste securely.
- Quilt around the gnomes and leaves, then add free-motion swirls and curls in the background to give movement.
Step 6: Binding the Runner
- Cut strips of fabric for binding (2.5” wide).
- Attach binding to the edges of the table runner using your preferred method.
- Hand-stitch or machine-stitch the binding to finish neatly.
Step 7: Finishing Touches
- Add embellishments if desired, such as buttons on gnome hats or embroidery details.
- Give the runner a final press to smooth it out.