Plush Aran Texture Bed Set
(bedspread, bed-runner, and pillows – step-by-step)
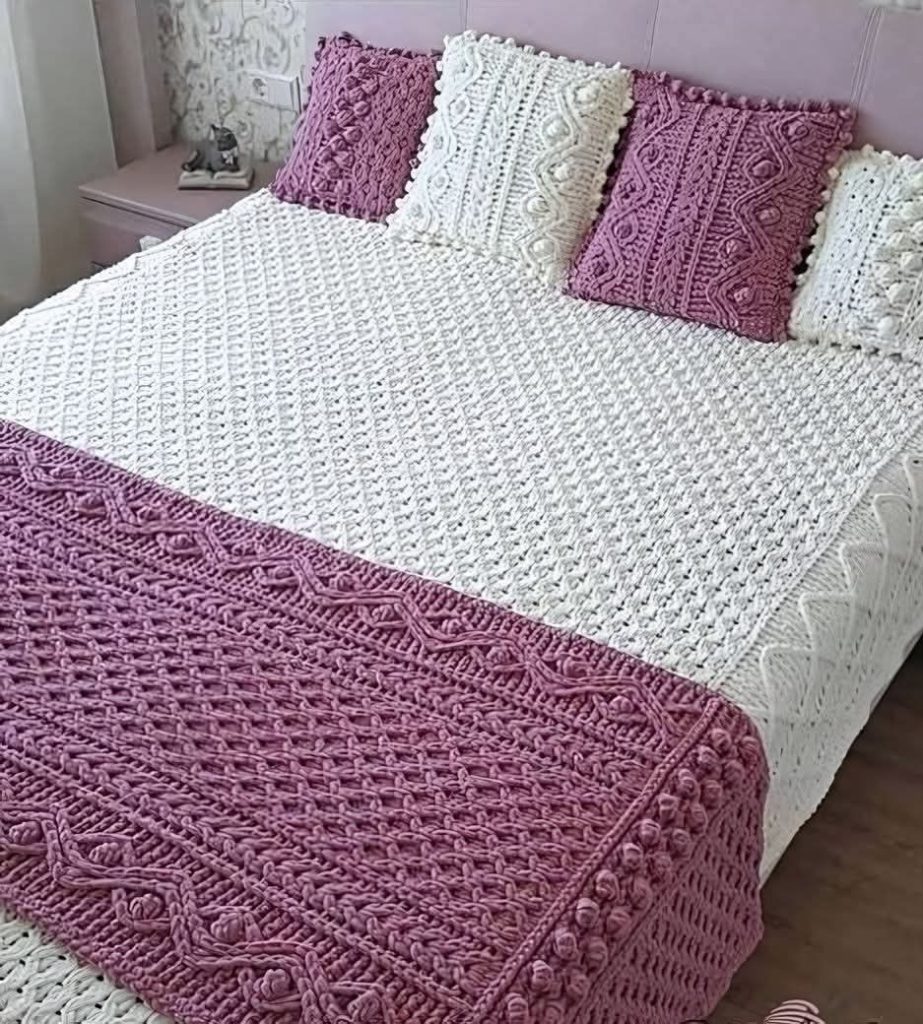
Nothing says “luxury handmade” like a bed layered in chunky, sculptural crochet. The Plush Aran Texture Bed Set pairs a creamy waffle-stitch bedspread with a mauve (dusty rose) cable bed-runner and matching pillows. The high relief of post stitches and bobbles catches the light beautifully and turns everyday yarn into heirloom texture.
This project is modular. Make just the bedspread for a clean, modern look, add the runner for high drama, or finish the set with pillows to echo the cables. Because every piece is worked flat, assembly is simple and the sizing is easy to customize to any mattress.
I wrote the instructions in US terms with clear stitch multiples so you can resize without math headaches. Choose a soft, easy-care yarn so the set can live on your bed, not just in a guest room. Cotton-blend or anti-pill acrylic in a bulky (#5) weight gives great stitch definition without too much weight.
If you’re comfortable with front-/back-post stitches and basic shaping, you’ve got this. New to cables in crochet? The runner and one pillow are perfect practice pieces before you tackle a larger cable panel.
Yarn, Tools & Gauge
- Yarn: Bulky/#5 weight cotton-blend or anti-pill acrylic
- Bedspread (Queen ~90″ × 90″): ~ 2,600–3,000 g in Cream
- Bed-runner (~18″ × 80″): ~ 800–1,000 g in Dusty Rose
- Pillows (three 18″ covers): ~ 900 g total (mix of Cream + Dusty Rose)
- Hook: 6.0 mm (J/10) or size to meet gauge
- Notions: tapestry needle, 18″ pillow inserts (or preferred size), buttons for envelope backs (optional), blocking tools
- Gauge (after light blocking): 12 sts × 10 rows dc = 4″ (10 cm).
Adjust hook to meet gauge.
Abbreviations (US): ch, st(s), sl st, sc, hdc, dc, tr, fpdc (front post dc), bpdc (back post dc), fptr (front post tr), pc (5-dc popcorn), rep, RS/WS.
Part A — Waffle-Stitch Bedspread (multiple of 3 + 2)
- Foundation: Ch to your desired width (mattress width + drop, or use sizes below). For a Queen (≈90″), ch 272 (multiple of 3 + 2).
- Row 1 (RS): Dc in 3rd ch from hook and in each ch across. Turn.
- Row 2 (WS): Ch 2 (counts as dc), fpdc around next st, dc in next 2 sts; rep to last st, dc in last st. Turn.
- Row 3 (RS): Ch 2, dc in next st, fpdc around each of next 2 sts; rep to last st, dc in last st. Turn.
- Repeat Rows 2–3 until length is reached (for 90″ long, work ~220 rows). End after a Row 3.
Bedspread Border
- Round 1: With RS facing, sc evenly around entire piece (3 sc in each corner).
- Round 2: [bpdc, fpdc] rib around (work posts only on sides; on top/bottom, place bpdc/fpdc around sc posts from Round 1).
- Round 3 (optional): Crab stitch (reverse sc) all around for a clean corded edge. Fasten off, weave in ends, block lightly to open the waffles.
Sizing guide (approx ch counts at stated gauge):
Twin 210 ch · Full 240 ch · Queen 272 ch · King 306 ch. Work more/less row repeats for length.
Part B — Cable Bed-Runner (about 18″ × bed width)
Set-up: Work a structured side frame with half-double crochet; the center panel carries an easy braided cable and bobbles.
- Foundation: Ch 162 (or bed width; keep a multiple of 12 + 6 for the cable panel), turn.
- Row 1: Hdc in 2nd ch and each ch across. Turn.
- Row 2 (RS): Ch 2, hdc in first 10 sts (left frame), place marker. [bpdc 2, fpdc 4, bpdc 2, fpdc 4] across center until 10 sts remain; marker; hdc in last 10 sts (right frame). Turn.
- Row 3 (WS): Ch 2, hdc in first 10, work sts as they appear across center (bpdc into bpdc columns, fpdc into fpdc columns), hdc last 10.
- Row 4 (Crossing Row, RS): Ch 2, hdc 10, then across center:
bpdc 2, skip next 2 fpdc, fptr in next 2, then fptr in skipped 2 (left cross), bpdc 2, skip next 2 fpdc, fptr in next 2, fptr in skipped 2 (left cross); rep to marker; hdc 10. - Rows 5–7: Repeat Row 3 (work posts as established).
- Row 8: Repeat Row 4 (crossing row).
- Texture Accent (every 6th RS row, optional): After the center cable section, [sc, pc in next st, sc] across the “ditch” between cable repeats to create a line of bobbles.
- Repeat Rows 3–8 to desired length (typically 54–80″).
- Edging: Work 1 round sc around, then 1 round crab stitch. Block to measurements.
Part C — Textured Pillow Covers (fits 18″ inserts)
Pillow 1 — Waffle (Cream)
- Front: Ch 56 (multiple of 3 + 2). Work Rows 1–3 of the waffle pattern until square (≈18″).
- Back: Make two panels 18″ wide × 12″ tall in plain hdc (for envelope). Add a button band if desired.
- Join: With RS out, overlap backs by ~4″ and sc around to join all layers. Add buttons.
Pillow 2 — Cable Panel (Dusty Rose)
- Front: Ch 66 (12 + 6 × 5 repeats + frames). Work bed-runner center instructions (shorter height) until square.
- Back: Two hdc panels as above. Join as for Pillow 1.
Pillow 3 — Bobble Diamonds (Cream or Rose)
- Foundation: Ch 58.
- Row A (RS): [sc 3, pc, sc 3] across.
- Row B (WS): Hdc across.
- Row C (RS): Shift bobbles 4 sts to the right to form a diagonal.
- Repeat Rows B–C to form a diamond lattice until square. Work envelope back pieces and join as above.
Finishing & Care
- Weave all ends securely on WS.
- Wet-block or steam lightly to relax the post textures without flattening them.
- Machine wash cold, gentle (if yarn allows); lay flat to dry.
Customization Tips
- Swap Dusty Rose for sage, charcoal, or latte for a different vibe.
- Add tassels or pompoms to pillow corners or runner ends.
- Narrow runner? Reduce the center by one cable repeat (subtract 12 sts). Wider? Add repeats in twelves.