Granny Square Crochet Handbag – Step by Step Tutorial
Crochet handbags made with granny squares are a true classic, blending tradition and modern fashion into one timeless accessory. This Granny Square Handbag is not only stylish but also practical, perfect for carrying daily essentials while showing off your handmade skills. With its structured shape and simple motif, it’s a beginner-friendly project that produces a professional-looking result.
The charm of this bag lies in the versatility of the granny squares. You can make them in neutral shades for a chic and minimalist look, or go wild with bright, contrasting colors for a boho vibe. The sturdy bottom and leather-like handles add durability, transforming a simple crochet piece into a fashionable item that you’ll love to wear.
This handbag is also a great stash-buster project. Those small amounts of leftover yarn in your collection can be turned into beautiful motifs. Whether you want a single-color square or multi-colored blocks, the possibilities are endless. Plus, lining the bag can add extra strength and longevity, ensuring it keeps its shape.
If you’re looking for a project that’s both fun to make and practical to use, this crochet granny square bag is a perfect choice. Let’s go step by step to create this charming piece.
Materials
- Cotton or acrylic yarn (Main color: Cream, Accent color: Brown or any shade you prefer)
- Crochet hook suitable for your yarn (usually 4.0 mm or 4.5 mm)
- Tapestry needle for joining
- Scissors
- Optional: Bag handles (leather, wooden, or crocheted)
- Optional: Fabric lining for added durability
Step 1: Making the Granny Squares
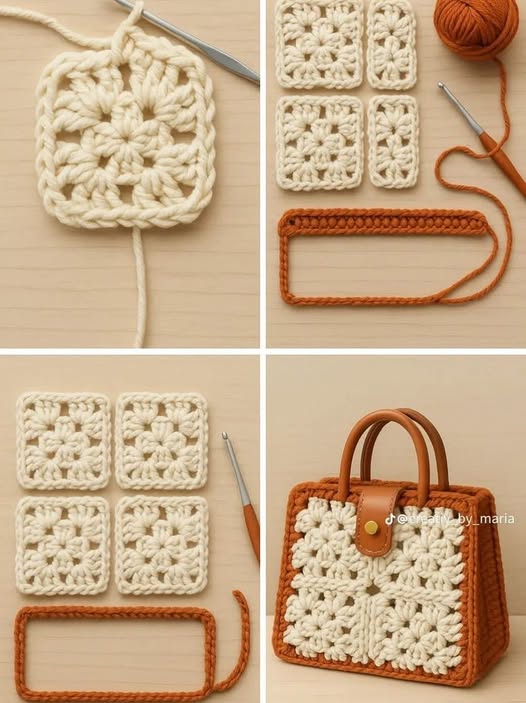
- Chain 4 and join with a slip stitch to form a ring.
- Round 1: Chain 3 (counts as first dc), make 2 dc in ring, ch 2, 3 dc in ring repeat 3 times, join with sl st.
- Round 2: In each corner space (ch-2), work 3 dc, ch 2, 3 dc. Between corners, work 3 dc groups.
- Continue until square reaches desired size (about 8–10 cm).
- Make 12 granny squares for the front, back, and sides.
Step 2: Making the Base
- With accent color, chain 25 (or length matching the bottom width).
- Work rows of single crochet until you create a rectangle base that matches the bottom size of your bag.
- Fasten off and weave in ends.
Step 3: Assembly
- Arrange your granny squares: 4 for the front, 4 for the back, and 2 on each side.
- Use whip stitch or single crochet to join the squares together.
- Attach the crocheted base to the bottom of the bag by sewing or crocheting around the edges.
Step 4: Finishing Touches
- Attach bag handles (either sewn or crocheted).
- Optionally, sew in a fabric lining to strengthen the inside and add a pocket.
- Add a button, snap, or zipper closure if you prefer extra security.
✨ Your Granny Square Crochet Handbag is complete—sturdy, stylish, and 100% handmade!