

When crochet meets botany, magical creations like this blooming spider plant come to life. Rich in detail and incredibly lifelike, this piece is perfect for decorating spaces with a touch of nature — without the need for watering! The long, arching leaves in vibrant green tones and delicate white flowers create an elegant and refreshing visual that feels just like a real plant.
This type of handcrafted project blends technique, patience, and artistic flair. It’s perfect as a gift, as a decorative item for homes or workspaces, or even for selling as a unique handmade piece. Let’s walk through the step-by-step process so you can make your own crochet masterpiece!
🧶 Materials Needed:
- Mercerized cotton yarn in light green, dark green, and white
- 1.75mm or 2.0mm crochet hook
- Thin floral wire (for shaping stems and leaves)
- Scissors
- Yarn needle
- Green floral tape (optional)
- Small pot (ceramic or plastic)
- Foam or filling material for the base
🌼 Skill Level: Intermediate to Advanced
🧵 Step-by-Step: Crochet Spider Plant with Flowers
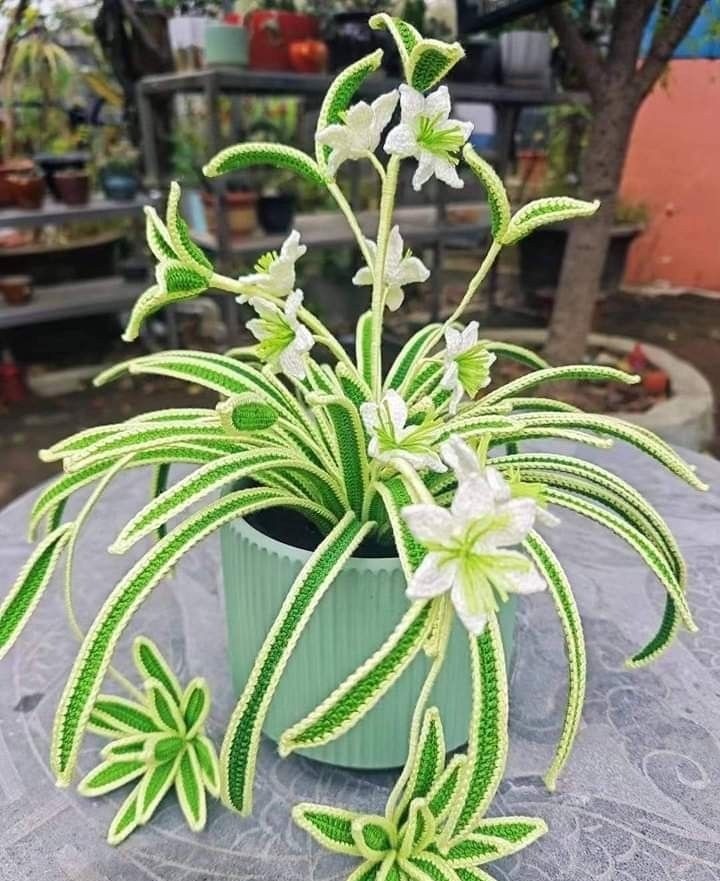
1. Long Leaves (Green):
- Chain 55 with light green yarn.
- Work single crochet (sc) back along the chain.
- Switch to dark green and crochet around the edge with sc to give it a finished look.
- Insert a piece of wire into the leaf to allow shaping.
- Make 20 to 25 leaves to create a full plant.
2. Small Leaf Clusters (Baby Plants):
- Chain 15 with light green.
- Work sc, then edge with dark green.
- Create 5 small leaves and stitch them together at the base to form a cluster.
- These can be placed cascading down the pot, mimicking real spider plant pups.
3. White Flowers:
- Start with a magic ring using white yarn.
- Chain 2, then create 6 petals around the ring — each petal made of 3 double crochets and 1 chain at the top.
- Finish off and shape the petals gently.
- Make 7 to 10 flowers.
4. Stems and Assembly:
- Cover wire with green yarn (chain stitches) to create stems.
- Sew or glue flowers to the top of each stem.
- Gather several stems and bind them at the base with floral tape or stitching.
- Arrange the flower stems in the center of the pot and surround them with the large leaves.
5. Final Touches:
- Insert foam or stuffing inside the pot to hold everything in place.
- Use hot glue to secure leaves and stems.
- Bend and shape the wires to make the leaves and flowers look natural and flowing.
🌸 Bonus Tip:
You can lightly spray your finished flowers and leaves with fabric stiffener or starch to help them hold their shape longer, especially in humid environments.
💬 Conclusion:
This crochet spider plant is a true celebration of handmade artistry. It’s a beautiful fusion of color, texture, and creativity that brings a little joy and greenery to any room. Whether you’re crafting for yourself or gifting it to someone special, this project will surely become a cherished piece.
Let your hands tell a story — one stitch at a time.