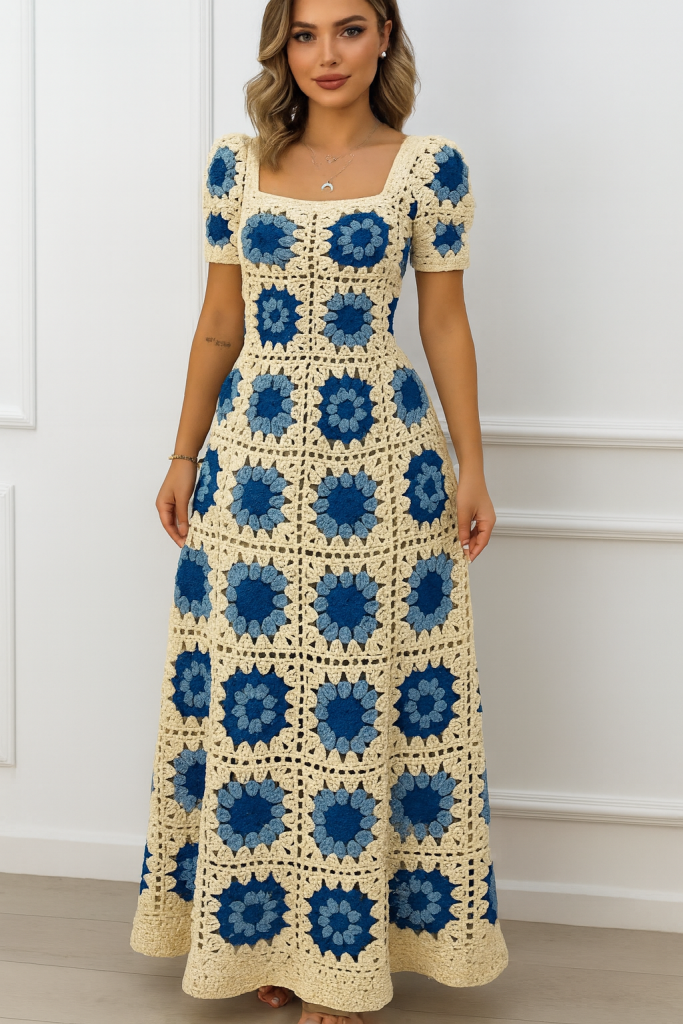
Crochet Granny Square Dress
Crochet fashion has made a huge comeback in recent years, and one of the most iconic and versatile pieces is the granny square dress. This timeless design blends the vintage charm of crochet squares with modern styling, resulting in a stunning handmade garment that can be customized with colors, shapes, and sizes. A granny square dress is both stylish and comfortable, perfect for summer days, beach outings, or even as a statement outfit layered in cooler seasons.
The beauty of this project is that it’s beginner-friendly yet sophisticated enough to impress advanced crocheters. Each square is worked individually, which makes it easy to crochet on the go and assemble later. With simple stitches and repetitive patterns, it’s a relaxing project that can be done little by little until you have enough squares to complete your dress.
In addition to its practicality, this dress is an eco-friendly fashion choice. Handmade pieces promote slow fashion, reducing waste and offering a unique, one-of-a-kind garment that reflects your personal creativity. Choosing your yarn carefully also allows you to experiment with textures, from soft cottons for summer wear to cozy wools for colder months.
This tutorial will walk you through the steps of making a granny square dress, starting with the squares themselves and moving on to assembly and finishing. By the end, you’ll not only have a gorgeous handmade dress but also the satisfaction of creating a piece of wearable art. Let’s begin!
Step-by-Step Instructions
Materials Needed:
- Cotton or acrylic yarn in two contrasting colors (e.g., cream and blue as shown)
- Crochet hook (size recommended for your yarn, usually 3.5mm–4.5mm)
- Scissors
- Tapestry needle
- Stitch markers
Step 1: Crochet the Granny Squares
- Start with a magic ring and make a round of double crochets (dc) to form the center.
- Change to the second color and work clusters of 3 dc, separated by chain spaces, to create the granny square pattern.
- Alternate colors for each round until your square reaches the desired size (approximately 10–12 cm for a dress).
- Make enough squares to cover your body measurements (front, back, and sleeves).
Step 2: Join the Squares
- Lay out your squares according to the shape of the dress: top part (bodice), waist, and skirt.
- Join squares using slip stitches or single crochet, working along the edges.
- Make sure to keep the joins neat and consistent for a professional finish.
Step 3: Shape the Dress
- For the bodice, join squares in rows that match your bust measurement.
- Add more rows of squares for the skirt, increasing width as needed to create a flared look.
- For the sleeves, join a row or two of squares to the armholes.
Step 4: Finishing Touches
- Work a round of single crochet around the neckline, armholes, and hem for a clean edge.
- Block the dress by wetting and laying it flat to dry, ensuring all squares are even.
- Try on your dress and adjust if needed by adding or removing squares.
✨ And there you have it—a beautiful crochet granny square dress! Perfectly customizable, this dress allows you to play with colors and lengths, making it truly your own.