Garden Trellis with Rose Appliqué – Quilt Pattern
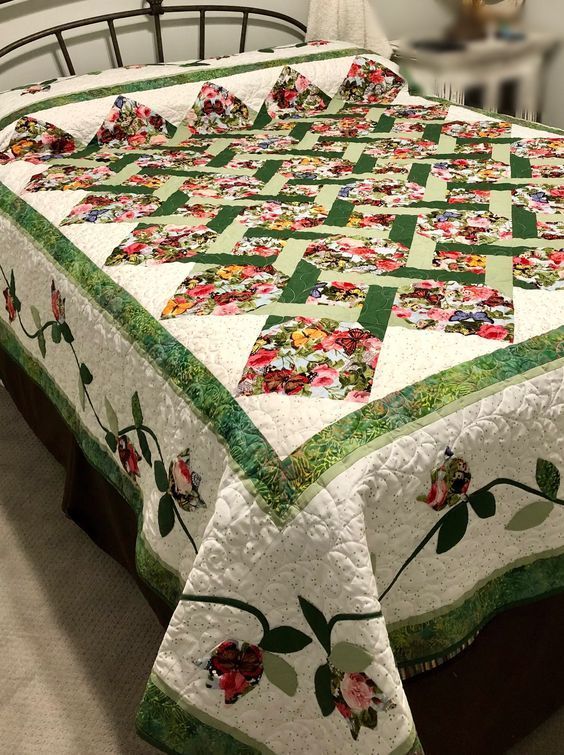
Below is a fresh, floral take on a classic sampler look. The Garden Trellis center uses quarter-log-cabin blocks made from one large floral square and two green “logs” that form an L-shape. Rotating the blocks creates a woven-trellis effect that looks intricate but pieces quickly. Around the center, soft inner borders frame a rose-vine appliqué on a light outer border, echoing the garden theme. Finish with prairie-point accents if you’d like a charming, heirloom touch.
This project shines with scrap florals and two coordinating greens (light and dark). Choose a creamy speckled or subtle print for the background to let the florals pop, and mix a few leafy greens for depth. The look can be vintage or modern depending on your palette; batiks and small-scale prints are especially lovely.
Construction is friendly for confident beginners and relaxing for seasoned quilters. The blocks are built “assembly-line style,” then rotated on the design wall to form the trellis. The appliqué border is optional—use fusible raw-edge appliqué for speed or needle-turn for a hand-stitched finish.
The instructions below give Throw and Queen options. Seam allowance is ¼″ throughout; press after every seam for flat, accurate blocks.
Finished Sizes & Fabric
- Throw ~64″ × 78″ (7 × 9 blocks, 7″ finished each)
- Queen ~90″ × 98″ (10 × 12 blocks, 7″ finished each)
Fabric (approx.):
- Florals (scrappy): Throw 2½ yd total; Queen 4 yd
- Dark green (trellis): Throw 1¼ yd; Queen 2 yd
- Light green (trellis): Throw 1¼ yd; Queen 2 yd
- Background/inner borders (cream): Throw 1½ yd; Queen 2½ yd
- Outer green borders/binding: Throw 1¼ yd; Queen 1¾ yd
- Appliqué vine/leaves/rose centers: scraps of greens & florals
- Backing & batting: to fit finished top
Cutting (per 1 block, 7″ finished / 7½″ unfinished)
- Center floral square: cut 5″ × 5″
- Dark-green log: cut 1½″ × 5″
- Light-green log: cut 1½″ × 6½″
Block count: Throw 63 blocks (7×9). Queen 120 blocks (10×12).
Cut all centers and logs assembly-line; keep greens in two piles.
Step 1 – Piece the Quarter-Log Cabin Blocks
- Sew dark-green 1½″ × 5″ to the right side of a floral 5″ square. Press toward the log.
- Sew light-green 1½″ × 6½″ across the bottom of the unit. Press toward the log.
- Square to 7½″.
- Make 63 (Throw) or 120 (Queen) blocks.
Design note: You’ll rotate blocks 0°, 90°, 180°, and 270° so the green “L”s point in different directions, forming the woven trellis.
Step 2 – Layout & Join the Center
- On a design wall, arrange blocks 7 × 9 (Throw) or 10 × 12 (Queen), rotating to create a balanced trellis.
- Join blocks into rows, then rows together. Press seams each row in opposite directions for nesting.
Step 3 – Inner Borders
- Cut cream inner borders 2″ wide (finish at 1½″).
- Measure the quilt center through the middle; cut side borders to that length, sew and press.
- Measure vertically and add top/bottom borders to fit.
- Add a 1½″–2″ scrappy green frame if desired for extra garden color.
Step 4 – Rose-Vine Appliqué Border (optional but gorgeous)
- Cut cream border strips 6″ wide (finish at ~5½″). Add to the quilt as in Step 3.
- From green scraps, cut or fuse a gentle vine (1″–1½″ wide) that meanders along the borders, turning the corners.
- Add leaves (assorted 2″–3″ shapes) and rose motifs from floral scraps (simple circles/spirals or layered petals).
- Fuse pieces with lightweight web, then blanket stitch or zigzag around edges. (For hand appliqué, needle-turn and slip-stitch.)
Step 5 – Optional Prairie Points
- For the playful peaks seen in similar quilts, cut 5″ squares from florals.
- Fold square in half diagonally (wrong sides together), then fold again into a smaller triangle.
- Baste along the raw edges across the top edge of the quilt (points facing inward).
- Capture the raw edges when applying the final top binding.
Step 6 – Quilt & Bind
- Layer backing (wrong side up), batting, and top; baste.
- Quilt: feather curls or echoed leaves in the cream; gentle curves or cross-hatching over the trellis; outline the appliqué.
- Bind with a deep green print for a crisp frame.
Tips for Success
- Keep dark/light greens consistent in value so the woven Xs read clearly.
- If your florals vary wildly, sprinkle each color family across the quilt to avoid “color clumps.”
- Pre-starch blocks before trimming to keep those 1½″ logs crisp.
- Want a faster border? Skip the appliqué and add a piano-keys border made from floral strips.