Pumpkin Harvest Quilt – Step by Step Tutorial
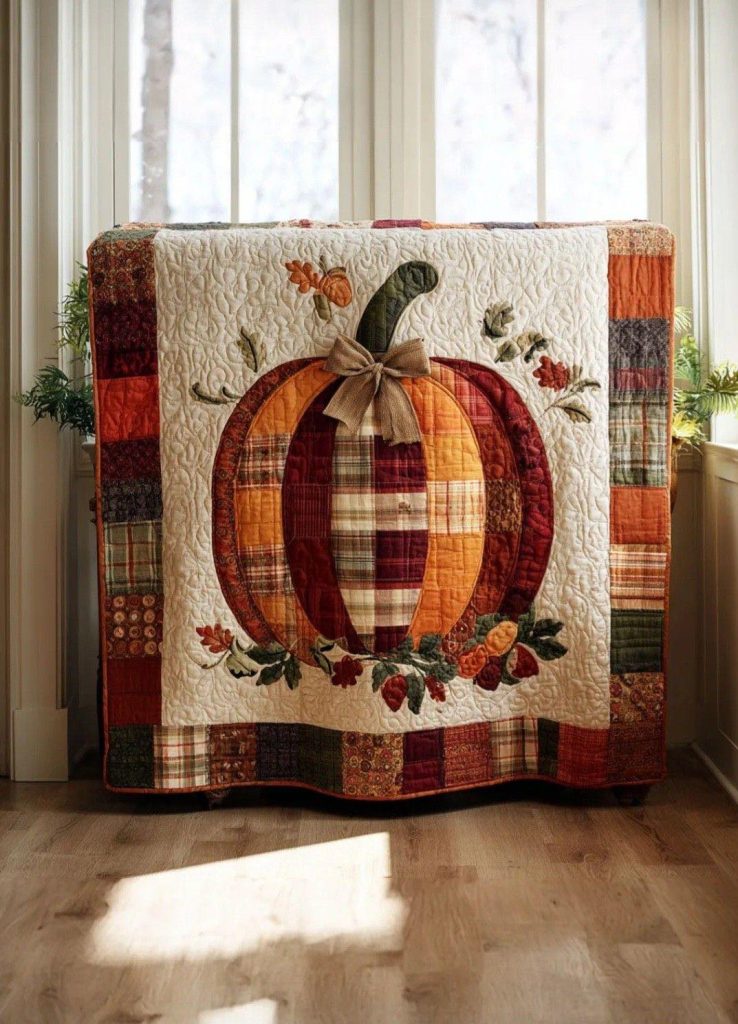
Quilting is a timeless art that allows us to tell stories through fabric, colors, and patterns. The Pumpkin Harvest Quilt is a perfect example of how quilting can capture the beauty of a season. With its rich autumn tones, patchwork borders, and the striking pumpkin applique at the center, this quilt brings warmth and charm to any room. It’s not just a functional blanket but also a decorative piece that celebrates fall, harvest, and coziness.
One of the things that makes this quilt so special is the way it combines different quilting techniques: patchwork, applique, and free-motion quilting. The outer patchwork border adds texture and variety, while the applique pumpkin gives the quilt its focal point. The detailed free-motion quilting on the background fabric enhances the overall look, making the pumpkin and leaves stand out even more.
This project is suitable for intermediate quilters, but even adventurous beginners can give it a try. The beauty of the design is that it can be customized with your own fabrics—whether you want to stick to traditional autumn colors or try something more modern. Imagine using plaids, batiks, or even metallic fabrics to make your pumpkin pop!
In this tutorial, we’ll go step by step through fabric selection, cutting, piecing the border, creating the pumpkin applique, and assembling the quilt. You’ll also get tips on quilting and binding to finish your masterpiece beautifully. By the end, you’ll have a stunning quilt that will brighten your home during fall and impress anyone who sees it.
Step-by-Step Instructions
Materials Needed:
- Assorted autumn-themed fabrics (orange, red, gold, green, and neutrals)
- Background fabric (cream or white)
- Fabric scraps for leaves, stems, and details
- Fusible web for applique
- Batting and backing fabric
- Sewing machine and quilting tools
Step 1: Cutting the Fabrics
- Cut 4” squares of assorted fabrics for the patchwork border.
- Cut a large central piece of background fabric for the applique pumpkin.
- Prepare strips and scraps in greens and browns for leaves, stems, and vines.
Step 2: Creating the Border
- Sew the 4” fabric squares together in rows to form the patchwork border.
- Assemble the border strips and set them aside.
Step 3: Making the Pumpkin Applique
- Draw a pumpkin shape on fusible web, divide into sections for a patchwork look.
- Iron fabric pieces onto the fusible web and cut them out.
- Arrange pumpkin pieces on the central background fabric and press them in place.
- Add leaves, vines, and a bow detail if desired.
- Use a zigzag or blanket stitch around each applique edge.
Step 4: Assembling the Quilt Top
- Sew the central panel with the applique pumpkin to the patchwork border.
- Square up the quilt top to ensure neat edges.
Step 5: Quilting and Finishing
- Layer the quilt top, batting, and backing.
- Quilt around the pumpkin and add free-motion quilting on the background.
- Quilt the borders with straight lines or leaf motifs.
- Bind the quilt with coordinating fabric.
✨ Your Pumpkin Harvest Quilt is now complete—a cozy and festive piece ready to celebrate the season!