Rainbow Crochet Umbrella – Step by Step Tutorial
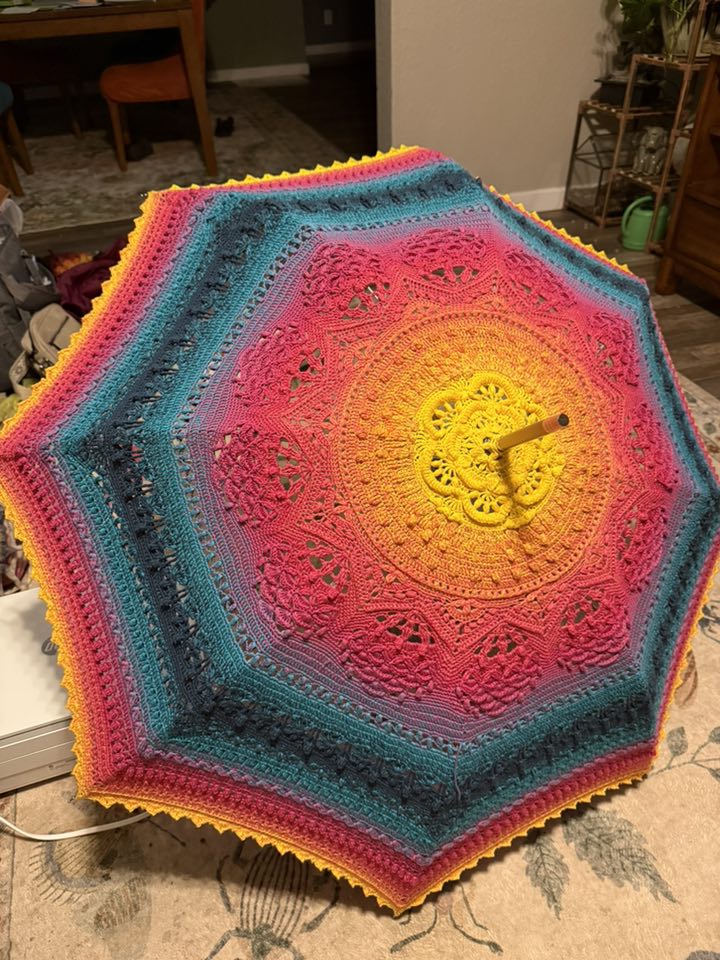
Crochet has always been a beautiful way to combine art and functionality, and this rainbow umbrella is the perfect example. Bursting with vibrant shades that blend seamlessly from sunny yellows to deep blues, this project is more than just an accessory—it is a true piece of handmade art. Whether used as a decorative parasol, a photoshoot prop, or a statement piece for summer festivals, this crochet umbrella will brighten any occasion.
What makes this project truly special is the combination of structure and lace. While the stitches form delicate motifs that resemble mandalas and floral designs, the umbrella frame gives it strength and practicality. It’s a project that requires patience and attention to detail, but the result is breathtaking. Advanced beginners and intermediate crocheters who love working in the round will especially enjoy this challenge.
One of the charms of this umbrella is the use of gradient yarn cakes, which create a natural color transition without the need to change yarns constantly. You can select a rainbow cake for a vibrant finish or choose a single-tone gradient for a more elegant and subtle look. The final effect will always look unique and personal.
As with many mandala-style projects, this umbrella starts small at the center and grows outward with increasing rounds. Each round adds detail, from shells and clusters to lace arches that create the beautiful openwork design. Once finished, it can be attached to a simple umbrella frame to give it shape and function. Now, let’s go through the step-by-step process so you can make your own crochet rainbow umbrella.
Materials Needed
- 1 large gradient yarn cake (1000–1200m, fingering or sport weight)
- Crochet hook size 2.5mm–3mm (check your yarn’s recommendation)
- Umbrella/parasol frame with removable fabric (or a new frame for covering)
- Stitch markers
- Scissors and tapestry needle
Step-by-Step Instructions
Step 1 – The Center

- Start with a magic ring.
- Round 1: Work 12 double crochets (dc) into the ring. Join with a slip stitch (sl st).
- Round 2: Chain 3 (counts as dc), dc in same stitch, 2 dc in each around (24 dc).
Step 2 – Building the Mandala
- Round 3: Begin cluster stitches: (2 dc cluster, chain 2) around.
- Round 4–6: Add shells (5 dc in one stitch) separated by chain spaces.
- Round 7–10: Transition into lace arches—(dc, chain 3, skip 2) repeated around to create openwork.
Step 3 – Increasing Size
- Continue working outward, alternating between rounds of solid stitches (dc, half double crochets) and lace motifs (shells, clusters, arches).
- Make sure increases are consistent to keep the work flat. Use stitch markers at hexagon/octagon points to maintain symmetry.
- Adjust tension so the umbrella fits snugly over the frame.
Step 4 – Finishing & Assembly
- Once the circle is large enough to cover the umbrella ribs, finish with a sturdy picot edge or scalloped border.
- Block the piece to stretch and set the lace.
- Secure the crochet piece onto the umbrella frame by sewing or tying it along the ribs and the top point.
✨ And there you have it! A vibrant rainbow crochet umbrella that combines the art of mandala-making with the practicality of a parasol. Each one turns out different depending on the yarn, making it a unique treasure.


