Lacy Shell Vest – Step-by-Step Tutorial (US terms)
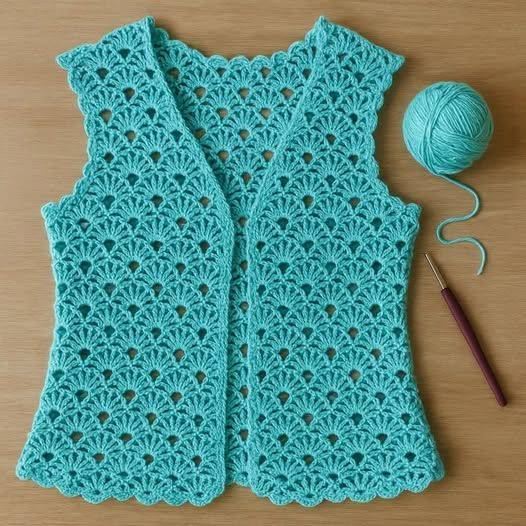
Airy shell vests are wardrobe heroes: they look elegant layered over dresses and tees, they work in every season, and they’re fast to crochet. This design uses an easy two-row shell repeat that grows evenly and blocks out beautifully with just a light steam. Because the stitch pattern is mostly chains and double crochets, the fabric has lovely drape without being see-through.
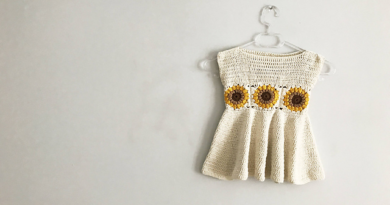
You’ll crochet the vest in three flat pieces—Back, Left Front, Right Front—then seam the shoulders and sides. Shaping is minimal: gentle armholes and a clean V-neck formed by simple decreases along the front edges. Finally, a scalloped edging is worked around the hem, armholes, and front bands to give that polished, wavy finish you see in the photo.
This is a very forgiving pattern. You can make it cropped, hip-length, or tunic-length by adding or removing shell rows; you can also choose closer or breezier ease depending on the yarn and hook. Cotton or bamboo blends highlight stitch definition for a summertime look; wool blends are cozy for layering.
Even if you’ve never made a garment, this vest is an excellent first project: no sleeves, repetitive stitches, and very little counting. Measure as you go, block lightly, and you’ll have a piece you’ll reach for again and again.
Sizes & Finished Bust (approx.)
XS (S, M, L, XL, 2XL) = 32 (36, 40, 44, 48, 52) in / 81 (91, 102, 112, 122, 132) cm
Designed for 2–4 in / 5–10 cm of positive ease. Choose the size closest to your bust + ease you prefer.
Materials
- DK (Category 3) cotton or cotton-blend: 550 (600, 650, 725, 800, 875) m
- Hook 4.0 mm (G/6) or size to obtain gauge
- Tapestry needle, scissors, stitch markers, blocking tools
Gauge (blocked, in pattern)
3 shells × 6 rows = 4 in (10 cm).
If you get more shells, go up a hook size; fewer shells, go down.
Stitch Guide
- ch = chain, sl st = slip stitch, sc = single crochet, dc = double crochet
- Shell = 5 dc in the indicated stitch/space
- Pattern multiple: foundation is a multiple of 6 + 1.
Shell Pattern (worked flat)
Row 1 (setup): Ch a multiple of 6 + 1. Sc in 2nd ch from hook, sk 2 ch, Shell in next ch, sk 2 ch, sc in next ch; rep to end. Turn.
Row 2: Ch 3 (counts as dc), 2 dc in first sc (half-shell), sc in 3rd dc of next Shell, Shell in next sc; rep to last sc, 3 dc in last sc. Turn.
Row 3: Ch 1, sc in first dc, Shell in next sc, sc in 3rd dc of next Shell; rep to end. Turn.
Repeat Rows 2–3 for pattern.
Back (make 1)
- Foundation width: Ch to the measurement for your size, using the multiple of 6+1.
Target widths after blocking: 16 (18, 20, 22, 24, 26) in / 41 (46, 51, 56, 61, 66) cm.
Work Rows 1–3 once, then continue repeating Rows 2–3 until the piece measures 12 (13, 13, 14, 14, 15) in from hem. - Armhole shaping (worked over next 4 rows):
- Row A (as Row 2): At start and end of the row, skip the first shell placement by working sc in the 3rd dc of the first Shell and ending with sc in the last Shell’s 3rd dc (this removes half a shell each side).
- Row B (as Row 3): Work even.
Repeat Rows A–B once more. You’ve decreased 1 full shell per side total.
- Work even in pattern until back length from hem is 22 (23, 24, 25, 26, 27) in. Fasten off.
Left Front
- Foundation width: Make a chain equal to half the back width + 1 shell using the multiple of 6+1.
Work the shell pattern until the length from hem matches the back to armhole. - Armhole shaping (side edge): Work the same 2-row decrease sequence as for the Back once.
- V-neck shaping (front edge):
On the front opening edge, repeat this two-row sequence until you remove 3 (3, 4, 4, 5, 5) shells total:
- Neck Row 1 (as Row 2): Do not begin with the edge half-shell. Instead, ch 1, sc in first dc group (skipping the half-shell), then continue pattern across.
- Neck Row 2 (as Row 3): Work even.
This gently leans the fabric to form the V.
- Work even until length matches the Back. Fasten off.
Right Front
Work as Left Front, reversing all shaping (decrease at opposite edge for the neck).
Assembly
- Block pieces to measurements.
- Seam shoulders (about 3–3½ in / 7.5–9 cm each) with whip stitch or mattress stitch, matching shells.
- Seam sides, leaving 7–8 in / 18–20 cm armhole depth (adjust to comfort).
Edgings (for the scalloped finish)
- Front bands & neckline (continuous):
Join yarn at lower right front.
Round 1: Work sc evenly up the front edge, around the neck, and down the other front; place sc in each dc and 2 sc in side of each shell; turn.
Round 2: sc in first st, sk 2, Shell in next st, sk 2; repeat along the entire edge, placing shells symmetrically at the back neck point. Fasten off. - Armholes:
Round 1: sc evenly around each armhole (no puckers).
Round 2: sc, sk 2, Shell, sk 2 around. Join and fasten off. - Hem (optional if you started with Row 1): Work one round of shells to mirror the fronts.
Customizing
- Length: add or remove shell rows before armhole shaping.
- Waist nip or A-line: work one decrease or increase by skipping/adding a shell at each side seam row, then continue even.
- Buttons: after Round 1 of front bands, add Round 2 as [5 dc shells] on the left and on the right replace a shell wherever you want a buttonhole with (dc, ch 2, dc, dc, dc); sew buttons opposite.