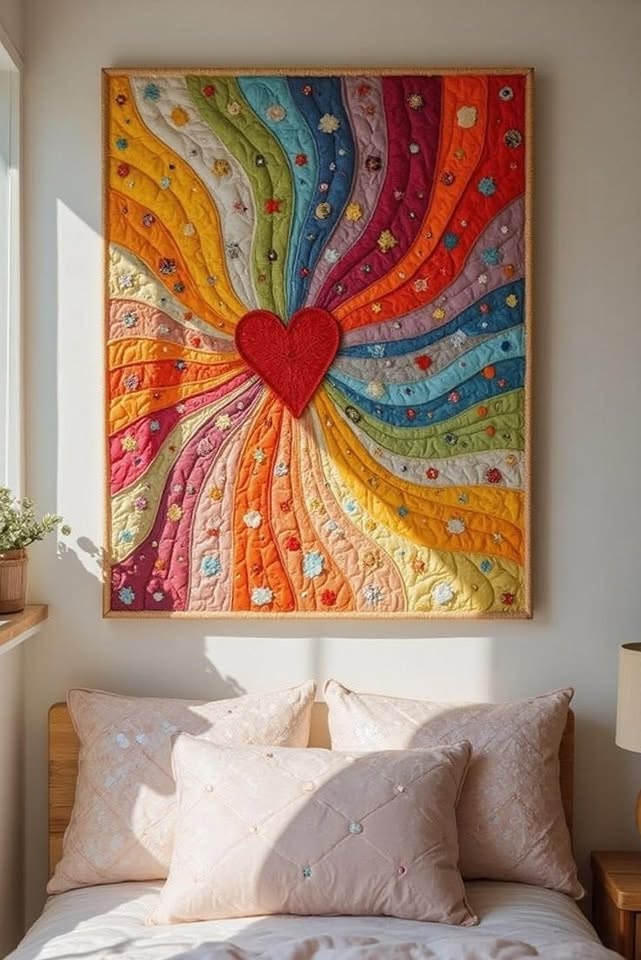
Heartburst Quilt Wall Art – Pattern & Decorative Guide
Quilting is more than a craft — it’s a powerful form of storytelling, a celebration of color, and an expression of the heart. The “Heartburst Quilt” brings all of this together in one striking piece. With a radiant red heart at its center and bold rainbow-colored rays bursting outward, this design symbolizes joy, hope, and the warmth of handmade art.
Perfectly suited for brightening up bedrooms, creative studios, nurseries, or even gallery walls, this quilt is more than a decorative item — it’s a statement. Each color ray represents a wave of emotion or memory, stitched together in harmony to create a stunning visual journey.
Whether you’re a seasoned quilter looking for your next artistic challenge or a passionate beginner ready to explore curved piecing and radiant layouts, the Heartburst Quilt is a rewarding project that will captivate and inspire. Let your creativity flow as you work each curve, stitch each seam, and bring your heart to life in fabric form.
Ideal for gifting, showcasing, or simply enjoying, this quilt is a heartfelt masterpiece that reminds us of the joy found in every stitch.
Materials Needed:
- Assorted cotton fabrics in rainbow colors
- Red textured or solid cotton fabric for the heart
- Lightweight batting
- White or neutral fabric for backing
- Thread to match and contrast
- Quilting pins
- Scissors or rotary cutter
- Sewing machine and quilting foot
- Wooden frame (optional for wall mounting)
Step-by-Step Instructions:
1. Design Layout
- Sketch a large heart in the center of your quilt top.
- From the heart, draw curved rays that radiate outward in different directions.
- Color code each section to plan fabric placement.
2. Cutting and Piecing
- Cut the heart shape from red fabric and interface it lightly.
- Cut each radiating segment from your rainbow fabric selections.
- Sew each curved section together, ensuring the edges align smoothly.
- Applique the red heart on top of the intersection point of all rays.
3. Quilting and Assembly
- Layer the quilt top, batting, and backing.
- Use safety pins or basting spray to secure layers.
- Quilt along the curves of each ray to enhance movement.
- Add floral or small appliqué embellishments along the rays if desired.
4. Binding and Finishing
- Square off the edges or leave the quilt top curved for a more organic look.
- Bind using a neutral or matching fabric.
- For wall art effect, mount the quilt on a stretched canvas or wooden frame.
Tips for Success:
- Use bright contrasting fabrics to make each ray pop.
- Incorporate different textures like batiks or metallic prints.
- Don’t be afraid to freestyle additional quilting lines for visual depth.
This radiant quilt brings joy, creativity, and heartfelt craftsmanship together. With every stitch, let your love for quilting shine! Whether as a statement piece or a gift, the Heartburst Quilt will surely leave a lasting impression.