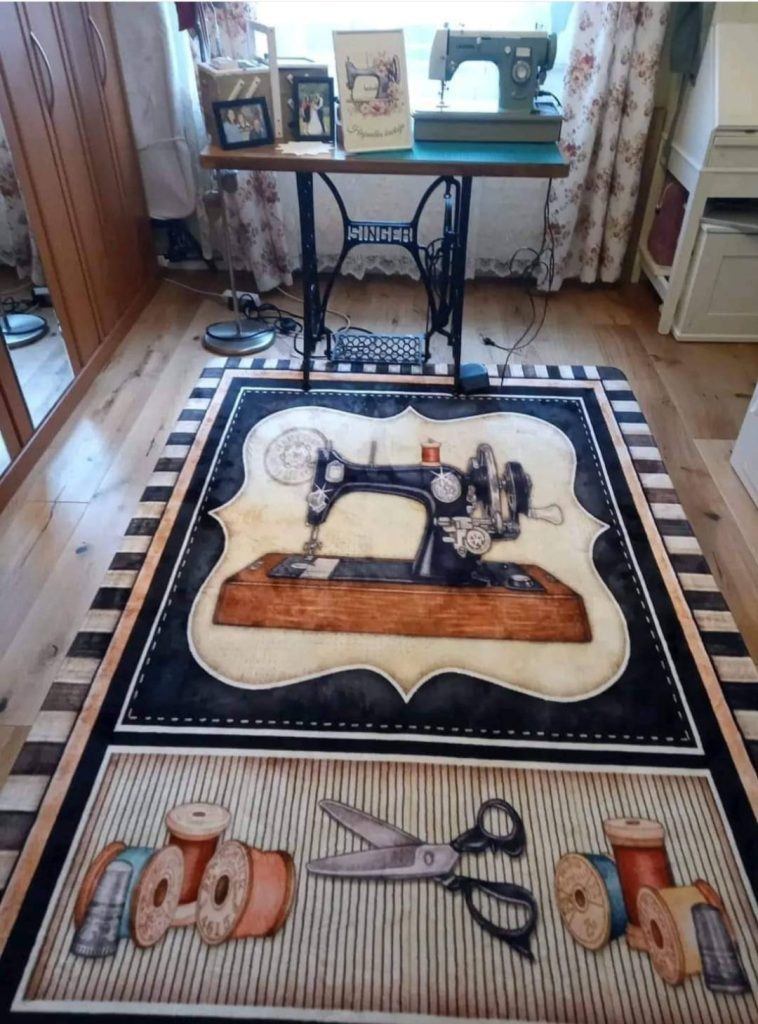
Vintage Sewing Machine Quilt Project
Theme: Sewing room with vintage elements (machine, threads, scissors)
Level: Intermediate to Advanced
Size: Approx. 45″ x 60″ (can be adjusted)
✨ Introduction
There’s nothing quite like bringing a sewing space to life with a quilt that celebrates the craft itself. This vintage-inspired sewing machine quilt features charming imagery of a classic Singer machine, thread spools, thimble, and scissors — all beautifully composed as a floor quilt or wall art. Perfect for adorning your sewing studio, it blends appliqué, patchwork, and traditional quilting techniques.
Whether you’re commemorating your love of sewing or gifting this to a fellow maker, this project is sure to add charm and nostalgia. In this tutorial, we’ll walk through how to plan, appliqué, quilt, and finish your sewing-themed masterpiece.
Let’s stitch the past into the present with color, texture, and precision!
🧰 Materials Needed
- Base fabric (background): Cream or beige, 1.5 yards
- Fabric for appliqués: Black, brown, rust, ivory, metallic gray (for machine, spools, scissors)
- Backing fabric: 1.5 yards
- Batting: 48″ x 65″
- Fusible web (e.g., HeatnBond)
- Bias tape (optional): Black or coordinating color for machine outline
- Thread: Matching and contrast (black, metallic silver, tan, red)
- Iron, rotary cutter, cutting mat
- Sewing machine or hand quilting needle
🪡 Step-by-Step Instructions
1. Design Transfer & Layout
- Sketch or print a sewing machine template and all accessory motifs (spools, scissors).
- Trace the reverse of each design onto the paper side of fusible web.
- Cut out the traced shapes roughly and fuse them onto the back of your appliqué fabrics.
- Carefully cut out each shape on the traced lines.
2. Assembling the Centerpiece
- Arrange the vintage sewing machine appliqué in the center of your background fabric.
- Use bias tape or satin stitch to define the machine outline and key mechanical parts (like the wheel and spool pin).
- Fuse and then sew around the edges using a zigzag or straight stitch.
3. Lower Border Details
- Below the central image, create a second section for spools and scissors.
- Appliqué the shapes as in Step 2 and quilt the background with vertical stitch lines to mimic a table surface.
4. Quilting the Design
- Sandwich your quilt top, batting, and backing.
- Pin or baste well.
- Use free-motion quilting around the appliqué motifs and echo-quilt around the main frame.
- For the background, add stipple quilting or loop patterns.
5. Borders
- Add a striped inner border and a solid outer border. Use coordinating fabrics that enhance the vintage aesthetic.
- Mitered corners will give a polished look.
6. Binding
- Square up the quilt and bind using your preferred method. A striped or black-and-white binding ties in nicely.
🪞 Final Touches
- Add embroidered or printed labels with phrases like “Made with love” or your name and date.
- Place it under your machine or hang it behind your work area as a homage to your passion.