Scrappy Plus Quilt: A Colorful Patchwork Journey
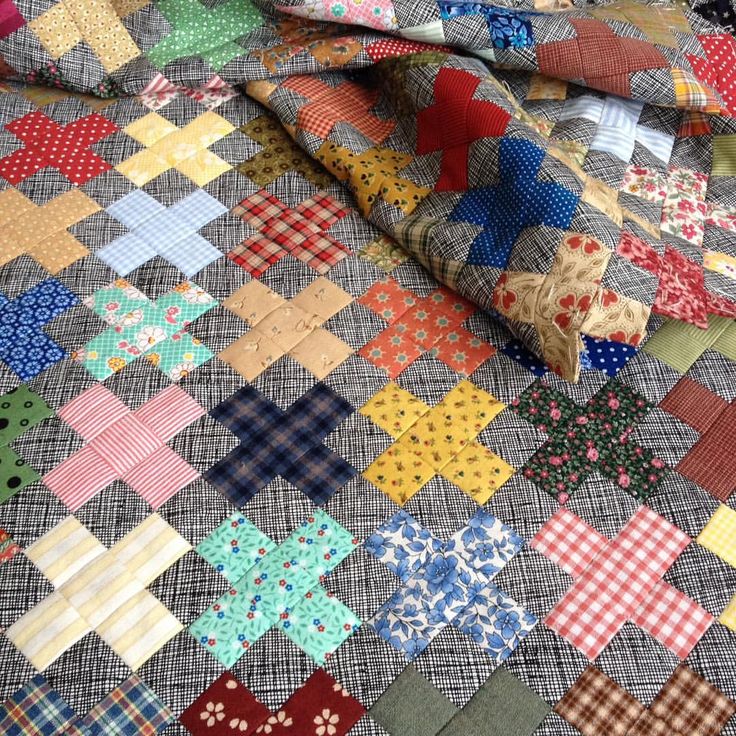
Scrappy quilts are more than just fabric stitched together—they’re stories of textures, memories, and joyful imperfection. The Scrappy Plus Quilt is a stunning example of how simple shapes and mixed prints can create something truly mesmerizing. This pattern blends modern design with vintage charm, thanks to its repetitive plus sign blocks made from an eclectic mix of fabric scraps.
One of the most satisfying aspects of this quilt is its flexibility. You can make it with charm squares, jelly rolls, or leftover stash pieces. There’s no need to stress about perfection—this project embraces the beautiful chaos of varied tones, scales, and colors. The result is a dynamic quilt that changes as you step back and admire the interplay of contrast and placement.
As you piece it together, you’ll notice how the “+” symbols begin to dance across the surface, creating a rhythm that guides the eye from block to block. It’s a quilt that feels playful and timeless, perfect for everything from nursery throws to cozy lap quilts.
So gather your scraps, set up your sewing machine, and dive into a patchwork journey where every block feels like a small victory. Here’s how you can recreate this exact look in your own quilting space.
Materials Needed
- Fabric scraps in assorted prints and colors
- Solid or consistent neutral fabric for contrast (often used for the corners)
- Rotary cutter and ruler
- Cutting mat
- Sewing machine
- Iron and pressing surface
- Optional: design wall or floor space for layout
Step-by-Step Instructions
Step 1: Cut Your Fabric

Each block is made from 5 squares:
- (1) center square: 2.5” x 2.5” (printed fabric for the plus)
- (4) side strips: 2.5” x 1.5”
- (4) background squares: 1.5” x 1.5”
You can pre-cut your fabrics in stacks and sort them into color families like in the image for better balance across the quilt.
Step 2: Assemble the Plus Blocks
- Attach two side strips to the center square.
- Sew a background square to each end of the remaining side strips.
- Join these to the top and bottom of the unit, creating a complete plus block.
- Press seams open or to the side.
Repeat this step with varied colors to build a full stack of scrappy blocks.
Step 3: Lay Out Your Quilt
Arrange your plus blocks in rows on a large table or floor, playing with color distribution and balance. You can rotate blocks or keep them aligned depending on your desired look. Diagonal flow or gradient color transitions work beautifully here.
Step 4: Sew the Rows
Sew the blocks together row by row. Press the seams in alternating directions for each row to nest seams more easily.
Step 5: Join the Rows
Once your rows are sewn, join them together to form the quilt top. Take care to match the corners of each plus symbol for a neat finish.
Step 6: Add Borders (Optional)
You can frame your quilt with a solid or scrappy border to tie the whole piece together and add size.
Step 7: Quilt and Bind
Layer your quilt top with batting and backing. Quilt in straight lines following the grid for a clean look, or use free-motion quilting to add texture. Finish with your favorite binding method.


