Quilted Turtle Plush: A Gentle Stitched Friend for All Ages
Quilted soft toys are one of the most delightful ways to use scraps and breathe new life into favorite fabrics—and this quilted turtle is a perfect example of that creativity. Whether you’re making it for a child, a gift, or just as a cheerful piece for your home décor, this turtle brings a sense of warmth, nostalgia, and charm.
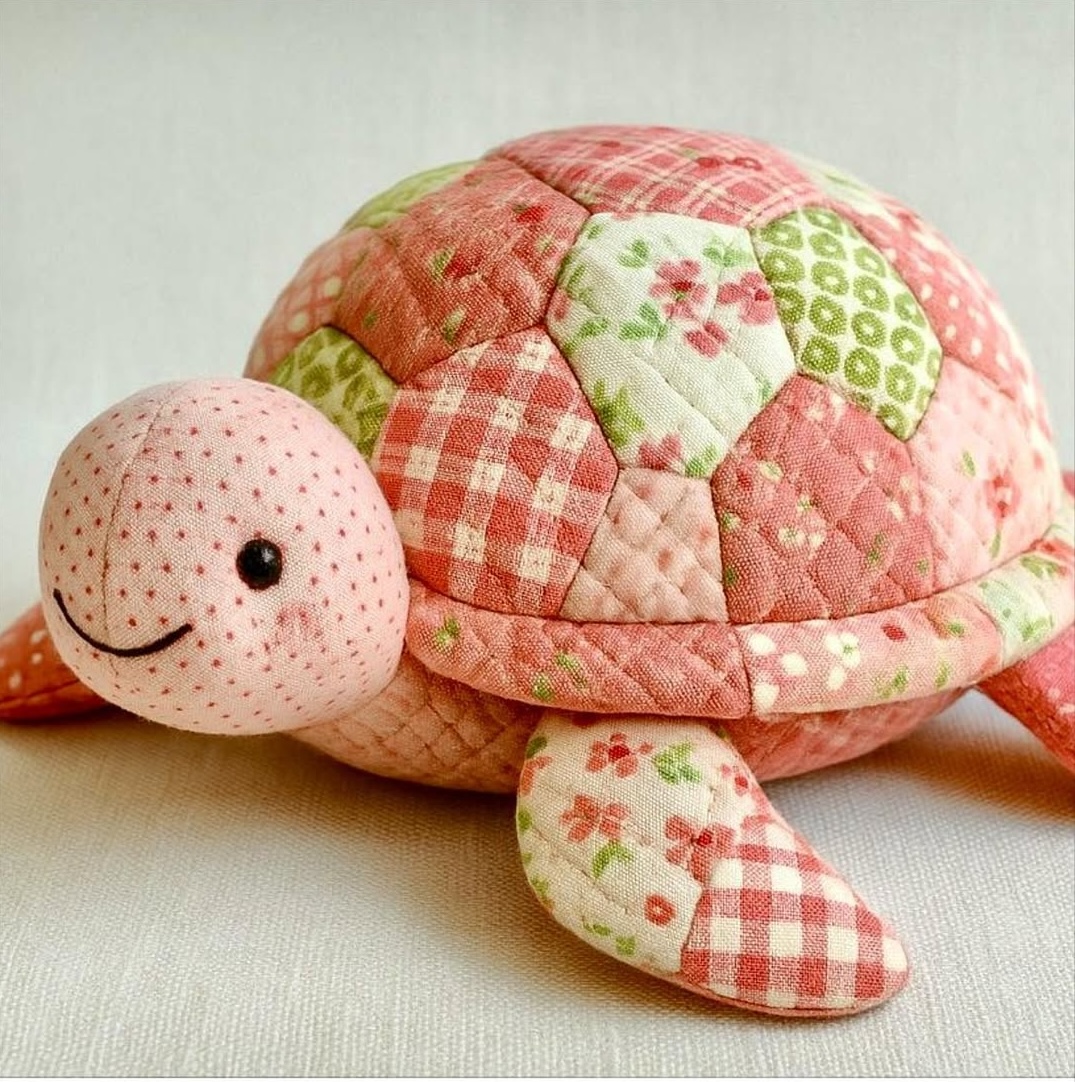
What makes this project truly special is the beautiful blend of patchwork and soft sculpture. The turtle’s shell showcases intricate quilting in a harmonious palette of blue and white tones, paired with leafy and floral fabric prints on the body. Its gentle face and rounded form make it irresistibly huggable, while the handmade aesthetic makes it unique and heartfelt.
This project is also a fantastic introduction to soft toy construction with quilting elements. It offers the satisfaction of building something both artistic and functional, using only a few basic materials. Even if you’re new to plush-making, the turtle’s forgiving shape and segmented design make it approachable and highly customizable.
Let’s bring this slow and sweet friend to life with some simple stitching and lots of love.
✂️ Materials You’ll Need:
- Assorted fabric scraps for shell (preferably cotton quilting fabrics)
- Coordinating fabric for body, head, and limbs (light prints or solids)
- Fusible interfacing (optional for extra firmness)
- Quilt batting (thin)
- Toy stuffing (polyester fiberfill)
- Black safety eyes or small buttons
- Needle and strong thread
- Fabric marker or chalk
- Paper for pattern drafting
- Sewing machine
- Iron and pins
🧵 Step-by-Step Instructions
1. Create Your Pattern Pieces
Sketch or download a pattern for a soft turtle. You’ll need separate templates for:

- Shell top (divided into hexagon or diamond patchwork pieces)
- Shell bottom (a solid oval)
- Head (two mirrored pieces)
- Legs (four pieces, mirrored in pairs)
- Tail and neck
Trace the shapes onto paper and cut them out.
2. Prepare the Quilted Shell
Choose 6–8 coordinating prints and cut small patches (squares, diamonds, or hexagons). Stitch them together into a domed shape that will form the turtle’s shell top. Press seams open.
Layer the shell top with batting and backing (just like a mini quilt sandwich) and quilt with small curves or echo quilting around the patches. Trim and set aside.
3. Cut and Sew the Body Parts
Using your pattern, cut the body pieces (head, limbs, neck, tail) from your chosen fabric. For added structure, you may choose to interface these parts. Stitch each piece right sides together, leaving a small gap for turning and stuffing.
Turn right side out, stuff each piece lightly but firmly, and hand-sew the openings closed with a ladder stitch.
4. Assemble the Body
Pin the limbs, head, tail, and neck to the shell bottom (the oval piece), aligning them inward. Place the quilted shell top over them, right side down, creating a sandwich.
Stitch all the way around, leaving a 2–3″ gap for turning. Carefully turn the turtle right side out, ensuring all pieces are pulled through and securely sewn.
5. Finish and Add Eyes
Stuff the turtle with fiberfill through the remaining opening. Stitch it closed invisibly.
Attach the eyes—either safety eyes inserted before closing the head, or hand-sewn buttons afterward. Add any final embroidery or decorative stitches (like nose or shell lines) to enhance the character.
🐢 Final Thoughts
This quilted turtle project is a celebration of craft and imagination. From its soft curves to its colorful shell, every element invites personal touches and creativity. Whether it’s snuggled in a nursery, placed on a shelf, or gifted to a loved one, this stitched turtle carries with it the warmth of handmade care.
You can adapt the size, fabrics, or even turn it into a weighted turtle for calming therapy use. It’s a perfect project to revisit again and again.


