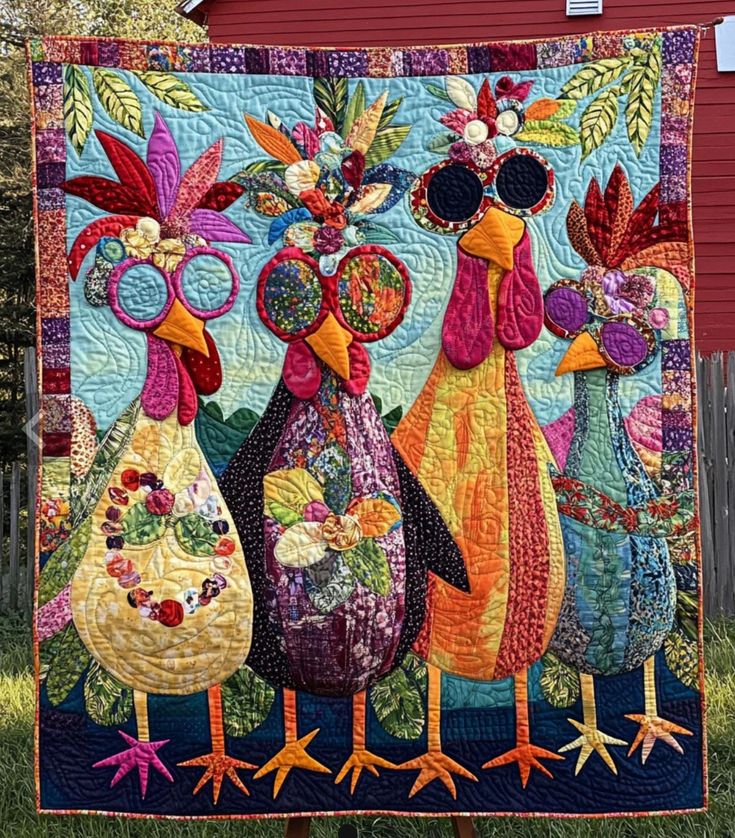
Chickens with Attitude Quilted Organizer – Funky, Functional & Feathered
Why settle for a plain old organizer when you can have sass, style, and storage all stitched into one? This “Chickens with Attitude” quilt is the ultimate fusion of fun and function. With their oversized sunglasses, bold fabric choices, and built-in pockets, these fabulous chickens are more than just decoration—they’re sewing room superheroes.
Whether you’re storing scissors, thread, brushes, or crafting tools, each chicken holds its own pouch, offering a quirky and creative way to keep your supplies at hand. The combination of free-motion quilting, appliqué, and bold prints makes this project a visual treat for any workspace.
It’s a fantastic project for confident beginners to intermediate quilters who want to sharpen their skills while crafting something wildly unique. Plus, with fabric scraps and colorful remnants, you can let your creativity run free—no two chickens ever look the same!
Let’s get started on this bright and cheeky quilted organizer that’s sure to make your crafting corner cluck with joy.
🧵 Materials Needed:
- Base fabric (about 1 yard, light blue or sky tone)
- Assorted fabric scraps for chickens, combs, beaks, sunglasses, and background
- Fusible web (e.g., Heat’n Bond)
- Batting and backing fabric (same size as the base)
- Sewing machine with quilting foot
- Fabric markers or embroidery thread for outlines/details
- Bias tape for binding (optional: pre-made or handmade)
- Scissors, pins, and iron
🪡 Step-by-Step Instructions:
1. Prepare the Background:
- Cut your base fabric to desired size (e.g., 36″ x 36″).
- Layer with batting and backing fabric. Baste with pins or spray.
- Quilt horizontal lines across the background to mimic wooden planks or sky texture.
2. Design and Appliqué the Chickens:
- Draw or trace three chicken body shapes, legs, beaks, and combs on fusible web.
- Iron fusible web onto the wrong side of your fabric scraps and cut out the pieces.
- Arrange each chicken on the background fabric and press into place.
- Stitch around the edges using a zigzag, satin stitch, or straight stitch.
3. Create the Pockets (the chicken bellies):
- Cut rectangles of various patterned fabrics (about 6″ x 8″ each).
- Add vertical stitching lines to form separate compartments.
- Stitch three pockets onto each chicken’s belly area, leaving the top open.
4. Add Sunglasses and Details:
- Cut oversized sunglasses from black fabric and bold-colored borders.
- Stitch these to each chicken face.
- Embroider or stitch small features like nostrils or outlines as desired.
5. Quilt, Bind & Hang:
- Quilt around the chickens and their accessories with free-motion or echo quilting.
- Add binding all around the edge for a clean finish.
- Sew hanging sleeves or loops at the top so you can hang it on your wall or behind your sewing desk.
This quilt is guaranteed to bring a smile and plenty of personality to any crafting space. Let me know if you’d like a printable version or SVG templates for the chicken shapes and accessories!