Cats in Pots Quilt.
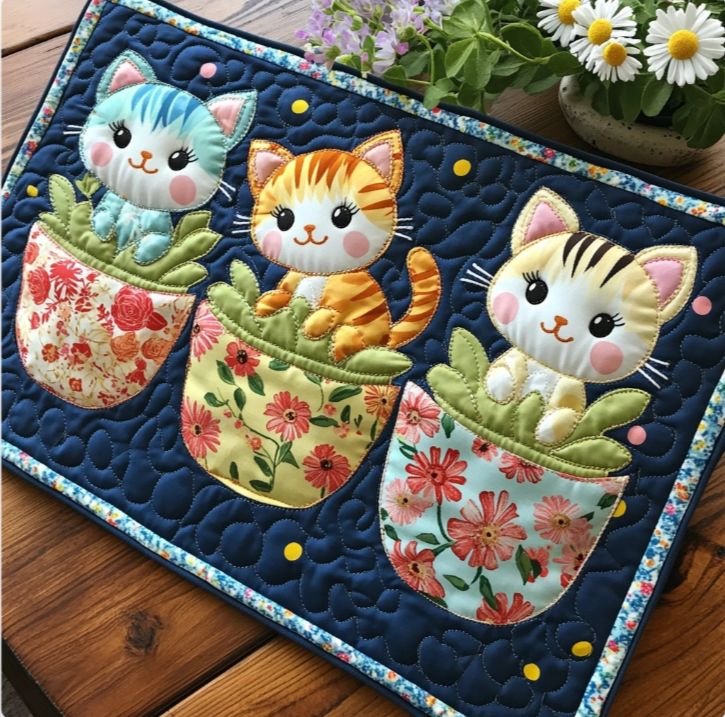
There’s something irresistibly joyful about combining cute animals with bright, floral fabrics—and this “Cats in Pots” quilt captures that magic perfectly. Whether you’re a cat lover, a fan of cheerful appliqué, or simply looking to brighten up your space, this quilt is the ideal blend of charm, texture, and creativity.
This project makes a fantastic wall hanging, baby quilt, placemat, or even a decorative piece for a sewing studio. The adorable kittens peeking from floral pots are stitched with love, surrounded by playful quilting that enhances the overall design. Best of all, it’s beginner-friendly for those just entering the world of fabric appliqué.
The mix of bold fabrics, soft curves, and expressive faces allows for personalization—try mixing colors, using different flower prints, or even adding embroidered names to make each kitten unique. This is more than just a sewing project; it’s a celebration of color, imagination, and personality stitched into every detail.
If you’re ready to dive into a light-hearted quilting adventure that guarantees smiles, then let’s begin this paw-sitively sweet journey together!
✂️ Materials You’ll Need:
- Navy blue or dark background fabric (approx. 18” x 24”)
- Assorted floral prints for pots
- Solid or striped fabrics for cats
- Green fabric for leaves
- Fusible web (e.g., Heat’n Bond Lite)
- Batting and backing fabric
- Fabric marker or chalk
- Appliqué scissors
- Sewing machine with free-motion or zigzag stitch capability
- Matching thread
- Iron and pressing mat

🧵 Step-by-Step Instructions:
1. Prepare the Background
Cut your background fabric to your desired finished size, adding extra room around the edges for trimming. Press it well and layer it with batting and backing to create your quilt sandwich.
2. Trace and Cut the Appliqué Shapes
Using your fusible web, trace templates for the cats, flowerpots, leaves, and facial features. You’ll need three sets of each (or more if you’re expanding the design). Fuse them to the wrong side of your chosen fabrics and cut them out carefully.
3. Assemble the Scene
Lay out the quilt top with the three flowerpots evenly spaced. Arrange leaves so they peek out from behind each pot. Then place your cats so they appear to be sitting inside each one. Play with the angles and positions until it feels balanced and expressive.
4. Fuse and Stitch Appliqués
Once you’re happy with the layout, fuse everything in place with a hot iron. Use a tight zigzag, blanket stitch, or free-motion embroidery to outline each shape. Add whiskers, blush, and inner ears using either embroidery thread or tiny pieces of fused fabric.
5. Quilt the Background
Add texture with simple free-motion quilting—swirls, loops, or paw prints work beautifully. Quilt around the appliqué shapes to help them pop.
6. Add the Border and Binding
Add a colorful floral binding that complements your fabric choices. Use a narrow border (about 1”) to frame the design without overpowering it.
🐱 Final Notes
The “Cats in Pots” quilt is more than just a fun project—it’s a canvas for personality. Whether you customize each cat to look like your own pets, or gift it to a fellow cat lover, this design brings joy wherever it goes. It’s small enough to complete in a weekend and detailed enough to be endlessly satisfying.
Ready to stitch your own bundle of joy? Get your favorite fabrics and let your creativity bloom—one paw at a time.


