Diamond Lattice Quilt
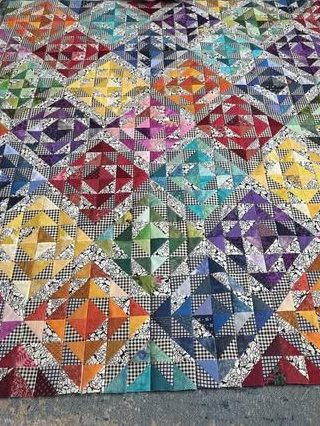
Here’s a blog-ready tutorial to recreate the rainbow quilt in your photo. The look comes from one simple unit—half-square triangles (HSTs)—paired with a constant black-and-white print that acts like stained-glass “leading.” Group your colors by hue to form bright diamonds, then rotate blocks to make the diagonal lattice dance across the quilt.
This design is wonderfully scrap-friendly. Pull strips or squares from your stash in red, orange, yellow, green, aqua, blue, purple, and pink. Mixing solids, tone-on-tones, and small prints gives depth; the consistent black-and-white ties everything together and keeps the quilt modern. No sashing, no Y-seams—just tidy HSTs and mindful placement.
The quilt is built from 10″ finished blocks (a 4×4 grid of 2½″ finished HSTs). Sew 6 × 6 blocks for a 60″ square throw like the photo, or expand to 7 × 8 blocks for a 70″ × 80″ twin. Seam allowances are ¼″ throughout; press as you go for accuracy.
Even beginners can master this quickly: we’ll make HSTs two-at-a-time, trim to size, lay out each block to create a color “diamond,” and then assemble the rows. Let’s sew!
Materials (for a 60″ × 60″ throw; 36 blocks)
- Black-and-white print (small check/stripe/dot works best): 2¼ yd
- Rainbow scraps or 12 FQs (you’ll use ~1½ yd total assorted color)
- Backing: 3¾ yd, Batting: 68″ square, Binding: ½ yd (cut 2½″ strips)
- Rotary cutter, mat, ruler; square ruler helpful (6½″ or 9½″)
Cutting
From the black-and-white print:
- Cut (144) 3½″ squares (these pair with colors for HSTs).
Tip: strip cut 3½″, then sub-cut squares.
From color fabrics (mix hues):
- Cut (144) 3½″ squares total. Aim for sets by color family (e.g., 24 aqua, 24 blue, 24 purple, …) so each block can lean toward a single hue.
This yields 288 HSTs → 16 per block × 36 blocks.
Make the HSTs (two-at-a-time)
- Pair one color square with one B/W square, right sides together.
- Draw a diagonal line on the back; sew ¼″ on both sides of the line.
- Cut on the line; press seams to the dark (B/W).
- Trim each HST to 3″ unfinished (2½″ finished).
Make all 288 HSTs and sort by color family.
Block Layout: “Lattice Diamond” (10″ finished)
Each block is a 4 × 4 grid of HSTs. Use one color family plus B/W.
- Row 1: B/W points face out at the corners; color triangles face toward center to begin a diamond tip.
- Row 2: Arrange four HSTs so color triangles point inward, completing the upper left/right sides of the diamond.
- Row 3: Mirror Row 2 (color triangles still point inward).
- Row 4: Mirror Row 1 so the color triangles form the bottom tip.
When you step back, you’ll see a filled color diamond centered in the block, with B/W forming “paths” on the sides.
Sew the block: Join units into rows, press row seams to the right on rows 1 & 3 and to the left on rows 2 & 4; then join rows, nesting seams. Square to 10½″.
Make 36 blocks—mixing hues so you have reds, oranges, yellows, greens, aquas, blues, purples, and pinks.
Quilt Top Assembly
- Lay blocks 6 × 6. Rotate every other block 90° (or alternate by rows) so the B/W paths connect diagonally and the color diamonds interlock—this creates the lattice effect seen in the photo.
- Join blocks into rows; press row seams in alternating directions, then join rows. Give the finished top a good press.
Optional border: add a slim 1½″ (finished 1″) black-and-white border to frame the design; this will bring the top to about 62″ square.
Quilting & Binding
- Baste with your preferred method.
- Quilting ideas:
- Straight-line grids on the diagonal (echo the lattice).
- Walking-foot “serpentine” across the quilt.
- FMQ orange peels inside color diamonds and a simple meander in the B/W paths.
- Bind with black-and-white for continuity or a scrappy rainbow for fun.
Resize Cheat-Sheet
- Twin (70″ × 80″): 7 × 8 blocks → cut 224 B/W + 224 color 3½″ squares (makes 448 HSTs).
- Baby (40″ × 50″): 4 × 5 blocks → cut 80 + 80 squares (160 HSTs).
Pro Tips
- Use a starch/press spray before cutting; the small HSTs finish crisp and points meet cleanly.
- Keep B/W as a consistent, small-scale print; it sharpens the stained-glass look.
- Chain-piece in big batches, then trim while listening to a podcast—your blocks will fly.