Bald Eagle Art Quilt – Step by Step
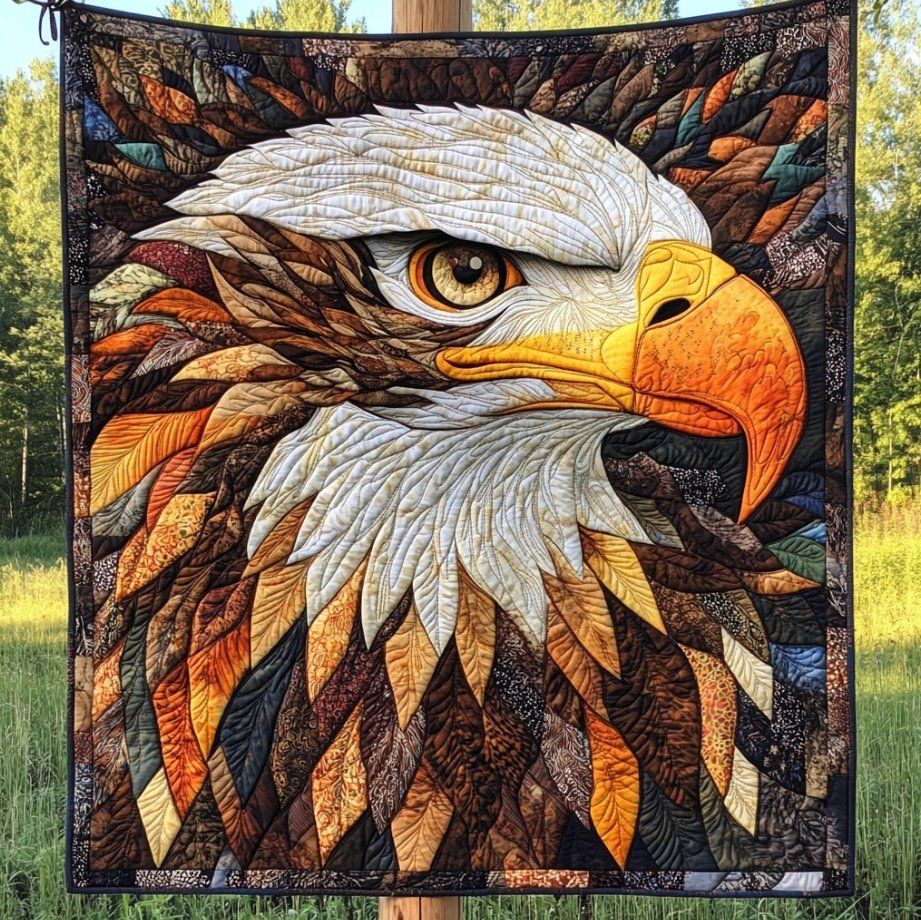
Art quilts let fabric do the storytelling, and a majestic eagle is the perfect subject. This design is built from layered, leaf-shaped “feathers” in warm browns, ambers, and creams, framed around a powerful eye and beak. The drama comes from value—lights and darks—more than any single print, so a scrap-friendly pull of batiks or textured solids works beautifully.
Although the finished piece looks intricate, the construction is approachable: trace templates onto fusible web, cut the feather shapes, then build the portrait like a collage on a fabric foundation. A little thread-painting adds dimension, and quilting along feather veins brings everything to life.
You control the realism. Keep edges clean with a fine zigzag for a graphic look, or add soft frayed edges and dense stitching for painterly texture. The eye is assembled as a small unit first so it’s easy to position and personalize.
Sized about 40″–45″ square, the quilt makes a striking wall hanging. Scale up or down by printing the pattern larger/smaller (“poster” setting) or by projecting a sketch onto your background.
Materials
- Background: 1½ yd dark, mottled or bark-like fabric
- Scraps/Fat eighths in 6 value groups:
- White/very light (head feathers)
- Light warm creams
- Medium tans
- Medium-dark browns
- Dark browns/near-blacks
- Golds/oranges (beak highlights) + deep amber/rust (beak shadows)
- Small bits of black/white for eye/pupil highlights; touch of amber for iris
- Lightweight fusible web (Steam-A-Seam 2 Lite or HeatnBond Lite) ~6–8 sheets
- Tear-away stabilizer (or thin batting scrap) for thread-painting the eye
- Threads: 50 wt neutrals for piecing, 40/50 wt quilting threads in the value groups above; optional smoke/clear monofilament
- Batting: 45″ square • Backing: 45″ square
- Microtex 80/12 needle, appliqué scissors, non-stick pressing sheet, fine markers
- Optional: black bias tape (⅛″) for crisp outlines; fabric paints/pencils for tiny details
- Hanging sleeve, facing/binding
Before You Start: Value Map
Print or sketch an eagle head reference and convert to 5–6 gray values. Label areas (1 = lightest to 6 = darkest). This “map” guides fabric pulls and keeps the portrait believable.

Step-by-Step
1) Make/Scale Your Template
- Draw or print a full-size eagle head within a square (e.g., 40″).
- On tracing paper, simplify the drawing into feather shapes (leaf/teardrop pieces) radiating around the head; separate beak layers, eye unit, and background wedges. Number each piece and add an arrow for grain direction (point of feather along the lengthwise grain resists stretch).
- Reverse the template (or remember to trace mirror-image onto fusible web).
2) Pull & Sort Fabrics
Lay fabrics in the six value piles. Avoid large high-contrast prints; mottled batiks and textures blend best. Pre-press with starch for clean cutting.
3) Prepare Appliqué Pieces
- Trace template pieces onto the paper side of fusible web (mirror-image). Group by value.
- Rough-cut, fuse to wrong side of chosen fabrics, then cut on the line.
- Keep pieces sorted in trays labeled by value and section (crown feathers, nape, beak, etc.).
4) Build the Eye (unit first)
- On a small cream circle, fuse a gold/amber iris ring, black pupil, and tiny white catchlight.
- Place on tear-away stabilizer; satin-stitch/zigzag (2.0–2.5 width, 0.4–0.6 length) around edges.
- Add a thin black eyelid arc on top edge (bias strip or tight zigzag). Tear away stabilizer; set aside.
5) Compose on the Background
- Lay background fabric on your design board; mark centerlines.
- Head base: position a large silhouette of the head in pale cream.
- Feather layering: starting at the back/outer edges, place dark feathers first, then medium, then lights, overlapping ⅛–¼″ like shingles. Angle pieces to radiate from the beak/eye.
- Add the eye unit and beak layers (dark shadow under top mandible, mid-tones, then bright gold highlights).
- Step back often; adjust for smooth value flow and believable feather direction.
Tip: Use a pressing sheet to pre-assemble tricky sections (e.g., a cluster of three feathers). Lift as one and transfer to the quilt.
6) Fuse & Secure Edges
When you love the composition, fuse thoroughly. Stitch around each piece:
- Invisible: monofilament top + fine zigzag (1.5–2.0 width).
- Graphic: 30–40 wt thread matching each value, narrow zigzag or blanket stitch.
Add short rows of thread-painting to suggest feather barbs—keep them angled, not straight lines.
7) Make the Quilt Sandwich
Layer backing (WS up), batting, and fused top. Baste (spray or pins).
8) Quilting Plan (the “wow”)
- Feather veins: quilt a central vein and gentle barbs within each leaf; vary length and direction for movement.
- Head feathers: echo lines that follow the feather flow; use lighter thread on the white crown for subtle texture.
- Beak: contour quilting to wrap around the curve; add tiny stipple in shadow areas to sink them back.
- Background: large sweeping feathers or wood-grain swirls to frame the portrait without stealing focus.
Stitch length ~2.5–3.0; use a walking foot for echoes and a free-motion foot for curves.
9) Square, Face/Bind, and Sleeve
Trim to a clean square. Finish with a slim facing for a gallery look (or a ⅜″ black binding). Add a hanging sleeve to the back and a label.
Sizing & Yardage Notes
- 40–45″ wall quilt: background 1½ yd; batting/backing 45″ square; fat-eighth bundles for feathers are ample.
- To scale: print your template “poster” at 120% for ~48″, or 80% for ~32″.
Tips & Troubleshooting
- Flat edges lifting? Increase heat/pressing time with a press cloth; top-stitch those edges.
- Too patchy? Reduce print contrast; swap in more solid textures within the same value.
- Eye lacks life? Enlarge the catchlight slightly and add a darker crescent at the top of the iris.
- Wavy top? Block with steam; use facing instead of binding to keep edges straight.
Variations
- Try a monochrome version (grays/charcoal) for dramatic graphic impact.
- Add metallic thread sparingly along beak highlights.
- Reverse the composition (eagle facing left) by mirroring your master template.


