Giant Scrappy Spiral Quilt – Step by Step (US terms)
Scrap quilts are pure joy: every strip holds a memory, and together they become a vibrant story you can cuddle under. This design is a single, oversized spiral/medallion log cabin built round-by-round from the center outward. It looks wonderfully complex, yet the process is calm and rhythmic—add a strip, press, turn, repeat.
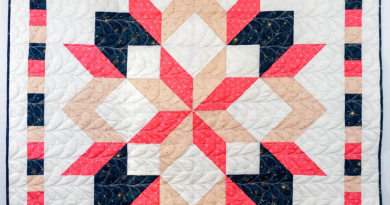
What makes this quilt special is its anything-goes palette. Solids and florals, polka dots and batiks—everything plays nicely because each strip reads as a small dash of color. Varying strip lengths and sprinkling light, medium, and dark values keeps the center glowing and the spiral alive with movement.
You can piece it completely improv (freeform) or keep it tidy with a consistent strip width. Pressing as you go and squaring up every few rounds keeps the sides true. Because you work from the middle outward, you can stop whenever it hits the size you want—baby, throw, or bed.
If you’re new to improv piecing, this is the perfect starter: there’s only one rule—maintain a good ¼″ seam. Everything else is your creative call: angled joins, skinny or chunky strips, surprise pops of color, even text prints. Ready to sew your stash into a showstopper?
Materials
- A mountain of scraps and strips (jelly-roll leftovers, trimmed bindings, stash trimmings)
- Neutral center square: 4″–8″ (you choose)
- Rotary cutter, ruler, mat, iron
- Sewing machine with ¼″ foot, thread
- Batting & backing (a few inches larger than the top)
- Binding (scrappy binding looks great)
Optional: 50–60″ square of lightweight foundation (muslin or thin batting) to build on; fabric glue stick for quick anchoring.
Strip Prep
- Sort scraps into lights, mediums, darks.
- Straighten edges; cut to a consistent width (1½″–2½″ are common) or leave widths varied for an improv look.
- Join short bits end-to-end with diagonal seams to make longer “strings.” Press seams open to reduce bulk.
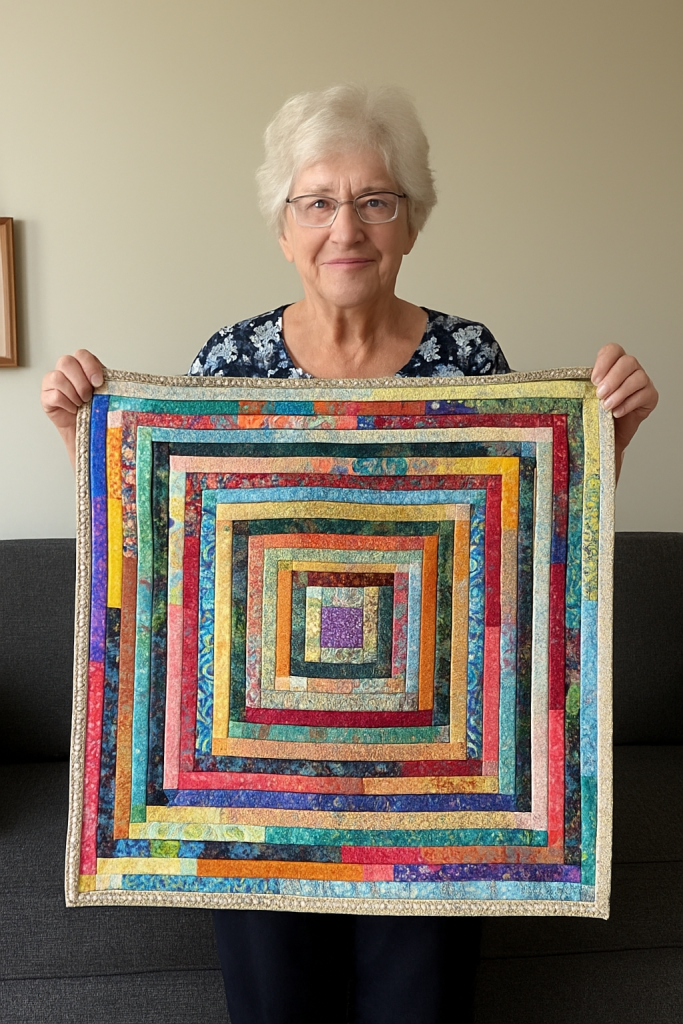
Step-by-Step: One Big Spiral Medallion
- Center: Start with a 4″–8″ square. Place it on point (diamond) or straight—your choice.
- First side: Choose a strip, place RST along one edge of the center, sew with a ¼″ seam. Press away from center and trim flush with the adjacent edges.
- Turn + Add: Rotate the piece ¼ turn. Sew the next strip to the new “top” edge, press, and trim.
- Keep rotating and adding strips to the next side—four strips complete one round.
- Value play: For glow and depth, try this rhythm per round: light → medium → dark → medium (or any sequence you enjoy). Random works too—audition on the edge before sewing.
- Keep going: Repeat Step 3, round after round.
- Press after every strip.
- After every 3–4 rounds, place a large square ruler on the center and true the corners to keep the spiral square.
- Grow to size:
- Each complete round increases the top by ≈ 2 × strip width in both directions.
- Example: center 6″ + 2″ strips → after 20 rounds ≈ 6″ + (2 × 2″ × 20) = 86″.
- Edge management: If a side bows, use a slightly shorter strip next or trim the edge straight before adding the next round. Tiny “splices” inside long strips add character.
- Finish the top: When you reach your target size, square the quilt top with a long ruler and a gentle hand.
Baste, Quilt, Bind
- Baste: Press backing, lay batting, then top; spray- or pin-baste smoothly.
- Quilting ideas:
- Walking-foot spiral from the center outward (1″ spacing looks great).
- Echo the strips with straight lines ¼″ from each seam.
- Serpentine/wavy lines across the whole top for quick texture.
- Binding: Scrappy binding (join leftover strips to 2¼″ width) frames the chaos perfectly.
Variations & Tips
- Color story: Keep the center light and move darker as you grow, or create “heat waves” by using warm strips every third round.
- Wonky joins: Angle a few strip ends at 45° for movement; it’s forgiving and fun.
- Foundation method: If you prefer no distortion, build rounds onto a big square of muslin—trim it away at the end or keep it as a stabilizer.
- Two-panel build: Make two half-tops (start each from a center), then join down the middle—easier under a domestic machine.
Quick Size Planner (approx., using 2″-wide finished strips)
- Baby (42″): 6″ center + ~9 rounds
- Throw (60″): 6″ center + ~13 rounds
- Queen topper (86″): 6″ center + ~20 rounds