Double Wedding Ring Quilt
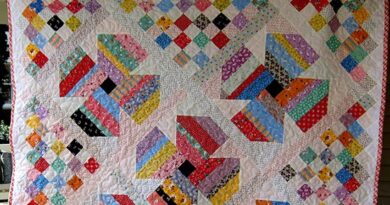
Few patterns are as iconic—and rewarding—as the Double Wedding Ring (DWR). Those interlocking rings look intricate, but when you break the quilt down into repeatable units (arcs, melons/centers, and corner squares), the process becomes methodical and surprisingly relaxing. The version in the photo uses a calm low-volume background with shades of blue for the rings, and it shines even more with custom feather quilting.
The DWR is built on curved piecing. You’ll piece scrappy arcs from small rectangles, then sew them to background “melons” (football shapes) and a concave center. Accurate cutting and generous pinning—or glue basting—are the secrets to smooth curves. If you’re new to curves, make one practice ring first; your second will already be neater and faster.
Templates are your best friends here. Acrylic sets for 10–12″ rings are common and include every shape you need (arc segment, full arc trimming template, melon/football, center, and corner square). If you prefer paper, print a DWR template at 100% and transfer to cardstock; just make sure the ¼″ seam allowance is included.
This tutorial shows how to sew one complete ring. Once you understand the unit, you’ll repeat it and join rings in offset rows to any quilt size. Choose two or three blues for a controlled look, or dive into a scrap basket for a sparkling, vintage feel.
Materials
- Assorted blues for arc segments (jelly-roll strips work great)
- Low-volume/white background for melons and centers
- A darker blue (or background) for corner squares
- DWR template set (acrylic or printed)
- Rotary cutter, small ruler, fine pins or glue pen, seam ripper
- Thread, sewing machine with ¼″ foot, iron
- Batting, backing, and bias binding for finishing
Tip: Starch fabrics before cutting; pressed, stable pieces make curves behave.
Cutting (per one ring)
Using your template set:
- Arc segments: 8 pieces for each arc × 4 arcs = 32 small rectangles/segments
- Melons (footballs): 4
- Center (concave square): 1
- Corner squares (the little squares where rings meet): 4
(Exact measurements vary by template brand; follow marks on your set.)

Step 1 — Piece & Trim the Arcs
- Lay out 8 segments for one arc, alternating light/medium/dark blues for sparkle.
- Sew segments end to end with ¼″ seams; press seams open to reduce bulk.
- Place the arc trimming template on the strip, align seam lines, and trim the outside curve.
- Make 4 arcs total.
Accuracy check: the ends of each arc should meet the corner-square template cleanly. If not, re-press and re-trim.
Step 2 — Attach Arcs to Melons
- Fold each arc and melon in half to mark the centers with a tiny finger crease.
- With right sides together, match center marks (arc is convex, melon is concave).
- Pin at center, then at quarter points; add lots of fine pins or use a light line of glue along the seam.
- Sew slowly with a true ¼″ seam, keeping raw edges aligned. Press toward the arc.
- Repeat until you have 4 arc-melon units.
Step 3 — Add Corner Squares
- Sew one corner square to each end of your arc-melon units (short curved seam).
- Press seams toward the squares.
- You now have 4 ring quadrants.
Step 4 — Insert the Center & Close the Ring
- Join two quadrants along the long curve to make a half-ring; repeat for the other half.
- Match centers and quarter marks; sew the concave center between the two halves, then sew the remaining long seams to complete a full ring.
- Give the unit a good press; gently steam and flatten with a clapper if needed.
Step 5 — Join Rings into Rows
- Lay out rings in staggered rows so each corner square nests into the next ring.
- Sew rings together where they touch at corner squares and shared melons, pinning well.
- Continue until the quilt top reaches your desired size.
- Optionally add straight borders to square the scalloped edges, or keep the traditional scallop and bind with bias binding.
Quilting & Finishing
- Quilting ideas: feathered spines in the melons, pebbles in the centers, and gentle echo lines along the arcs (as shown).
- Batting: a medium loft cotton or 80/20 gives nice texture.
- Binding: cut 2¼–2½″ bias strips for smooth curves; press well and take your time around inside points.
Sizing Guide (quick planning)
- 10–12″ rings are common. A throw sized about 60″ × 72″ usually needs 5 × 6 rings (30 total).
- Multiply the “per-ring” cutting list by your ring count, then add 5–10% for testing and color play.
Troubleshooting
- Puckers on curves: add more pins/quarter marks; don’t stretch the concave piece.
- Ring not laying flat: seams might be a hair too large; resew just inside the previous line.
- Bulk at intersections: press seams open in arcs and spin the seam at corner squares.